Acting on a location(s)
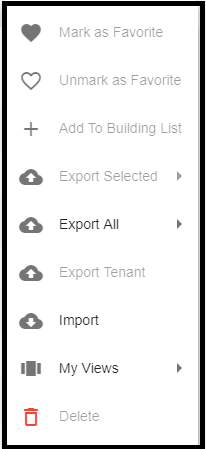
Use the  Actions menu (vertical ellipsis) to perform actions on a selected address(es). Some actions on the menu are unavailable (dimmed) until you have selected an address or addresses to act on.
To act on all addresses in the building list, select the checkbox that displays at the top of the list to select all locations in the list.
Note
Administrator privileges are required to perform Export Selected and Export All functions. Edit User privileges (or greater) are required to perform the Import function
 |
There are two methods available for adding a building(s):
From My Locations > Add Building icon, as defined in the following procedure.
From the Import Building function, as defined in the section Importing locations.
To manually add a location:
Click from the navigation sidebar.
Click the
 Add Building icon, located at the bottom right side of the page.
Click the tab.
Complete the following required fields: Building Name, Street Address, City, State, Country, and Building Category.
Optionally, complete the Postal, MSA Name, Latitude and Longitude fields.
Optionally, add Parse Address information by clicking the drop-down arrow that appears to the right of the Parse Address field.
Optionally, add any notes that you would like to store with the Location record in the Building Notes field.
Note
If you choose not to populate any of the optional fields at this time, you can add the optional information later.
Click the
 Save icon located in the upper-right corner of the page.
Note
This function requires Edit User privileges or greater.
My Locations import dialog box provides three options for importing building or pricing records:
Simple Import - Building information only
Building Pricing Import - Building pricing information only
AT&T Response Import - BLEAP output format from AT&T
Important
The maximum upload limit for a single import is 100mb of data, which equates to approximately 80 to 200K of buildings. The limit is on the total file size, which is dependent upon how much data is loaded into each location record.
For each import option, you can download a Sample Excel File to view the required format. Additionally, the system provides file upload tips and cautions as guidance on the Import page.
To import location(s) or pricing records into My Locations:
From your Excel file you can add a new building (N), update an existing building (U), or delete a building (D) using the Transaction Indicator field.
Prepare your excel file for upload following the guidelines in the sample template.
Click from the navigation sidebar.
Click the
(vertical ellipsis), located in the upper right side of the page.From the Actions menu options, click .
From the drop-down list, select the format for import: Simple Import, Building Pricing Import, or AT&T Response Import.
Optionally (but recommended), click to verify the format of the file for import.
Click and select the file for import. The file is added to the page.
Click to import the file.
Note
If "Allow deduplication" is disabled in company setting, system uses "address key + Primary number + GLID" to identify and avoid duplicate locations from being imported in to "My Locations"
Note
Administrator privileges are required to perform Export Selected and Export All functions.
The Actions menu on the Buildings List page enables you to export either building information or pricing information for selected records, or for all records in the building list or currently filtered view.
Important
As of Release 4.52.0
To improve the performance of building exports, the system now splits small versus large exports into two separate thread pool processes, so that small export requests are no longer blocked by larger exports in progress. Additionally, the export performance is improved by limiting the fetch to required fields only. Building exports having a building count of 10000 or less are considered small exports and result in faster processing.
To export building information for select buildings:
Click from the navigation sidebar.
Click the check box that appears to the left of the location(s) that you want to export.
From the (vertical ellipsis), located at the top right section of the page, click .
The system prompts you to confirm that you want to export the selected buildings. Click to continue.
Result: The export displays STARTED status at the bottom right corner of the page.
When the export status shows "FINISHED", click the download arrow to download the exported file to your local drive.
To export location information for all location/buildings in the current filtered view:
This function exports all locations in the currently filtered view. For example, if you filter a specific State, it exports all locations from your currently filtered list.
Click from the navigation sidebar.
From the
located at the top right section of the page, select .The system prompts you to confirm that you want to export all buildings. Click to continue.
Result: The export displays STARTED status at the bottom right corner of the page.
When the export status shows , click the download arrow to download the exported file to your local drive.
To export pricing information for select buildings:
Click from the navigation sidebar.
Click the that appears to the left of the location(s) that you want to export.
From the (vertical ellipsis) located at the top right section of the page, select Export Selected > Export Building Pricing.
The system prompts you to confirm that you want to export the selected buildings. Click to continue.
Result: The export displays "STARTED" status at the bottom right corner of the page.
When the export status shows "FINISHED", click the download arrow to download the exported file to your local drive.
To export pricing information for all buildings in the current filtered view:
Click from the navigation sidebar.
From the (vertical ellipsis), located at the top right section of the page, select .
The system prompts you to confirm that you want to export all buildings. Click to continue.
Result: The export displays "STARTED" status at the bottom right corner of the page.
When the export status shows "FINISHED", click the download arrow to download the exported file to your local drive.
Provided that your company instance has subscribed to Building Intelligence, you can export tenant data from My Locations as follows:
To export tenant data:
Click from the navigation sidebar.
Either select the specific locations that you want to export or click the check box at the top of the page to select all locations in the current view/page.
Note
"Select All" selects only those locations in the current view. For example, if you are currently displaying 10 records on the page, select all export tenants for those 10 buildings only. You can use the Records field located at the top right corner of the page to select the number of records you want to view on the page (10, 25, 50, or 100).
From the
(vertical ellipsis) located in the upper right section of the page, click .Result: The export displays "STARTED" status at the bottom right corner of the page.
When the export status shows “FINISHED”, click the download arrow to download the exported file to your local drive.
Note
After TCW.2024.R01 release on January 20, 2024, the exported tenant data includes following new fields:
Latitude
Logitude
NAICS Code
Industry