Using the My List Functions
Accessing My Lists
The My Lists function enables you to add, name, and save a list of locations using the bulk upload operation.
To access My Lists:
Click from the navigation sidebar.
Result: Network Finder menu expands.
Click the My Lists tab.
Result: The My Lists page displays. In the following example, no lists have been created or saved. Once lists are created and saved, they are listed on this screen. See Adding a List.

To add a list to My Lists:
From the My Lists page, click the plus sign icon
 that appears at the top right side of the page.
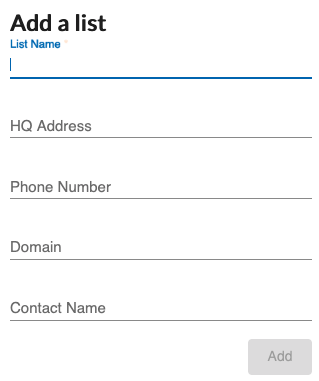
Result: The Add a List dialog box displays.

In the List Name field, type the name that you want to use as an identifier for this list. This is the only required field.
Click .
Result: The newly created account name displays in the list.
Note
The button is disabled (dimmed) until a list name is entered.
Optionally, enter the following information:
Field name
Description
HQ Address
The address of the account’s headquarters.
Phone Number
The phone number of the account’s headquarters.
Domain
The URL for the account’s website
Contact Name
The name of the contact person for this account
To add locations to a list:
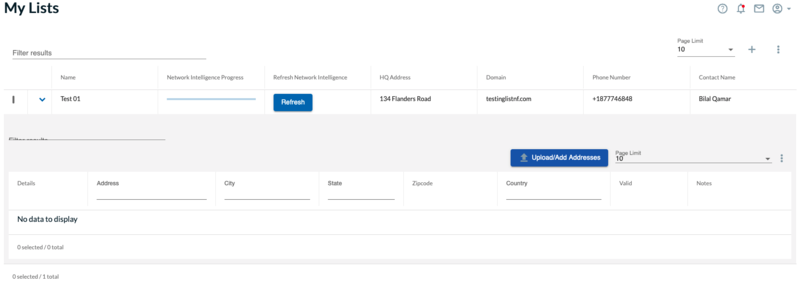
Click the arrow that appears to the left of the Name field.
Result: The page expands as shown in the following example.

Click the
 button.
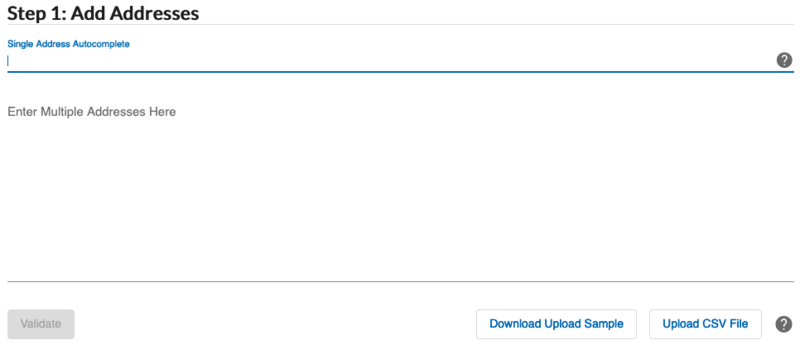
Result: The Add Addresses page displays.

Note
When entering an address, it is recommended that you enter the complete and exact street address for your location.The 5-digit zip code is optional but recommended. If entering multiple addresses, each address must be separated with a comma, for example, 1800 Amphitheatre Parkway, MountainView, CA, 94043.
From the Add Addresses page, choose from the following options:
To enter a single address, type the address into the Single Address Autocomplete field.
To enter multiple addresses, either type the addresses in the Enter Multiple Addresses Here box or copy and paste them from an external file.
Note
When entering multiple addresses, each address component must be separated with a comma, for example, 1800 Amphitheatre Parkway, MountainView, CA, 94043. As a best practice, start a new line for each new address.
To upload a CSV File containing addresses in bulk format,
Optionally, click Download Upload Sample to see the required format for uploading addresses.
Click Upload CSV File located at the bottom left side of the page.
Locate the CSV file you wish to upload and either double click on the file for import or open it. The addresses are uploaded and display in a list below the Upload CSV File button.
Scroll to the bottom of the page and click Import.
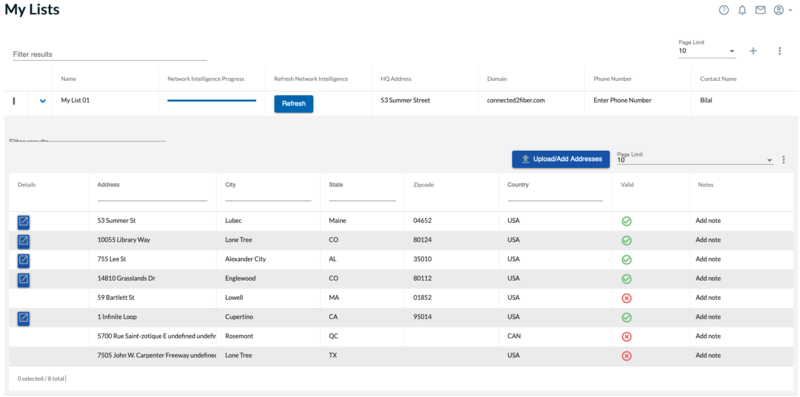
Click Validate. All valid USPS addresses display with a green check mark. If the address is not valid, an X appears beside the address name. If the address is not validated, only partial information is returned (such as network providers in the local area).
Click Import.
Result: All validated files are imported as shown in the sample figure that follows.
The Network Intelligence Progress status bar shows the progression as network intelligence data is pulled from the database (i.e., LEC, Cable, OnNet, NearNet information).
 |
Once a named list is populated with addresses, you can perform these functions:
Click the
 that appears to the left of an address to view location details, such as Network Providers at that location, a satellite image of the location on the map, and a list of adjacent businesses to that location.
Click the field to the right of an address to enter any special notations you wish to store with that record.
Click on the
 that appears to the right side of the screen (see sample screen above) to perform these functions:
– Downloads a CSV file containing all addresses in the list including the network intelligence information for those locations (i.e., LEC, Cable, OnNet, NearNet information)
– Emails a CSV file containing all addresses in the list to your email address
– Deletes all addresses from the saved list/account
- Where applicable, click the button to regenerate network intelligence. The progress bar reloads.
Because Network Intelligence requests cannot be initiated when cache is empty, you may receive an error message stating “Cache not found. Please click the Refresh button”.

To view routes on the map:
Click the My Lists tab.
Click the
 to the left of the location.
From the Details page, click the tab.
On the left side of the map, click either to view the selected routes on the map.