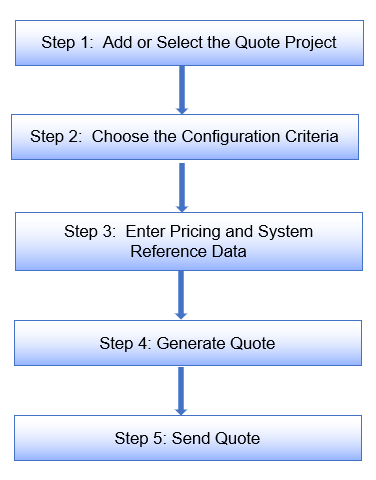
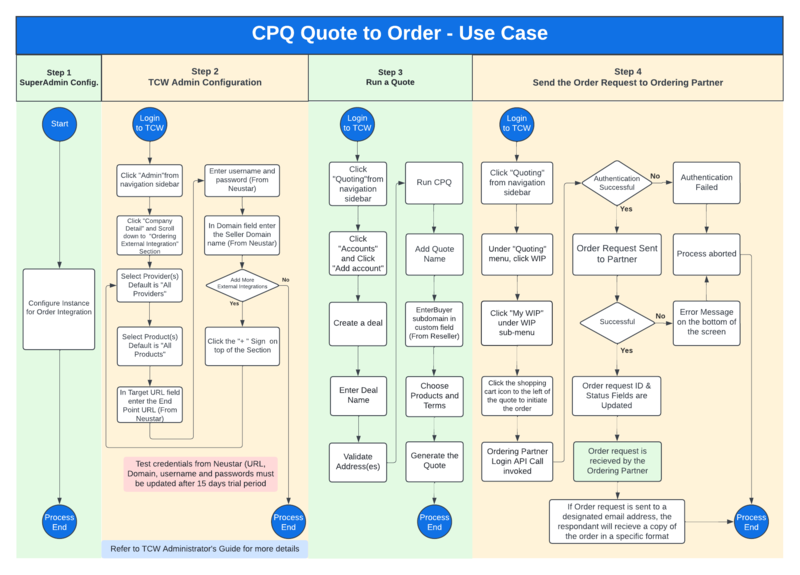
CPQ Process Flow
Prior to completing the CPQ process flow to create and distribute a quote, you must first complete these tasks:
Add an account. See Adding an account.
Add a deal(s) to the account. See Adding a deal to an account.
Add an address(es) to the deal. See Adding/Importing addresses to a deal.
Note
If you want to generate a quick quote for one or more addresses to obtain pricing only, you can bypass the account and deal creation for now and simply use the Quick Quote function. See Generating a Quick Quote for details.
The following diagram outlines the tasks required to complete the CPQ process flow. Detailed steps for completing each of these tasks is provided in the sections that follow.
Note
As you work through a quote, you can click on the process flow icons that appear at the top of the page to go to a specific step in the flow. The active step in the flow is highlighted.
In Step 1 of the CPQ process flow, you can either add a new quote or select an existing quote to work with.
Note
For an existing quote in which an order has been placed, you can expand the quote, click the Actions menu (3 dots), and select Order Details to view the Audit Log for the order.
To add a new quote:
Select from the navigation sidebar.
Locate an account, and click the icon.
Select a deal.
Click .
Click .
Result: The “add a quote” dialog box displays.
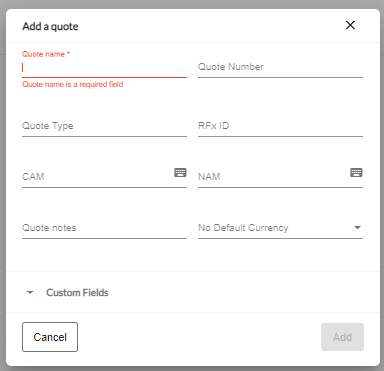
Enter a name for the quote (required field) to enable the Add button, then complete the optional fields as desired:
Important
Important! If you are a buyer who is using the quote to order process flow, you are required to enter the subdomain, provided to you by the order fulfillment partner (for example, Neustar) into the Custom field
Field Name
Description
Quote Name (Required)
Type the name that you wish to use for identification of this quote.
Quote Number (Optional)
Optionally, enter a number that you want to use to reference this quote.
Quote Type
Optionally, enter a customer defined quote type.
Rfx ID (Optional)
Optionally, enter a reference number of an external document to be linked to this deal. For example, you may want to reference an external RFP document to associate with this deal.
CAM
Type the Customer Account Manager name. When you assign a name in this field, the user receives an email notification.
NAM
Type the National Account Manager name. When you assign a name in this field, the user receives an email notification.
Quote Notes
Type any notes that you want to store with this quote.
No Default Currency
Optionally, select a default currency for this quote from the dropdown list provided.
Custom Fields
(Required for buyers using the quote to order process flow).
Important
Important! If you are a buyer who is using the quote to order process flow as defined in the section , you must add the order subdomain in this field, for example, the subdomain provided to your from Neustar.
If Custom Fields have been defined for quotes within your instance, they display as options for selection from the dropdown list. You can select the custom fields you want added to the quote and provide a value for each custom field selected.
Click to create the quote.
Result: The Configuration page displays.
At this stage, you can do the following:
Continue with Step 2: Choose the Configuration as described in the section that follows.
Click the Back button to return to the previous page where you can share the quote with another user before continuing.
In Step 2 of the process flow, you choose your configuration options. In case you have used site groups to validate address, you can choose separate configuration for each site group and submit for quote request.
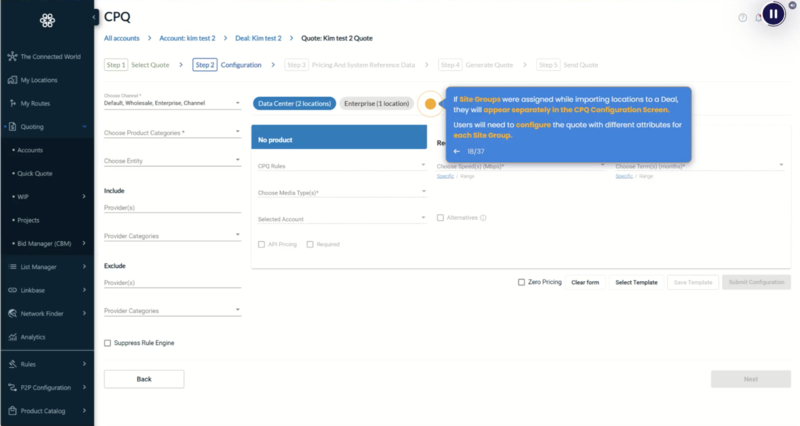 |
To choose your configuration options:
As applicable, in the drop-down, select the price book to be used for this quote: Default, Wholesale, Channel, or Enterprise. You can choose a single channel or multiple channels using the dropdown list.
Default - The provider does not have sales channels or is only buying and selling across the ecosystem.
Wholesale - The sales channel for the selling of connectivity solutions to other network service providers where providers are reselling the network services to third parties.
Channel - Built to support the agent sales channel for those selling through third party sales brokers who are representing the service providers products and services. Also, the internal sales team using CPQ to send quotes to.
Enterprise - Built for the commercial sales team selling to the commercial, government, and education market directly. Also, using CPQ to quote services to.
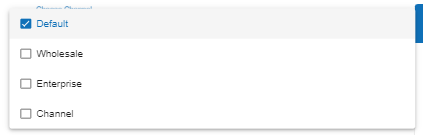
Note
Default is the commonly used channel option for quoting.
If a provider (seller) has defined the branded commercial products under Admin -> Company default attributes -> CPQ Commercial Products Configuration and enabled it for quoting, those products are populated in a drop-down list "Choose Commercial Product" and are available to CPQ users for quoting. You can select these products and the pre-configured speeds and terms are automatically populated in configuration page as shown in the following example.
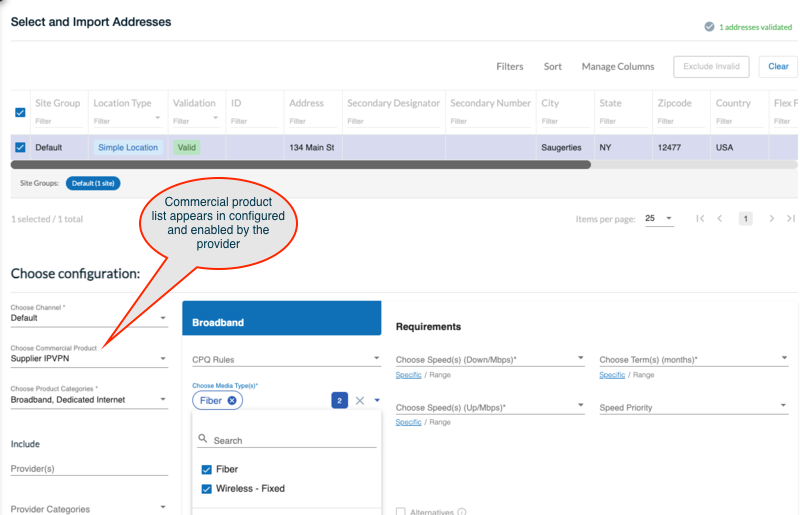
Note
This option is only available if configured and enabled by the seller.
In the drop-down, select the products for your quote to create the product configuration cards. For example, Ethernet-Switched, SONET/TDM, Broadband, etc.
Note
If you select Data Center Services as a Product Category then Speeds will change to Cabinets in the configuration section.
If a provider (seller) has defined the branded commercial products under Admin -> Company default attributes, those products are populated in the drop-down list and are available to CPQ users for quoting.
Optionally, to look for special pricing that was previously configured for a specific entity/account name, select the entity name/account name from the drop-down; otherwise, leave this field blank.
Optionally, use the fields to fine tune or filter the specific providers or provider categories that you want returned in the CPQ response for pricing. If the fields are left blank, the system defaults to all providers, and all categories.
Note
As you type the name of the provider into the Include/Exclude field, the field auto completes to provide you with the Connectbase conformed “standardized” provider name for selection.
For each product category card, complete the following fields. All field marked with * are mandatory and must be filled before submitting a quote request.
Configuration Option
Description
CPQ Rules
Optionally, select a predefined CPQ business rule from the drop-down list.
Choose Media Types (required)
Select the media types to be included in the price quote. For example, Fiber, Coax/HFC, Copper, Wireless, etc.
Selected Account
Optionally, type the name of the account associated with this quote.
API Pricing (checkbox)
Check/uncheck this check box to include/exclude pricing from shared Connectbase catalogs and 3rd party APIs in your quote.
Required (checkbox)
If selected (checked) the response must include everything that was configured as part of the solution, i.e., only return those results where all configured/selected products and conditions are met.
If deselected (unchecked), return results that meet any of the configured conditions.
Example:
When required is checked, solutions will be returned from only those suppliers that provide the product. This field is applicable in cases where there is more than one product selected. For example, if you configure two cards, one for Broadband and one for Static IP and check the “Required” field for both products, the solutions provided are returned only for those suppliers who support BOTH products. If unchecked, the response returned is based on an either/or scenario.
Specific Requirements
Choose Speed(s) (Mbps)
Required. This field allows you indicate a specific speed(s) that you want returned in the response. When you enter a specific speed(s), you can also do the following:
Search for Alternative pricing if the specific speed(s) and/or term(s) are not found. See Alternatives (checkbox) description below.
Enter a range in the Requirement Range field. The system searches and returns the specified range in addition to the specific speed(s)/term(s) you requested, where found. See Speed Range (Mbps) field description below.
Choose No. Cabinet(s)
This field allows you to select the number of cabinets to be returned in the response. If you opt to not select the number of cabinets then all 6 cabinets are selected when you submit the configuration. This field is only applicable if Data Center Services is selected as the Product Category.
Choose Term(s) (months)
Required. This field allows you indicate if you have a specific desired term(s) to be returned in the response.
Note
If Data Center Services is select for the Product Category, this field is not required. However, if you opt to not choose a term then all Terms are selected when you submit the configuration.
Speed Priority
Where applicable, select either Download or Upload as the speed priority. For example, for Broadband products.
Alternatives (checkbox)
This checkbox provides the ability to search for alternative pricing when a specific requirement of a single speed and/or term that you selected is not found. This feature expands the search results enabling you to better understand your available pricing options.
This option is only enabled when a SINGLE value is added under Specific Requirements for Speed and/or Term.
If selected (checked), the system returns the configured options. An admin can configure the alternate preferences under Admin->Company Default Attributes -> CPQ Alternative Preferences.
If Alternative pricing is found, it is indicated as such on the results page in Step 3 in the “Is Alternative” column, indicated with a red icon
 . Additionally CPQ results also provide the requested speed to compare the requested and retrieved results.
If deselected (unchecked), the system will search for the Specific Requirements and/or Requirements Range only.
Note
While you can enter both a Specific Requirement and a Requirements Range, the Alternatives function is unavailable if a Requirements Range is selected.
Requirements Range
Speed Range (Mbps)
Optionally, enter a minimum and maximum speed to have that range returned in the price quote.
Note
You can enter both specific requirements and a requirements range; however, if you enter a requirements range, the Alternatives function is unavailable.
Cabinet Range
Optionally, enter the range of cabinets to return in the price quote. This field is only applicable if Data Center Services is selected as the Product Category.
Term Range
Optionally, enter a minimum and maximum term to have that range of terms returned in the price quote.
Note
You can enter both specific requirements and a requirements range; however, if you enter a requirements range, the Alternatives function is unavailable.
Zero Pricing (checkbox)
Enable the Zero Pricing checkbox to include default pricing for all configurations when pricing is not found in the instance. If no solution is found for a location, then speeds, product details, and other information appear blank. For example, if an address has multiple entries with no solution then multiple blank lines display in addition to the default pricing.
Note
This is a current limitation for ICB pricing if no solution is found. As a workaround, you can put $99,999 for MRC with a comment to reach out to a rep for pricing details to populate the blank lines..
Optionally, but recommended, you can save your configuration as a template for future use.
To save your configuration as a template, Click .
The Save Configuration Template dialog box displays.
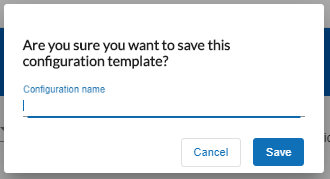
Give the configuration a name, and click .
If you want to share this configuration template with other members of your team, click . In the field, type the name of the user. The system will auto populate the name for selection based on what you are typing.
Click Submit Configuration.
Result: The system displays the following message:

Click to continue.
Result: Pricing in progress message displays, along with a progress bar so that you can monitor results.
Click Next.
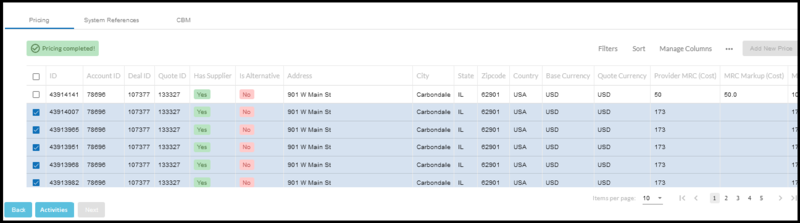
Result: The page displays (defaults to the Pricing tab). Pre-approved pricing is matched to the buildings using the product pricing catalog in the platform.
In Step 3 of the CPQ process flow, you can:
Use the Pricing tab to view pricing, add new pricing, import, or export pricing, change pricing, refresh a quote, or find alternative providers.
Addresses that do not validate, or that do not have pricing configured, display as blank. However, you can manually add pricing for those addresses.
Price changes that occur within the pricing tool do not update existing quotes.
Use the System References tab to attach documents to select locations with reference data that you wish to tie directly to this quote.
 |
Note
Depending on your user group permissions, additional data displays in the response.
The example screen above displays only a portion of the screen and is intended to call attention to the functions available from this page. The screen provides a scroll bar that enables you to scroll right to view a multitude of remaining data fields. Some, but not all, data fields enable you to add/edit data to be saved with the record. For example, you can enter a Priority Order #, Priority ID, Serviceability ID, and other information to be stored with the quote output. You can also change the order of columns in the grid or select/deselect columns for view. See Customizing your view for details.
Icon | Function |
|---|---|
| Click the checkbox to select a location(s). To select all locations, click the checkbox above the list. A checkmark indicates selection. |
| Delete the selected location. |
| View the selected location on the map |


To review pricing:
Click the tab.
Result: The Pricing tab displays the list of addresses, products, speed, pricing, and more in the grid, and the results are based on the selections you made in Step 2 “Choose Configuration. Pricing is matched to the buildings using the customer’s product catalog as defined within The Connected World.
Note
To filter the columns type in a specific filter in the filter box at the top of a column. However, for Media Type, Net Status, and Building Status a drop-down list displays enabling you to select your specific filter.
Note
Depending on your user group permissions, additional columns of data displays. Visit CPQ View Rights to configure additional columns based on the user groups.
Custom Fields
If have been defined for quotes within your instance, those fields are also displayed in the pricing grid.
Fallout
The CPQ pricing grid provides you with a count and record of addresses for which no solution was returned, thereby identifying addresses that need additional pricing solutions. In the pricing response for fallout addresses, only the address is displayed in the row of data, and the supplier indication is designated as “No Supplier” (yellow triangle).
Note
If you are enrolled in CPQ Bid Management, you can initiate a bid request to address any fallout locations.
Alternatives
If the Alternatives option was selected in Step 2 Configuration, then the pricing of both higher and lower upload and download speeds display in relation to the desired speed in Step 3 of the quoting process.
Nitel Broadband Pricing
Nitel API only returns overall pricing (Broadband + Static IP) for all Broadband products to all customers, with the exception of Comcast, Connectbase maps. Nitel pricing to return three options within the CPQ UI pricing response. These include: Total pricing, Core Pricing, and Ancillary pricing.
Note
For Comcast, there will be no change to the current response.
The details are as follows:
Total MRC and NRC pricing coming from Nitel is categorized into Core service pricing and Ancillary pricing.
In CPQ Step 3 response, the API info column will show the following values: Product info, Access Medium and Loop and Port MRC and NRC pricing.
To filter the pricing results on the page by pricing criteria:
On the Enter Pricing and System Reference Data page, click the located at the top right side of the page.
Result: The Filter for CPQ Pricing dialog box displays.
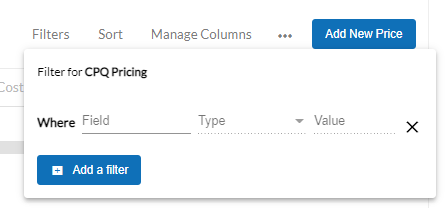
In the field, select the attribute to be filtered from the drop-down list.
In the field, select Contains or Equal.
Optionally, enter an associated value into the field.
For example, = Country, = Equal, = USA
Click to add additional filters.
Customize your view of CPQ grid data and save your preferred view for future use.
Managing your grid data enables you to select/deselect columns for view, arrange the columns on the page for your preferred view, and save the view for future use.
To manage columns for view:
To see the list of available columns for view, click the tab located at the top right side of the page.
Result: The Manage Columns dialog box displays a scrollable list of the available attributes.
Select/deselect the columns you wish to include/exclude in your view. A check mark in the column indicates selection, whereas an empty check box indicates that the column is deselected and will not be displayed for view.
Note
When you navigate away from the page, your customized column selections are automatically saved. To maintain the columns, an admin must define the columns for viewing in the user group.
Optionally, drag and drop selected columns to reorder their view in the grid.
Point at the column name that you want to move.
Left click and drag the column name to the desired location on the page.
Result: An up and down arrow displays to show you where you can drop the column. The column moves to the selected location on the page.
Click .
Editing pricing is a user level entitlement. The Allow Change Price toggle must be enabled on the Admin panel for your user account. Please contact your Connected World Administrator or Customer Support Desk (CSD) Portal for assistance.
Note
Once a quote has been generated, the pricing cannot be changed for that quote.
To manually edit pricing:
In Step 3 Pricing and System Reference Data, edit the pricing listed in the pricing fields as needed.
Click the , and type the new price into the field.
Press Enter on your keyboard to save the change.
Note
If you manually change pricing, you can click the menu and select to view your changes.
To edit prices from the Actions menu:
Click the check box to the left of the pricing to be edited.
Click the menu located at the top right side of the page.
Click .
Result: The Change Prices dialog box displays.
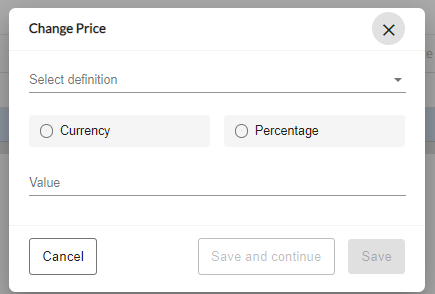
In the field, select the price attribute to be changed from the drop-down list. For example, MRC (Price).
Select the applicable toggle. You can apply the price change by or by .
Enter the value of the price change into the field.
Click to finalize your change or click to make additional price changes.
Discounting is a user level entitlement. If you user account is not configured to apply discounts, this feature is unavailable to you.
Where enabled, you can apply discounts to selected rows in a CPQ quote. The modal content is similar to that of Change Price functionality; however, the behavior applies the discounts over the selected financial component. It does not overwrite the values.
Example 1: A 5% discount over a Provider MRC (Cost) $200 will change the Provider MRC (Cost) to $190, all the financial components affected by the cost change are recalculated in the CPQ grid.
Example 2: A $100 discount over an MRC (Price) $500 will change the MRC Price to $400, the cost components are not changed, the Margin value is changed according to the new price.
The maximum discount to be applied is conditional to the limits set for the user group.
The discounts are applied to each financial component (MRC/NRC, Cost/Price, etc...) and if the value added is superior to the maximum discount allowed for that user (who belongs to a user group with discount thresholds) a warning message displays, and the discount is NOT applied.
To apply discounts:
From the pricing results page in step 3 “Pricing and System Reference Data”, click the horizontal ellipsis (three dots …) to the right of the Manage Columns field.
From the dropdown menu, click .
Result: The Apply Discounts dialog box displays.
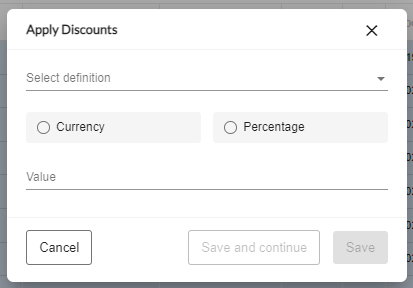
In the Select definition field, click the drop-down menu (down arrow) to select the condition where the discount is to be applied, such as MRC (Price) for example.
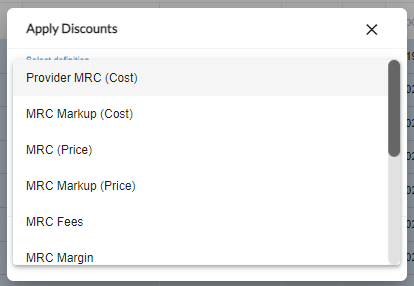
Use the slide rule to the right of the dialog box to scroll through the available options.
The below example shows the dialog box displayed upon selection of Provider MRC (Cost).
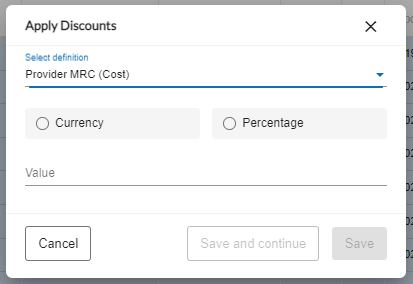
Select the associated radio button to define if you want the discount to be applied as a currency, such as $, or as a percentage.
In the value field, enter the discount rate to be applied.
Note
If the value you enter exceeds your configured threshold, the discount will not be applied, and an error message displays.
Click if you have finished applying discounts or click to apply additional discounts.
This feature must be enabled in your company’s instance for it to be visible on the page.
CPQ components, where configured, enables you to add pricing for certain components, such as additional equipment/hardware costs, to the quote under the configured conditions.
Note
This feature must be enabled within your company’s instance. For assistance, contact Connectbase Customer Support or your designated Customer Success Manager.
To add components pricing to the quote:
In Step 3 Pricing and System Reference Data, click the menu.
Click .
In the Included column, click the toggle to add it to the quote. Alternatively, click the vertical ellipse or action menu and select .
Result: The component is added to the quote provided the configured conditions are met.
To add new pricing:
In Step 3 Pricing and System Reference Data, click .
Result: The Add New Price dialog box displays.
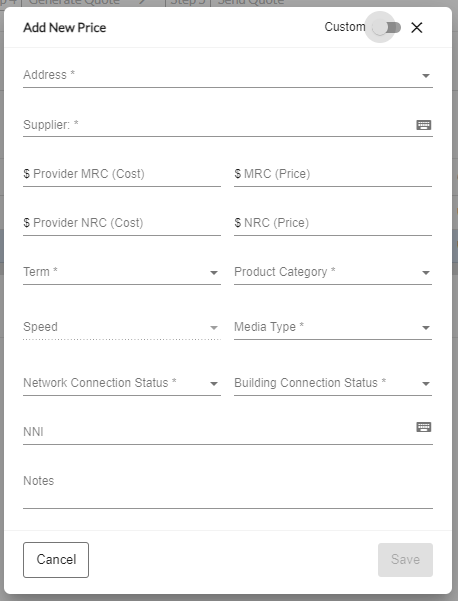
Using the arrows to the right of the fields, select the and Building Connection Status for which you want to add a new price.
Note
The Save button is disabled until all mandatory fields are populated.
Optionally, click the button to add a separate line item, such as a router.
Optionally, click the field to select an NNI address from the dropdown list.
Optionally, add a notation in the field.
Click .
Note
When manually adding a new price in CPQ, the system will automatically generate the Site ID, where provided, for display within the CPQ grid.
To refresh the quote:
In Step 3 Pricing and System Reference Data, click the menu.
Select .
Result: The quote is refreshed and any existing pricing data will be overwritten if updated data exists.
Editing pricing is a user level entitlement. The Allow Change Price toggle must be enabled on the Admin panel for your user account.
To change pricing across selected rows:
In Step 3 Pricing and System Reference Data, select specific row(s) or Select All to change pricing in bulk across all rows.
Click the menu and select .
On the pop-up dialog box, enter either the currency amount or percentage in which you want to change the MRC, NRC, Provider MRC, and/or Provider NRC.
Based on your entries, click the Currency or Percentage radio button.
Click .
You can export your pricing data to a CSV file so that you can make updates to your configuration parameters in bulk format, such as to add a new provider, or to edit terms or pricing. You can then re-import the file to update your pricing within your deal in CPQ.
You cannot add new locations to a deal using this method.
The import and export templates have been realigned so that both templates provide the same columns in the exact same order. This enables you to edit the downloaded export file and reimport it without having to rearrange columns.
Note
When you export a file, the column name “Transaction Status” is exported with blank values that must be entered prior to reimporting the file. Valid values for Transaction Indicator include: U for Update, N for New, and D for Delete.
In Step 3 Pricing and System Reference Data, do one of the following:
To do this
Complete these steps
Export All pricing
Click the menu.
Select . Pricing is downloaded into a CSV file. The downloaded file displays in the lower left corner of the page.
Export selected pricing
Click the checkbox to the left of the locations to be exported.
Click the menu.
Click . Pricing is downloaded into a CSV file. The downloaded file displays in the lower left corner of the page.
Import pricing
Click the menu.
Select .
In the Upload Tips and Cautions section, note the required fields for import.
Optionally, download the sample upload template to confirm the import requirements.
Click and select your file for import.
Click . The import process begins, and a spinning progress circle displays in the lower left corner of the page, until the import completes.
To find alternative providers:
In Step 3 Pricing and System Reference Data, click the menu.
Select .
Complete the request dialog box.
Click .
Result: An email request is sent to request offnet pricing.
To view audit logs:
In Step 3 Pricing and System Reference Data, click the menu at the top of the page.
Click .
Result: The Audit Logs page displays.
To view API audit tracing status, click the tab.
To view automations, click the tab.
In Step 3 Pricing and System Reference Data during the quoting process, the Activities button is visible when Activity Rules have been preconfigured in the Admin panel for your instance. Activities can include such conditions as Approve Quote, Approve Deal, for example.
The following conditions apply:
If an Activity Rule has been configured as mandatory, the quote/deal cannot move beyond Step 3 in the process flow until the approval or milestone is completed.
If the Activity Rule has been configured as optional, the activity is visible in the Activities queue, but the quote can be completed prior to the completion of the approval or milestone.
If your instance does not use activities, the Activities button does not display. Choose Next to complete your quote.
To add system reference data:
In Step 3 Pricing and System Reference Data, click the tab if you want to add reference data specific to the customer data, such as pricing that could not be automatically set to the file. For example, if you want to include non-intersected buildings in the price quote, they must be manually priced.
Click the arrow to the left of the location in which you want to add reference data.
Click .
Result: The Add new system reference dialog box displays.
Complete the following required fields:
Field
Description
System Description
Enter a descriptive identifier for this reference
System Data
Enter the data identifier for the file
System Reference Number
Enter the URL or link that is associated with the file.
Click the button.
Optionally, click the paperclip icon to the far right of the selected location to view or upload an attached file for this location.
Result: The Attachments dialog box displays and lists any attachments that have been uploaded to this location. To add an attachment, click .
Once you have completed Step 3 in the process flow, you can exit the quote until you are ready to generate the final quote.
Note the following: In Release 4.37.0, Connectbase deprecated CPQ Step 4 “Manage Approvals” from the CPQ process flow. Where applicable, Step 3 is now enabled with an approval/milestone workflow (Activities button) that is based on predefined Activity Rules for the instance.
If Activities have been configured, the Activities button displays at the bottom of the pricing screen and the Next button is disabled until the Activity requirement is met.
If no Activities are configured for the instance, the Next button is enabled and the quote proceeds directly to the new Step 4 “Generate Quote”.
See Managing Activities for details.
When you are ready to generate your final quote:
Select from the navigation sidebar.
Locate an account that contains the deal being quoted, and click the icon.
Select a deal.
Click the button.
Select a quote and click .
Result: Step 3 Pricing and System Reference Data page displays.
Click the tab.
Optionally, click the menu and select if you want to obtain updated pricing.
Click and complete any optional activities as needed.
Click .
Result: Step 4 Generate the Quote page displays. See Step 4: Generate quote for next steps.
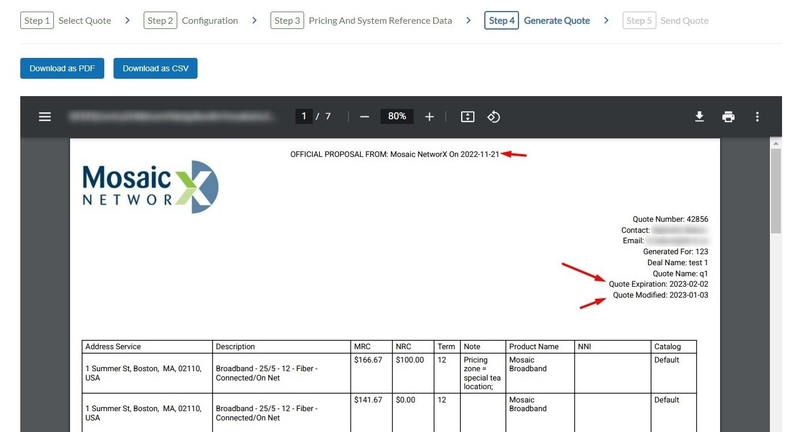
To generate the quote:
In Step 4 Generate Quote, click .
Result: The Warning dialog box displays.
To finalize your quote now, click . Alternatively, click to return to the Generate Quote page without finalizing your quote or to go back and make changes.
Result: The quote is generated as a file and stored for the configuration and locations that are associated with the user that created the quote. The document can now be sent to a customer and/or stored for future reference.
Note
When the quote is generated, it is assigned a unique identifier and date. Once a quote completes, it is not editable. However, a new quote can be generated from the Choose Configuration step or by selecting a new deal.
Download the quote, either as a file or as a file. Click the associated button to download the quote in your preferred format.
To continue to the Summary page, scroll to the bottom of the page and click .
Result: The Send Quote page displays.
Note
When modifying a quote, the expiration date of the quote is updated based on the newly modified quote date, rather than the initial date of creation. The expiration date is then reset to 30 days from the last modification date.
CPQ Ordering is an instance level entitlement. To enable an instance and associated users to use the CPQ ordering function, your instance must be configured by an internal Connectbase designated administrator to Allow Integration and Allow Ordering. If you require technical assistance or wish to report an issue to the Connectbase Support team, please log into the Connectbase Customer Support Desk Portal at https://support.connectbase.com and submit a support ticket.
Orders can be configured to be sent to a specific URL endpoint, such as Neustar, or to a designated Email address(es).
 |
To place an order for a completed quote:
Provided that your instance and user account are enabled for CPQ ordering, you can place an order from the WIP screen only after the quote is completed/generated.
Select from the navigation sidebar.
On the page, click the shopping cart icon for the quote to be ordered. Notice that the shopping cart is enabled only if Workflow Status = Quote Generated.
Result: The message “Are you sure you want to order it now” displays.
If you are ready to proceed with the order, click OK.
Result: The quote is updated with the Order Id and Order Status fields.
If the order is sent to a designated URL endpoint, the order will be received by the designated company (Neustar, for example).
If the order is sent to a designated Email address, the respondent will receive a copy of the order in the form of an email that looks similar to the example shown on the following page.
After placing your order, you can go your My WIP tab to view order records. The status of your orders is listed under the Order Workflow column.
Upon successful submission, “Ordered” displays.
If the submission fails, “Order Failed” displays.
If multiple orders are places, but some fail and others are successful, “Ordered Partially” displays.
Following is a sample Email distribution that is sent to a recipient who has been configured to receive orders.
From: donotreply@connectbase.com (donotreply@connectbase.com) <donotreply@connectbase.com (donotreply@connectbase.com)>
Sent: Wednesday, February 9, 2022 12:35 PM
To: customer@gmail.com
Subject: Automatic Ordering System
Order: #43
General Information
quote id | 152621 |
quote number | 001 |
account id | 127461 |
account name | Data Test 1 |
user name | Customer name |
user email | customer@gmail.com |
Solution: #43469451
term | 12 |
locationId | 5791754 |
note | Pricing zone = Tier 2; |
provider | FRONTIER |
mrc | 850 |
nrc | 1000 |
address | 701 Silver Spur Rd |
city | Palos Verdes Peninsula |
state | CA |
zip | 90274 |
addressValid | 1 |
latitude | 33.77118 |
longitude | -118.370631 |
uniqueKey | OZ99-587-1670519999 |
globalLocationId | US8553QJCH+8PPBS00 |
countryCode | USA |
product Name | Ethernet - Switched |
API Product Name | Ethernet - Switched |
speed | ETHERNET 50M |
uploadSpeed | 50 |
downloadSpeed | 50 |
mediaType | Fiber |
netStatus | Connected |
bldgStatus | OnNet |
status | Pricing generated from Frontier Communications Corporation-819 API |
currency | USD |
currencyName | Dollar |
notes | Red |
The page displays the Account Name, Deal Name, Quote Name, and Quote Id for the generated Quote. From the Send Quote page, you can email the quote directly to the customer(s).
To distribute the completed price quote to a customer(s):
In the field, type the <customer’s email address>. To send the quote to multiple email addresses, separate each address with a comma. The Subject field defaults to the Quote Name.
In the field, enter any descriptive information that you want to add to the email. (Required field).
Click the button.
Result: The completed project price quote is sent to the customers email address as indicated in the field.