Manage Accounts
About My Accounts
My Accounts enables you to view and save all businesses that are included in your company’s footprint. You can also view or add tags that you associate with specific locations and businesses.
Market Explorer is built on the concept of “My Accounts”, which provides a user-centric view specific to the individual’s user account and preferences. Whereas Market Explorer is enabled at the company level, My Accounts is enabled at the user level.
Accounts can be either Enterprise or Wholesale, depending upon the individual user’s entitlements.
Note
To view this feature within The Connected World, the My Accounts feature must be turned on within your user profile. If you do not see the My Accounts tab, but have subscribed to this feature, please contact your account administrator for assistance.
Accessing My Accounts
To access My Accounts:
Click from the navigation sidebar.
Result: The Accounts page displays a listing of your saved accounts.
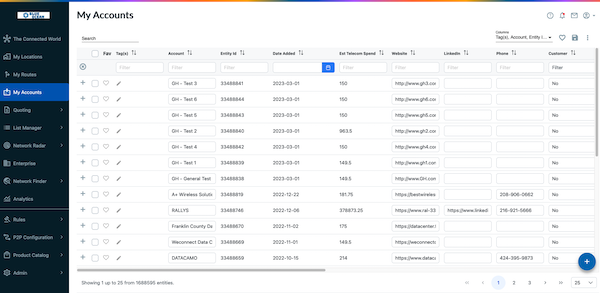
To view account details:
Click the
 sign to the left of the company name.
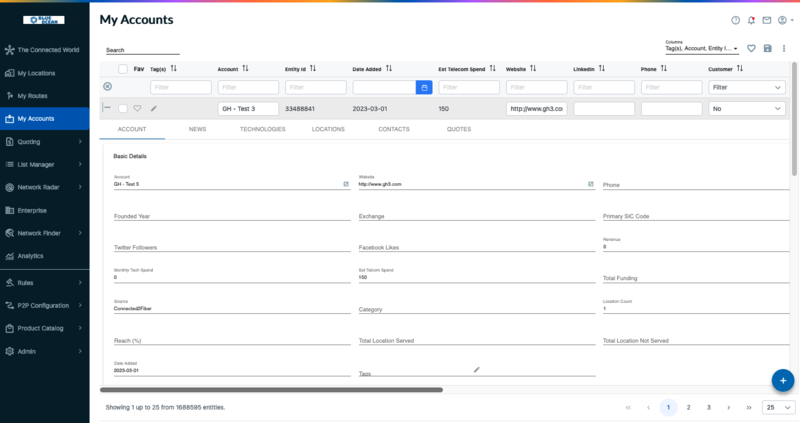
Result: The Account page displays for the selected company.
The following tabs are provided on this screen:
Account - The Account tab enables you to view detailed company profile information, such as the company’s website address, their contact information, the number of employees they have, etc.
News - The News tab enables you to view the latest new stories related to the selected company.
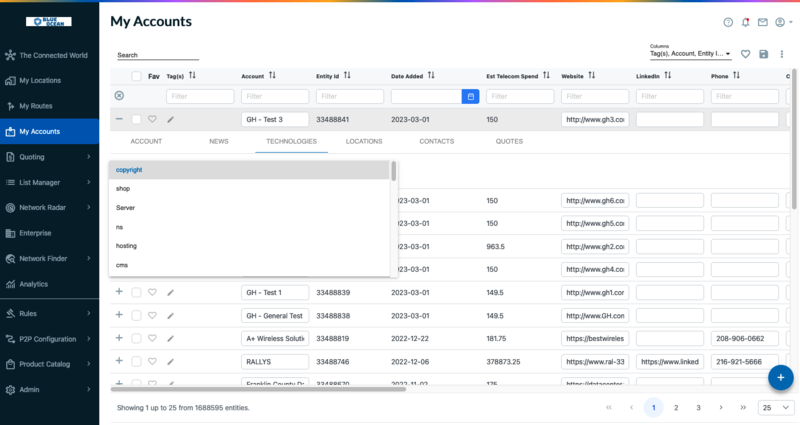
Technologies - Technologies tab enables you to view and manage the listed technologies.
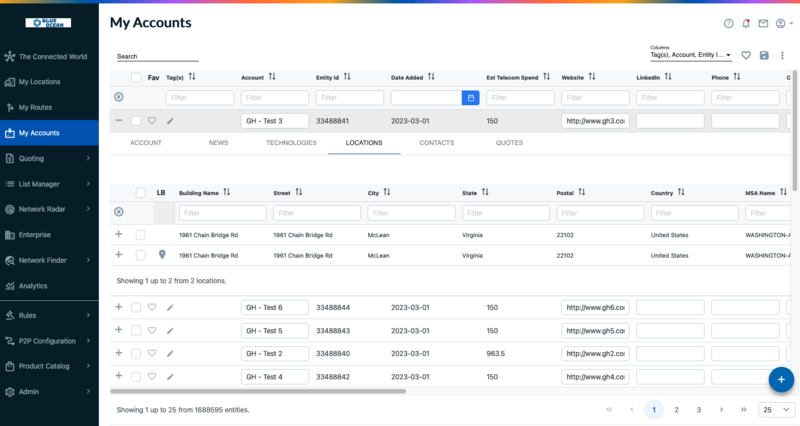
Locations - Locations tab enables you to view and manage the associated location(s) with the account.
Contacts - Contacts tab enables you to view and manage the contacts for this account.
Quotes - Where applicable, Quotes tab links matching My Accounts records to My Quotes records in CPQ.
The following table describes the field definitions of column data in My Accounts.
Field | Description |
|---|---|
Tag(s) | From the results of your search, you can tag selected records, or all records, and then name and save them to your “My Accounts” database. This field indicates tagged accounts. |
Account | The name given to identify the account. |
Entity Id | A proprietary Connectbase ID used to identify the account in TCW. |
Date Added | The date the account was added to The Connected World. |
Entity Telco Spend | Entity Telco Spend is indicated at the entity level. It is the telecommunications spend amount for a specific entity, such as an overall company. For example, $580,530 for all Taco Bell branches globally. By contrast, Est. Telecom (Telco) Spend within the Building Filters Attributes of Market Explorer is indicated at the location level. It is the estimated cost for telecommunications services at a specific location of a company. For example, $600.00 for Taco Bell at 100 Main St. |
Website | The URL for the website tied to the account. |
The LinkedIn URL tied to the account. | |
Industry | Where provided, the industry in which the company is associated. Examples: Colocation, data center; Space, Research and Technology; Insurance, etc. |
Revenue | Where provided, the annual revenue of the company. |
Symbol | The stock exchange ticker symbol, where applicable. |
Exchange | Indicates the marketplace where securities, commodities, derivatives, and other financial instruments are traded. For example, New York Stock Exchange (NYSE). |
Phone | The main contact phone number for the company. |
Market Cap | The total dollar market value of a company's outstanding shares of stock. Current Share Price*Total Number of Shares Outstanding. |
Employees | The number of employees in the company. |
Customer | Yes/No. Indicates if the account is a customer of Connectbase. |
Source | Indicates the source of the data; either Connectbase internal data or externally provided data. |
Location Count | The total number of locations for the account. |
Country Count | Lists the total number of countries in which the company has a presence. |
Continent Count | Lists the total number of continents in which the company has a presence. |
Reach (%) | Displays the percentage of reach to intersecting locations based on My Buildings profile. |
Total Location Served | The total number of locations served by the account/company. |
Total Location Not Served | The total number of locations that are not served by the account/company. |
Account Revenue | The annual account revenue of the account/company. |
To view company profile information:
From the , select the company name.
Click the tab.
Result: The Account screen displays.
To view company news:
From the Business list, select the company name.
Click the tab.
Result: The News screen displays a list of news items related to the company and its technology.
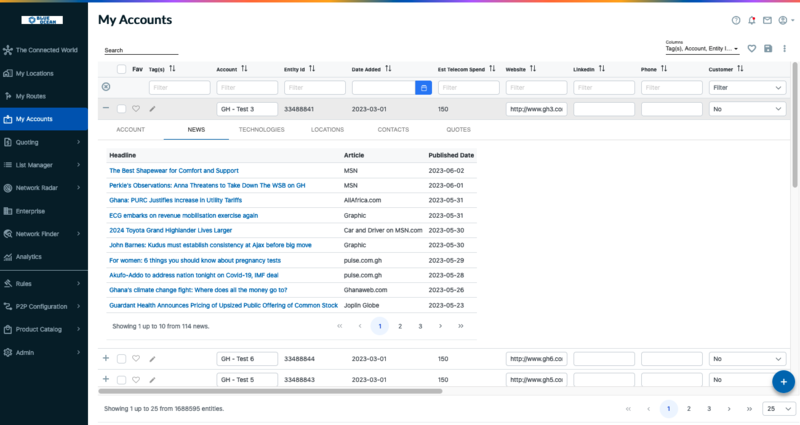
Use the grey scroll bar on the right of the screen to scroll through the listing and select the news story you wish to view.
To view a company’s technology:
From the Business list, select the company name.
Click the tab.
Result: The Technology screen displays.
To view company locations:
From the Business list, select the company name.
Click the tab.
Result: The Locations screen displays.
The following example shows the Locations page for the selected company.
To view the selected location on the map, click the to the left of the building name
 .
.To tag a location(s) for an account, click the
 (vertical ellipses) in the upper right-hand corner within the locations tab of the screen by scrolling to the right of the page.
Select either or .
When prompted, type the name you want to associate with the tagged records.
Click .
You can use the export function to export some, or all, of your accounts to a CSV file. This feature enables you to make edits to your accounts in bulk format. You can then use the Import Accounts function to re-import your accounts.
To export accounts:
Click from the navigation sidebar.
From the list of accounts, you can either export selected accounts or export all.
To export select files, click the checkbox to the left of the Account name of each account to be exported. A check mark indicates selection. Click the
 (vertical ellipsis) located at the top right side of the page.
Click . When prompted to confirm the export, click .
To export all accounts, click the
 (vertical ellipsis) located at the top right side of the page and click . When prompted to confirm the export, click .
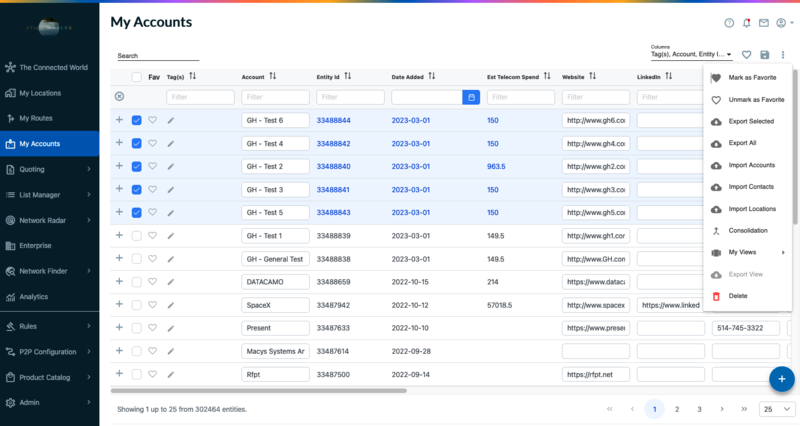
Result: The exported file downloads in CSV format in the bottom left corner of the page. The export status indicates “In Progress” until the download completes and the status changes to “Finished”. You can now download the file to your local system.
You can use the import function to upload accounts in bulk format from a CSV file. Upon upload of multiple accounts, you then have the option to consolidate your accounts. See Consolidating Accounts for details.
To import accounts:
Click from the navigation sidebar.
Click the
 (vertical ellipsis) located at the top right side of the page.
Click .
Result: The Import Account dialog box displays. Note the required fields.
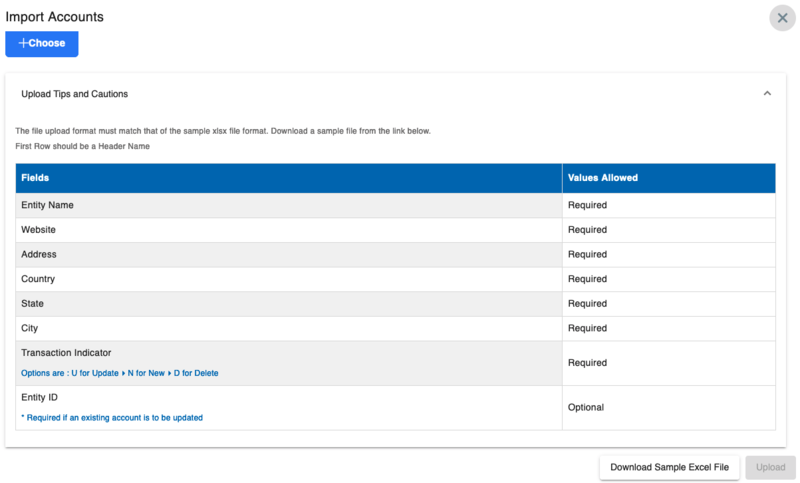
Optionally, click to view the required format. You can use the downloaded sample as a template.
Click the button and select the file to be imported.
Result: The name of the file displays below the + Choose button.
Click the button, located at the bottom of the dialog box.
Result: The import process begins and displays an import status icon and pop-up information panel enabling you to monitor the progress of the import.
When the import completes, an email notification is sent to the user indicating the import details.
Note
Previously, if an address in the import file did not match a record in , the record would fail to import. Beginning with the 4.16.0 release, if an address is not found in , the address will be validated using the Standard Address API, a new building record will be created in using a conformed address, and the record will be marked as Prospect.
From the My Accounts list, you can select accounts to be consolidated into a single account.
To consolidate accounts:
Click the checkbox to the left of each of the accounts to be consolidated.
Alternatively, if you want to consolidate all accounts into a single account, click the checkbox at the top of the page to select all from the list.
Click the
 (vertical ellipsis) at the top right side of the page.
Click .
Result: A warning message displays, “Are you sure you want to consolidate the selected accounts”.
Click to continue the consolidation process.
Result: The Consolidate Account dialog box displays.

Select the name of the account into which all selected accounts are to be consolidated.
Optionally, click the checkbox if you want to merge the contacts from the listed accounts into the consolidated account.
Click .
Result: The selected accounts are consolidated into the designated account.
This function enables you to load all locations in your inventory to an account.
To import locations:
Click the from the navigation sidebar..
From the account list, click the to the left of the account name for selection.
Click the
 (vertical ellipsis) located at the top right side of the page.
Click .
Result: The Import Locations dialog box displays. Note the required fields and values allowed.
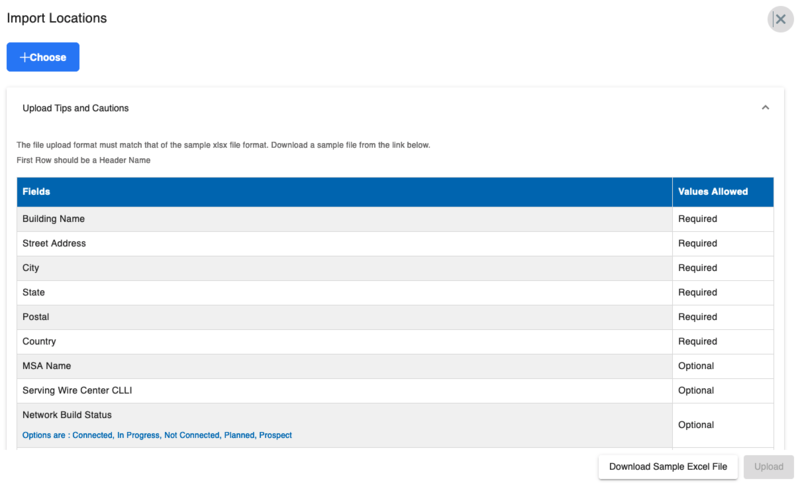
Optionally, but recommended, click the to verify that your import file meets the required format. You can use the sample file as a template to build your import file.
Click button and select the file for import.
Result: The name of the file displays below the + Choose button.
Click the button, located at the bottom of the dialog box.
Result: The import process begins and displays an import status icon and pop-up information panel enabling you to monitor the progress of the import.
When the import completes, an email notification is sent to the user indicating the import details.
Viewing Contacts
To view contacts:
From the , select the company name.
Click the tab.
Result: The Contacts screen displays. If contacts have been added for this account, they are listed here.
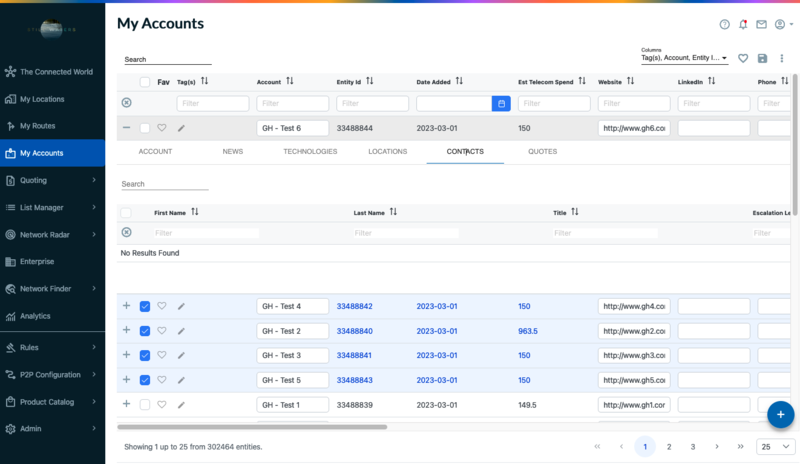
To add a contact:
From the Contacts page, click
 icon located at the top right of the Contacts dialog box (Scroll to the right of the page to access the actions menu within contacts tab).
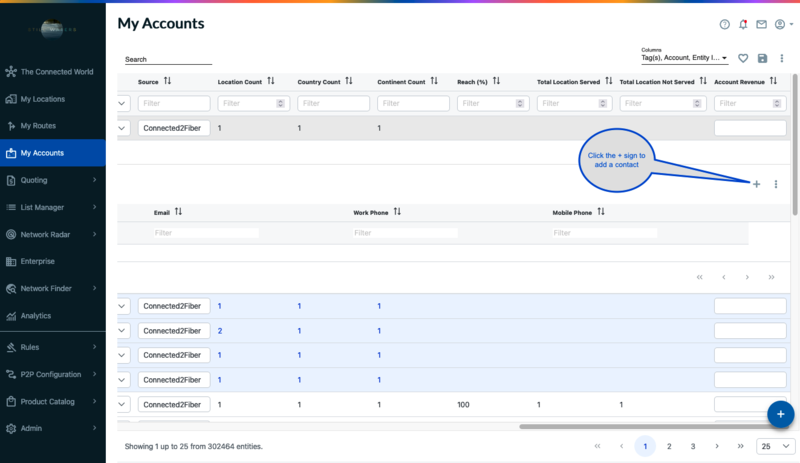
Type the First Name (required), Last Name (required), Title (optional), Escalation Level (optional) Email (required), Work phone (optional), and Mobile Phone (optional).
Click the icon
 , located next to
  sign at the top right corner of page within "Contacts" tab.
To import contacts:
From the Contacts page, click the Actions menu (vertical ellipsis) located at the top right of the Contacts dialog box (Scroll the page to right to access the actions menu).
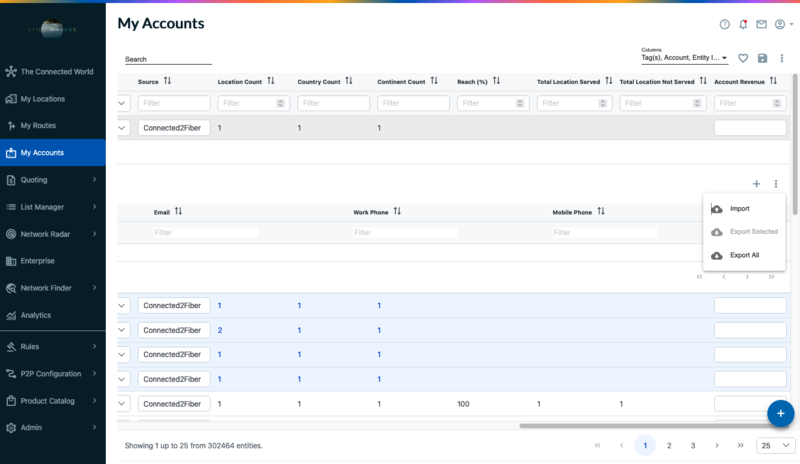
Click .
Result: The Import Contacts dialog box displays.
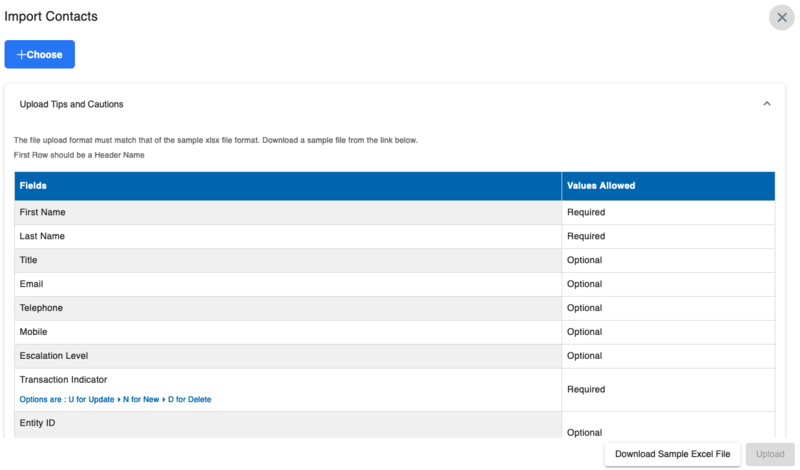
Verify that the file upload format matches the format shown on the Import Contacts dialog box. Click the as needed.
Click the button.
Select the file for import.
Result: The contacts are imported and displayed in the Contact list.
Click the icon.
To export contacts:
Either select specific contacts to be exported from the list, or you can export all.
From the Contacts page, click the (vertical ellipsis) located at the top right of the Contacts dialog box (Scroll to the right of the page to access the actions menu and click on export contacts as shown in the below example).

Click .
Result: The message “Are you sure you want to export the selected contact(s)? dialog box displays.
Click .
Result: The exported file downloads to the bottom left side of the page for download. The status shows in progress, until the export completes.
Viewing Quotes
The Quotes tab links matching My Accounts records to My Quotes records in CPQ. The account is expandable, like My Quotes, to show deals and provides all of the same functionality as in the expanded deals function of My Quotes as shown in the below example.
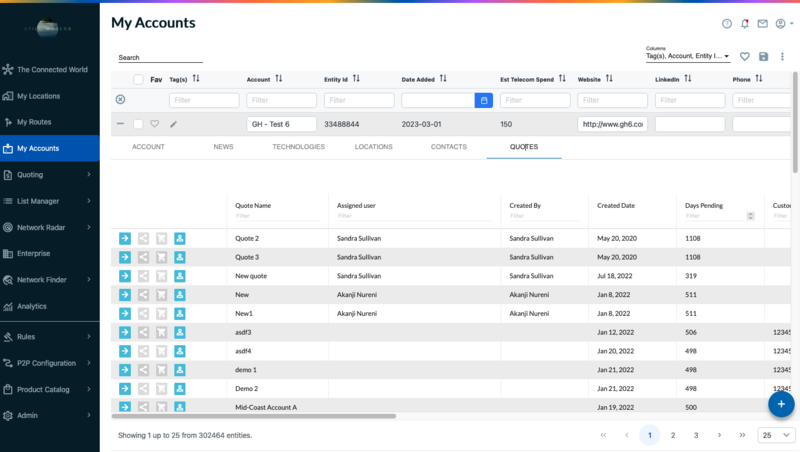 |
This page displays the total quotes generated within the instance by all users. You can apply filters on all columns or sort to view specific quotes. Click on
 arrow to see details of a specific quote.
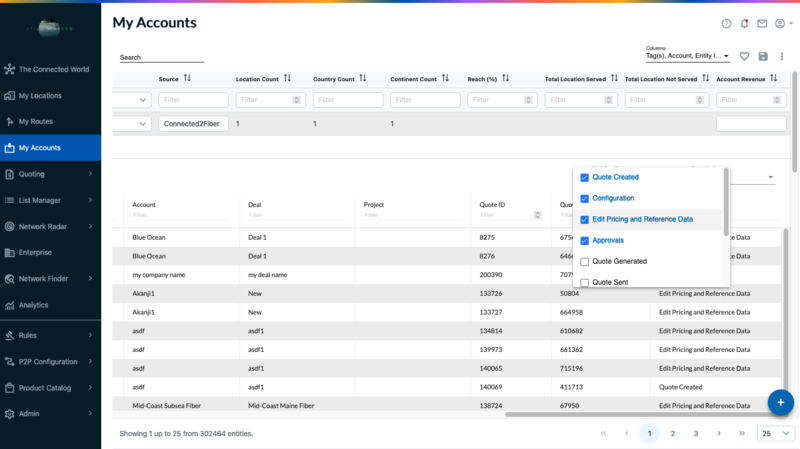
You can also view the quotes by workflow status. Scroll to the right of the page and click Workflow status bar and select the required status(es) to view the desired quotes, as shown in the below example.
