User Management
From the Users Management menu, you can edit, delete, or deactivate a user’s account, or review the list to determine which instances a specific user can access. Additionally, you can configure user groups and define a company user hierarchy.
“The Connected World” has Role-Based Access Control (RBAC). The system supports various modes of operation for distinct types of users: Administrator, Edit User, View User, Billing Administrator, Carrier Relations Admin, and Portal User.
Anyone having Administrator-level privileges can add users to the instance. The authentication of the user login and password determines the specific actions each user-defined role may invoke.
To add a new user:
Click .
Result: The Users page displays the existing list of users.
Click the icon located at the bottom right side of the page.
Result: The Add User dialog box displays.
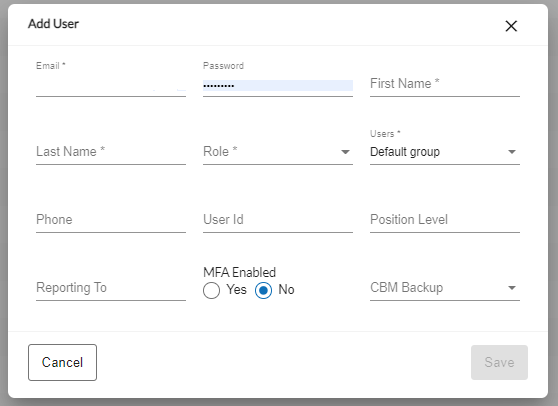
From the drop-down list in the Role field, select the user role you want to assign to this account. See table below.
Complete the following required fields: Email, Password, First Name, Last Name, Role, and Users (user group).
User Role
Description
Administrator
Allows full access to the instance and enables you to edit, delete, and upload building lists.
Edit User
Allows an associate to edit and upload building lists but does not allow you to delete anything from the instance.
View User
Allows an associate to view, but not edit, information within the instance and all modules for which you subscribe.
Billing Administrator
Provides the same privileges as the Administrator. Additionally, when a user clicks a link to request a subscription (i.e., Building Intelligence or Network Intelligence), the request is sent to this user's email address.
Carrier Relations Admin
Allows you to edit user privileges and provides full access to the Linkbase module.
Portal User
As a user of the serviceability portal, allows you to search one or multiple addresses/locations to determine the carrier’s serviceability at those location(s).
Business Partner
Identifies the user as a CPQ Order integration partner.
Corporate User
This user can create all necessary attributes from their system into The Connected World to support synchronized quoting. All users who are directly associated to the Corporate User will then have access to all quoting results generated by the Corporate User.
Optionally, complete the remaining fields: Phone, User Id, Position Level, Reporting To, MFA Enabled toggle, and CBM Backup (where applicable).
MFA Enabled – If enabled, turns on the multi-factor authentication feature and requires the user to use an authentication tool to log into the platform.
CBM Backup – Enables you to add a backup contact user’s email address to receive and respond to bid requests in the event the main contact is unavailable to do so.
Click .
Result: After creating or associating the user account, notify the user to expect an automatically generated email announcing that their account has been created. New users are required to change their temporary password within 60 minutes of account creation.
Note
Associated users do not need to change their password. In this case, notify the user accordingly.
The following features are user level entitlements that can be enabled for a user(s) of an instance from the Admin > Users panel.
To enable user level entitlements:
Use the filter to locate the user in the list.
Scroll to the right to the user level entitlements.
Use the toggle buttons to enable the required entitlements.
Result: The message Updated Successfully displays.
Note
Before exiting the Admin panel, remember to click SAVE if you make any changes to the user level entitlements.
Entitlement | Description |
|---|---|
My Account | Click the toggle (blue) to enable this user to create/save prospects/business accounts in Market Explorer. When enabled, the user has access to the My Accounts tab in TCW. |
Pricing Channel | From the dropdown list, select/check the pricing channels to be enabled for this user to view within step 2 of the CPQ process flow: Default, Wholesale, Enterprise, and/or Channel. To select All pricing channels, click the checkbox at the top of the list. |
Allow CPQ | Click the toggle (blue) to enable this user to access the CPQ module within their company’s instance. When enabled, the My Quotes tab is visible to this user and the CPQ workflow is enabled to configure and distribute quotes. |
Allow CPQ API Access | Click the toggle (blue) to enable this user access to the CPQ APIs. |
Allow Messaging | Click the toggle (blue) to enabled user level messaging within the instance. |
Allow ME_Export | When enabled, ME export allows the user to export market data from the platform to an excel spreadsheet. Note: This toggle cannot be enabled from the Admin panel. It must be enabled by an Internal Connectbase Administrator. |
Allow Limit Notifications | Click the toggle (blue) to enable notifications to be sent to the portal user if rate limits have been configured and the user has reached the limit. |
Allow Change Pricing | Click the toggle (blue) to enable this user to make manual pricing changes within a CPQ quote. |
Allow Financial Manager | Click the toggle (blue) to enable this user to view/ use the functions within the Financial Manager (such as Margin Manager, Financial Rules, etc. |
To edit users:
Select from the navigation sidebar.
Click the edit icon next to a user’s name.
Edit the following fields:
Email
Password
First Name/Last Name
Role
User Group
Phone
User ID
Position Level
Reporting To
MFA Enabled
Click .
To revoke login permission for a user, deactivate their account by going to the Users tab in Admin.
To deactivate users:
Select from the navigation sidebar.
Click the deactivate icon next to a user’s name.
Click to confirm.
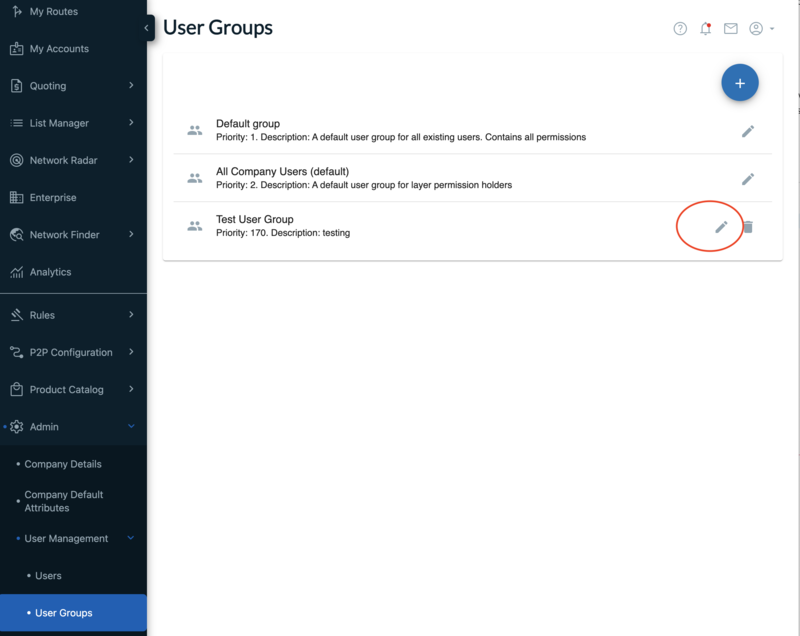
From the User Groups page, you can edit the default group of users which includes all users in your instance. You can also add/define new user groups within your instance to enable/disable access of certain functions to specific users.
Further, you can specify which CPQ columns/view rights are to be made available to members of a user group.
Initially, all users of an instance are included in a default user group with all buildings and data elements enabled.
From the Admin screen, you can add specific user groups and assign users to one or multiple groups.
Within a user group, you can further define which records in My Buildings the user can/cannot access. For example, Geography, Building Category, Network Build Status, Building Connection Status, Media Type, etc. This setting controls which fields will display on the building record to the user.
The default access for a new user group is all fields enabled. The Admin user can then add/remove fields they wish to show/hide from the users within the group.
To add a user group to your instance:
Click from the navigation sidebar.
Click the icon that displays in the bottom right corner of the page.
Result: The Add User Group dialog box displays.
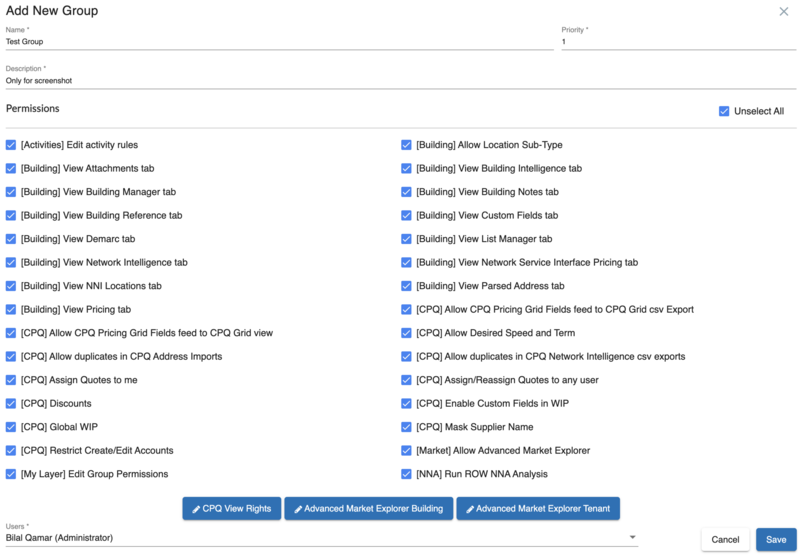
In the Name field, assign a unique name to the group. This is a required fields.
The priority parameter for a user group is a required and unique value that determines the precedence of rules and permissions applied to users within the group. It establishes a hierarchy among multiple groups, ensuring that when a user belongs to more than one group, the rules of the group with the highest priority take precedence.
Each user group must be assigned a unique priority value, with lower numbers indicating higher priority (e.g., 1 is the highest). If you belong to multiple groups, your rights and permissions will be determined by the group with the highest priority, ensuring rules are applied clearly and consistently. This hierarchy effectively resolves any conflicts between group permissions.
Enter a description for the group.
In the Permissions section, click the functions to be enabled for this user group. These permission settings are used to determine the specific functions that will be viewable within the platform for the user group to access. For details about the various user entitlements, see Assigning/editing User Group Permissions
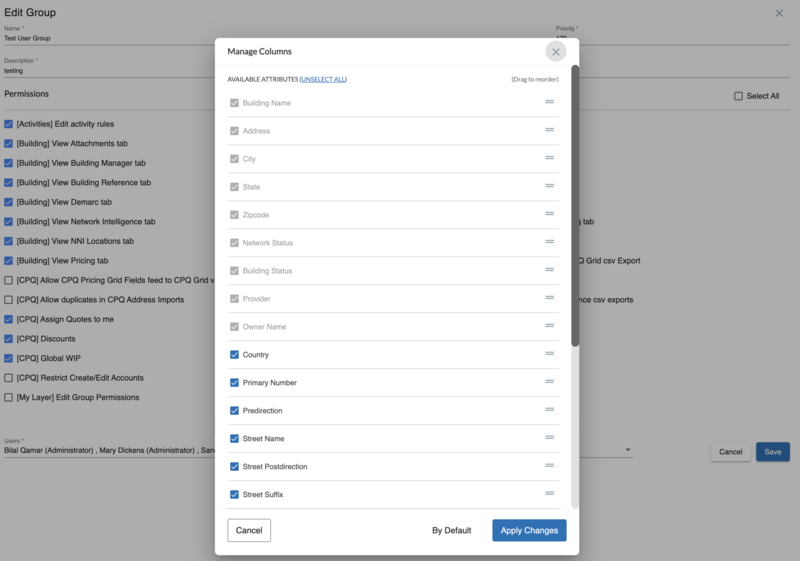
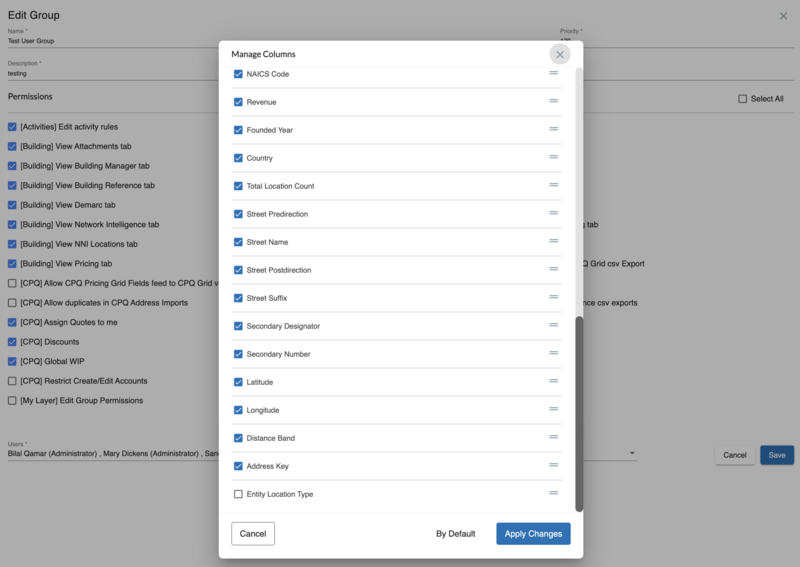
Optionally, click to select/deselect the columns that you want this user group to view within the CPQ quote grid.
Result: The Manage Columns dialog box displays.
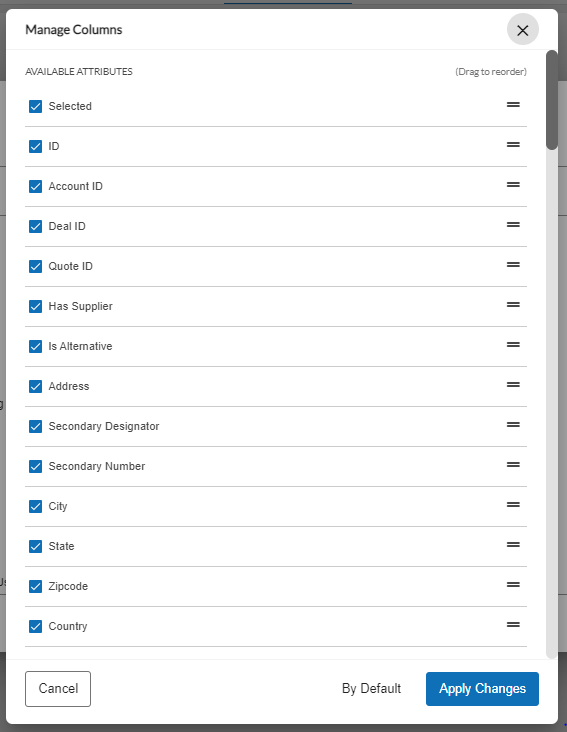
Select/deselect the columns for inclusion/exclusion from the user groups view in CPQ.
Note
You can also drag and drop column names to reorder their order of display within the CPQ quote grid.
Click .
Optionally, click to select/deselect the building data that you want this user group to view within the Advanced Market Explorer. You can also use the drag and drop function to reorder the columns in the order in which you want to view them on the grid. When you finish, click .
Optionally, click to select/deselect the tenant data that you want this user group to view within the Advanced Market Explorer. You can also use the drag and drop function to reorder the columns in the order in which you want to view them on the grid. When you finish, click .
In the Users field, click the drop-down arrow to select the users to be assigned to this group.
Note
Users can be assigned to one or more groups within your instance.
Click .
Result: The user group now displays in the list of User Groups.
Once a user group is defined, you can edit the user group using the Edit (pencil) icon that appears to the right of the user group name to edit permissions for the user group or delete the user group using the Delete (trash) icon.
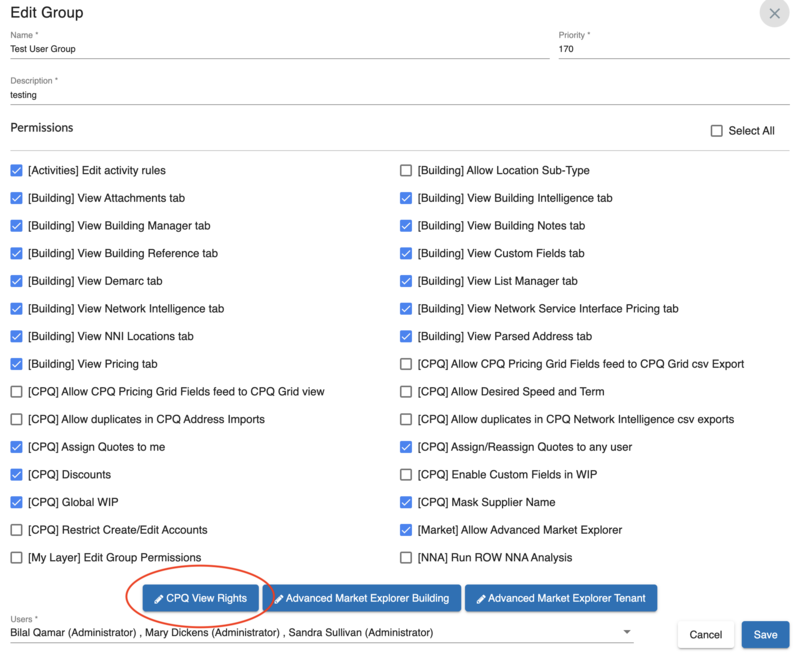
Once you create a user group, you can use the Edit function to define permissions for users of the group.
To edit/assign permissions to a user group:
Click from the navigation sidebar.
To the right of the user group name, click the icon.
Result: The Edit Group dialog box displays.
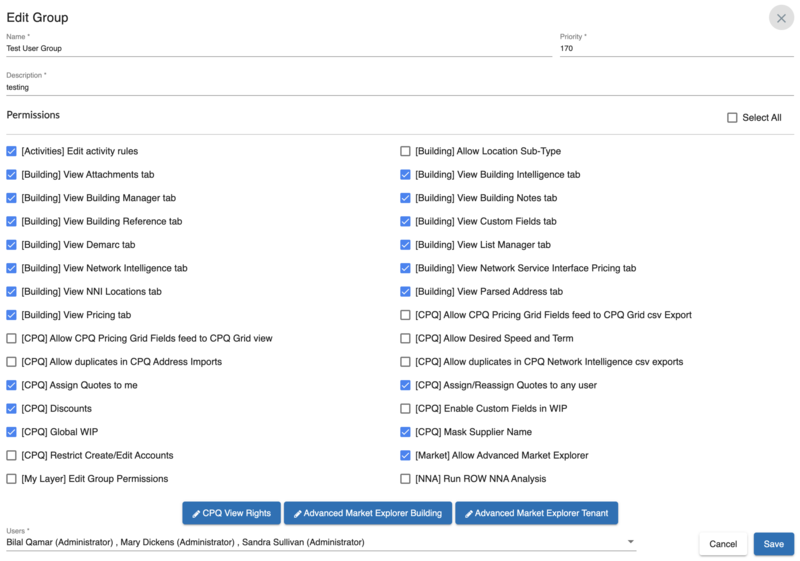
From the Edit Group dialog box, click/check the permissions you want to enable for this user group. A blue checkmark indicates selection. Uncheck any permissions you do not want enabled for this user group so that the checkbox is empty.
Permissions
Description
[Activities] Edit activity rules
Enable this permission if you want this user group to have the ability to edit activity rules for CPQ.
The Activities button is visible to users only when Activity Rules have been preconfigured in the instance. Activities can include such conditions as Approve Quote, Approve Deal, for example.
[Building] View attachments tab
Enable this permission if you want this user group to view attachments that have been added to building records in My Locations.
[Building] View Building Manager tab
Enable this permission if you want this user group to view Building Manager information within My Locations.
Building Manager information includes such data as Property Details, Property Manager, Building Access Manager, Easement Manager, Lateral Manager, Riser Manager and Demarc Manager information.
[Building] View Building Reference tab
Enable this permission if you want this user group to view Building Reference data within the My Locations > Building Information page.
Building Reference information includes such data as Building Category, Network Build Status, Building Connection Status, Access Medium, and other building level details.
[Building] View Demarc tab
Enable this permission if you want this user group to view Demarc information from within My Locations.
Demarc locations identify the physical point of connectivity to the network within a building, campus, mall, or tall building, for example.
[Building] View Network Intelligence tab
Enable this permission if you want this user group to have the ability to view network intelligence information within My Locations.
Network Intelligence tab enables you to view Telco, CableCo, and Broadband information for a location.
[Building] View NNI Locations tab
Enable this permission if you want this user group to have the ability to view NNI locations within the Product Catalog.
NNI locations identify where you connect to your partner networks.
[Building] View Pricing tab
Enable this permission if you want this user group to have the ability to view pricing information within the building records in My Locations based on selected criteria.
[CPQ] Allow CPQ Pricing Grid Fields feed to CPQ Grid View
When enabled, configured user groups can view additional columns of data in CPQ step 3 UI pricing grid response.
[CPQ] Allow duplicates in CPQ Address Imports
This setting enables you to choose which view you want the user group to see for CPQ Address Imports.
When this permission is enabled/checked, the following conditions apply:
In Deal view, after CPQ address imports, the following fields display: ID, Address, Secondary Designator, Secondary Number, City, State, Zip, Country, Site ID, Original Supplier name, Supplier name, Build connection status, Network Connection Status, Access medium, Building Unique Key.
In Account view, displays count with duplicates.
Account view location counts match the deal view Total location counts
When this permission is disabled/unchecked, the following conditions apply:
To view a summary of unique addresses, in Deal view after CPQ address imports, displays fields: ID, Address, Secondary Designator, Secondary Number, City, State, Zip, Country, Site ID, Counts with Duplicates.
In Account view, displays count of unique address (include combination of secondary + site ID).
Account view location counts matches deal view Total unique location counts.
[CPQ] Assign Quotes to me
Enable this permission if you want this user group to be assigned quotes.
[CPQ] Discounts
Enable user group to apply discounts to pricing.
[CPQ] Global WIP
Enable this permission if you want this user group to have the ability to view Global WIP in CPQ.
Global WIP enables you to view all work in progress to determine the workflow status of quotes and assigned users.
[CPQ] Restrict Create/Edit Accounts
Enable this permission if you want to restrict this user group from creating/editing accounts in CPQ.
[My Layer] Edit Group Permissions
Enable this permission if you want this user group to have the ability to edit user group permissions for access to My Layers.
The My Layers Personal data is data that is viewable only to you unless you choose to share it with the other users of your instance. Prior to sharing layers to a user group, the user group must have been preconfigured to allow sharing.
[Building] Allow Location Sub-Type
Enables users to see building sub-types in Map Filters Building tab.
[Building] View Building Intelligence tab
Enable this permission if you want this user group to view Building Intelligence data from My Locations.
Building intelligence expands the location record to include detailed information on the tenant within the building and the competitive networks terminated to the building.
[Building] View Building Notes tab
Enable this permission if you want this user group to view any notes that have been added to the building records within My Locations.
[Building] View Custom Fields tab
Enable this permission if you want this user group to view custom fields that have been defined for the records within My Locations.
[Building] View List Manager tab
Enable this permission if you want this user group to have access to the List Manager function.
List Manager enables you to share building lists, routes, and/or pricing with partner carriers.
[Building] View Network Service Interface Pricing tab
Enable this permission if you want this user group to have the ability to view Network Service Interface Pricing.
This function enables you to view UNI and NNI pricing, where applicable.
[Building] View Parsed Address tab
Enable this permission if you want this user group to view the Parsed Address information within My Locations > Building Information tab.
[CPQ] Allow CPQ Pricing Grid Fields feed to CPQ Grid csv Export
Configured user group can view additional columns of data in CPQ step 3 export.
[CPQ] Allow Desired Speed and Term
Enables the configured user group to select desired speed and term in Step 2 of the CPQ process flow.
[CPQ] Allow duplicates in CPQ Network Intelligence csv
This setting enables you to choose which view you want the user group to see for CPQ Network Intelligence Exports.
When this permission is enabled/checked, the following conditions apply:
Export CSV will populate columns I through M (Network Connection Status, Building Connection Status, Media Type, Provider, and Original Supplier Name).
Any address with multiple building records will show as multiple rows.
When this permission is disabled/unchecked, the following condition applies:
Export CSV will NOT populate columns I through M (Network Connection Status, Building Connection Status, Media Type, Provider, and Original Supplier Name).
[CPQ] Assign/Reassign Quotes to any user
Enable this permission is you want this user group to have the ability to assign/reassign quotes to any user in the instance.
[CPQ] Enable Custom Fields in WIP
When enabled, configured user groups can view custom fields and/or flex fields in the Global WIP and My WIP grids
[CPQ] Mask Supplier Name
Enables a reseller/buyer to mask the actual supplier name when quoting to the buyers.
[Market] Allow Advanced Market Explorer
Advanced Market Explorer enables customers to turn on additional locations in the addressable market data to explore and gain greater insights in the market grid.
Allow Advanced Market Explorer must first be enabled by an internal Connectbase Administrator for enablement within your instance.
Once enabled for your instance, the Admin user can add the appropriate permissions to your user group.
[NNA] Run ROW NNA Analysis
Enables to run the Near Net Analysis. Must be enabled by an internal Connectbase Administrator for enablement within your instance.
Click Save.
Optionally, click to manage (select/deselect) the columns that this user group will be allowed to view in CPQ. Then, click .
CPQ View Rights
You can enable/disable CPQ columns (including custom columns) for a user group that would be visible to the members of that specific group only. You must be an Administrator to enable CPQ columns for a user group. To enable CPQ columns follow the steps below:
Login to TCW as an Admin.
Click > > from the sidebar menu.
Click the for the user group you intend to enable the CPQ columns for.
From the dialog box click on button.
A new dialog box presents all available column that you can select/deselect to be viewed by a specific user group.
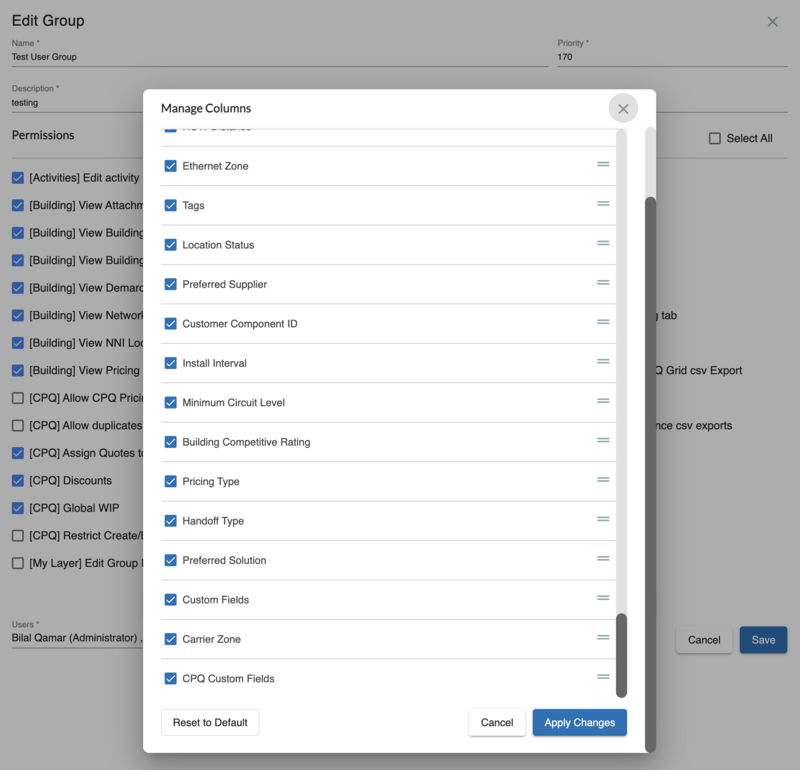
Click to save.
Note
You have the ability to customize column visibility for different user groups and rearrange them by simply dragging and dropping columns into the desired order.
Manage Advanced Market Explorer Columns
You can enable/disable Advanced Market Explorer columns (including building reference columns and building tenants columns) for a user group that would be visible to the members of that specific group only. You must be an Administrator to enable Advanced Market Explorer columns for a user group. To enable these columns follow the steps below:
Login to as an Admin.
Click > > from the sidebar menu.
Click the for the user group you intend to enable the CPQ columns for.
From the dialog box click on button or button as shown below
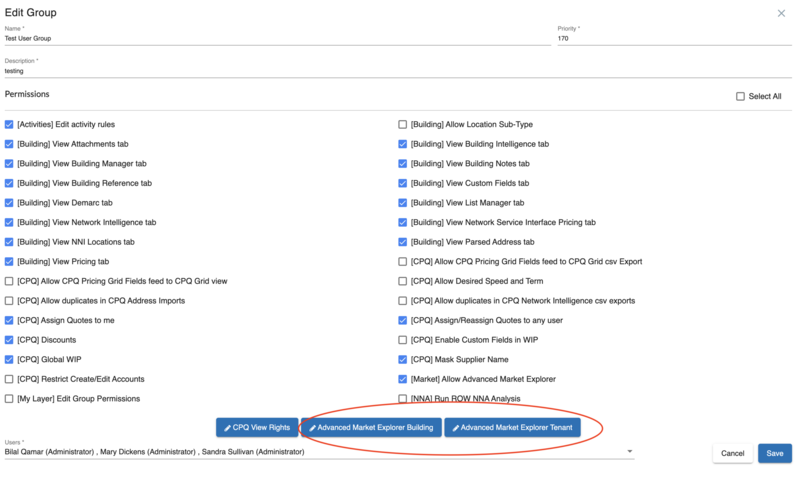
For a dialog box presents all available column that you can select/deselect to be viewed by a specific user group.
For a dialog box presents all available column that you can select/deselect to be viewed by a specific user group.
Click to save.
Note
You have the ability to customize column visibility for different user groups and rearrange them by simply dragging and dropping columns into the desired order.
You cannot delete a user group that has users in it. Move the user to another group to delete the user group.
To delete user groups:
Select from the navigation sidebar.
Click the icon next to a user group.
Note
The Default group and All Company Users group cannot be deleted.
Click to confirm.
This feature is used to define a user hierarchy for CPQ notifications and quote approvals.
To add a user hierarchy:
Click .
In the Add/Edit Levels section of the page, click the icon.
Result: The page expands to enable you to add/edit levels.
Type the name of the Department, Position Level Name and enable the Quote Approval toggle. An example is shown below.

To add additional user hierarchy positions, click the icon again.
Result: A new line displays to add another level.
When you have added/edited all levels, click the (disk) icon to save your changes.