Getting Started
Browser requirement
For optimal performance, use Google Chrome as your default browser for “The Connected World” software.
User roles
The Connected World has Role-Based Access Control (RBAC). The system supports various modes of operation for different types of users as defined below:
User Role | Description |
|---|---|
Administrator | Allows full access to the instance and enables you to edit, delete, and upload building lists. |
Edit User | Allows you to edit and upload building lists but does not allow you to delete anything from the instance. |
View User | Allows you to view, but not edit, information within the instance and all modules for which you subscribe. |
Billing Administrator | Provides the same privileges as the Administrator. Additionally, when a user clicks a link to request a subscription (i.e., Building Intelligence or Network Intelligence), the request is sent to this user's email address. |
Carrier Relations Admin | Allows you to edit user privileges and provides full access to the Network Radar module. |
Portal User | As a user of the serviceability portal, allows you to search one or multiple addresses/locations to determine the carrier’s serviceability at those location(s). |
Business Partner | Sellers using Business Partner Portal to share their serviceability and pricing to their off platform customers, set those customers up as users with a Business Partner role. |
Corporate User | This user can create all necessary attributes from their system into The Connected World to support synchronized quoting. All users who are directly associated to the Corporate User will then have access to all quoting results generated by the Corporate User. |
Anyone having Administrator-level privileges can add users to the instance. The authentication of the user login and password determines the specific actions each user-defined role may invoke. Depending on your user-defined role and module subscriptions, you may not be able to view or execute all functions described within this document.
Note
To enable user entitlements for module-specific subscriptions, please contact your designated Customer Success Manager for assistance or submit a support request at https://support.connectbase.com
Accessing the platform
To login to The Connected World:
Start your web browser and enter the following URL into the location/address field: https://cw.connectbase.com/login, then press .
Result: The Connected World Login dialog box displays.
There are two methods available for logging into the Connected World platform:
Using your Connected World Email and password.
Using Single Sign On (SSO) Login) – This option is available only if your company subscribes to Single Sign On capabilities with Connectbase.
To login with your Connected World credentials:
From the Connected World login dialog box, enter your and . Click the button.
To login with your SSO credentials:
From the Connected World login dialog box, click the button. Enter your and click . The system redirects you to your company’s SSO login screen.
When setting or resetting your user password, the password requires a minimum of 8 characters and must also include the following:
One or more uppercase characters
One or more lowercase characters
One or more numeric characters
At least one of the following special characters: #?!@$%^&*-
There are two methods you can use to change your user password.
If you forget your user password:
From the login screen, click ?
Enter your email address and press .
Result: A link is sent to your email enabling you to reset your password.
To reset your user password from the Main Menu:
Click the Company & Profile icon
 that appears in the upper right corner of the page.
From the drop-down menu, click .
Result: The Reset Password dialog box displays.
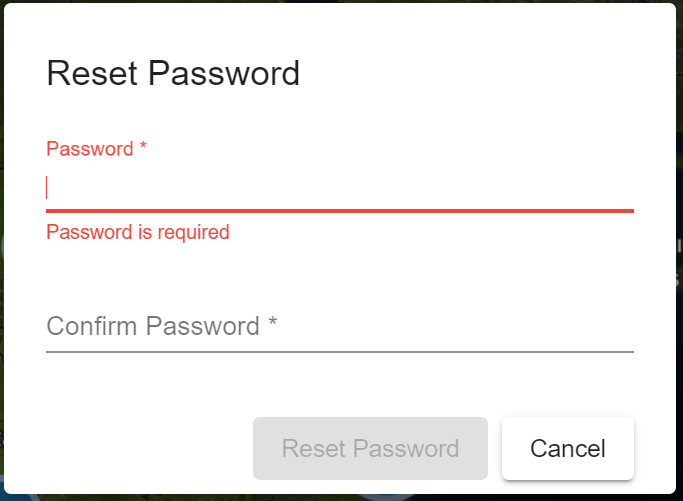
Type the new password in the field, then retype it in the field.
Click .
Map Filters icon 
From “The Connected World” map page, Map Filters  help you refine and/or limit the results viewed on the map. Map Filters also provides access to the “My Layers” function, and depending on your user entitlements, may also provide access to Market Explorer.
To access Map Filters, click the Map Filters icon that appears next to the search bar at the top right of the map page. Within the Map Filters, you can multi-select anything within a grouping, type of connection, access medium, etc.
Lists are restrictive, meaning that you do not need to check every box. If all boxes are left blank, all available data is presented exclusive of any filtering.
Filter | Description |
|---|---|
Buildings | Enables you to select or deselect specific configurations you wish to view on the map, including building categories, distance band, competitive ratings, and custom fields. NoteFor custom fields, users can click the drop-down menu to select from the available options. Also, the search value at the top of the drop-down menu to quickly locate a specific custom field name in the list. |
Networks | Enables you to select or deselect specific route configurations you wish to view on the map. |
Circuits | This function displays if you are a registered user of Network Radar. It enables you to select or deselect specific circuit configurations you wish to view on the map. |
Market Explorer | This function displays for only those registered users of Market Explorer with user-level entitlement only. Market Explorer strengthens the sales targeting efforts of network providers by enabling users to customize search parameters for any location or set of locations in a specific market. |
My Layers | Enables you to create your own hierarchical folder structure and upload data sets to organize and maintain data that is specific to your needs and business role. |
Click the Notifications icon  to view a list of activity notifications within the platform for your instance. The number shown in the red circle indicates the number of unacknowledged activity notifications available for review.
Within the Notifications page, you can select some, or all, notifications and either click Update Selected as Read to maintain the notification or click Delete Selected to remove the notification(s) from the list.
Click the Messages icon  to communicate with other users in the instance. Clicking this icon displays the list of all users in the instance. You can select any user from the list and send a message to the selected user.
Company & profile menu icon  displays the company name, instance ID, username, role, and other options as displayed in the below table:
Field Name | Description |
|---|---|
<Company Instance Name> | Company Instance Name |
<1234> | Instance ID |
<User Name> | Username |
Administrator | User role |
Profile | The Edit Profile dialog box displays where you can view or edit your personal account information. |
About | Displays the current software version, privacy policy, and terms of use. |
Feedback | Opens the Feedback form to send feedback to a TCW administrator. You can attach documents or files as needed to provide additional information. This action automatically generates a support ticket within the Connectbase support system. |
Reset Password | Displays the Reset Password dialog box where you can enter a new password and confirm the new password. |
Change Company | If a user is connected to more than one instance, you can switch between the instances using this option. |
Logout | Exits the platform. |
On the map view, icons and routes are color coded to aid in visual identification and the building map icons dictate the building category. When you click on a specific building icon, the building information pop-up window displays.
The following tables define the building icon colors, building categories, and pop-up building information functions.
Building icons - color-coded legend
The color of the building icons indicates the state of connectivity. These colors are stagnant and are not customizable.
This color | Indicates this connectivity status |
|---|---|
Dark Blue | OnNet, Connected |
Dark Green | Near Net, Not Connected |
Light Blue | In progress of becoming OnNet |
Light Green | Planned |
Red with bullseye | Prospect |
Orange | Indicates one of the following conditions:
|
Building icon categories
The building map icons indicate the building category.
Building icon | Building category |
|---|---|
| Commercial building |
| Data center |
| Health care facility |
| Government building |
| Residential building |
| School/University |
| Wireless |
| Multi classification (For example, Commercial building and Health care facility) |
When you click a building icon on the map, the Building Information pop-up dialog box displays, showing the address, the customer name, along with the access medium and status of the selected building. From the pop-up dialog box, you can click any of the following options for the respective action.
Note
When you navigate away from the Building Information pop-up dialog box by clicking on the Building icon, for example, a Back button is provided, so that you can easily return to this location on the map.
Icon | Description | Action |
|---|---|---|
| Magnifier | Click the Magnifier icon to view the Network Intelligence data (Telco, CableCo, Network Providers). |
| Check mark | Enables you to set a building as the default building on the map. Left click the building you want to mark as your default building, then click the checkmark. The check-mark changes to a double checkmark to indicate that this building is the default. The program will then open to this site every time you login. |
| Flag | Click the Flag icon to send a message to Customer Support regarding building updates or discrepancies. |
| Star | Click the star icon to save the building to your Favorites. Favorites are located in the My Locations Menu by selecting the icon in the upper right corner to display only your saved Favorite building locations. Favorite building locations are also identified in the third column of the My Locations page, indicated as Orange in color. |
| Dollar sign | This icon appears only if you have CPQ enabled. Clicking this icon loads the CPQ Quick Quote functionality and automatically loads the address into the user interface. |
| Building | Click the Building icon to view building details, products, and building reference information. In cases where a building has more than one associated Access Medium and Connection Status, the information dialog box displays both. For example, when a location has both OnNet and Near Net available. |
| Pencil | Click the pencil icon to update building information, provided you have Edit User or higher privileges. This icon does not display for View only users. |
It is good practice to log out of the platform whenever you have completed a session, rather than just exiting the program. Logging out of the application helps to clear the cache and can provide you with a better user experience.
To exit the platform:
Click the icon
 that appears in the upper right corner of the page.
From the drop-down menu, click .
