Manage Suppliers and Supplier Pricing
About Linkbase
Linkbase is a powerful module designed to help you organize, automate, and engage with partner network data. It delivers up-to-date visibility into OnNet and NearNet connectivity from your network partners, allowing you to efficiently search, discover, and assess new networks to expand your service reach.
With Linkbase, carriers can streamline how they manage OffNet relationships, enabling quick identification of potential partner networks based on geographic location and network capabilities. Automated building lists make it easier to stay current with partner network coverage and to evaluate opportunities for growth.
Linkbase supports more strategic carrier relations by improving how teams respond to serviceability inquiries. By simplifying the partner discovery process and enhancing access to qualified network data, it enables faster quoting, stronger alignment to revenue goals, and increased success in competitive deals.
Key Benefits and Capabilities
Connectbase provides one platform to manage partnerships with an easy-to-use search interface that accommodates bulk location lookup and the capability to prospect, find, and accept partners and their building lists with automated updates in their format of choice.
The Linkbase module provides the following key benefits and capabilities:
: Automated building lists enable you to visualise your partner’s buildings and keep that information current and accessible.
: Helps you gain market perspective and maximize growth with visibility; identify potentially new network partners based on location data and needs enabling providers to leverage connectivity while avoiding upfront building costs.
: Enables you to transparently share an overview of the routes and buildings you can reach through partners, and track product and pricing.
: Provides for faster, more effective proposals through enhanced view of serviceability.
: Provides on-board validation, standardization and enablement for all loaded buildings to create an organized, searchable database of fiber availability.
Use powerful filters (geography, serviceability, product type, access medium) to find ideal partners instantly.
Profiles reflect products, coverage, and engagement preferences. Linkbase matches demand and supply intelligently.
With just a click, launch pre-filled requests to initiate a partner connection with minimal coordination.
Both parties must approve a connection before any data is shared. You control visibility and access.
includes a powerful new automation tool , designed to streamline how you discover, evaluate, and connect with partnerss on The Connected World Platform. This feature enhances collaboration across the ecosystem by offering a centralized, intuitive interface to identify official sellers and buyers and initiate connections seamlessly.
presents an up-to-date, alphabetically organized directory of all verified sellers and buyers within the platform. Each partner is listed under the company name, ensuring consistency and clarity during the search and selection process. All external API integrated sellers are categorized and included in the sellers list. To make navigation even easier, the module includes a smart search function that allows you to filter partners by:
Country (geographic location of services)
Product (such as Ethernet, DIA, Wave, etc.)
Access Medium (e.g., Fiber, Copper, Fixed Wireless)
Approval Status (If a partner needs authorization to get connected. means all incoming connection requests are pre-approved)
This makes it effortless to identify the right partner based on your specific requirements. Once you've identified a potential partner (seller or buyer), enables you to request a connection directly through the interface. The connection request process is automated and integrated with Connectbase Customer Support Desk, ensuring transparency, traceability, and timely updates at every step. Once the request is submitted, both parties are notified, and the connection workflow progresses providing transparency to all parties.
Find Partners section includes the following listings under two separate tabs:
All Official Sellers on the TCW platform
All external API-integrated sellers on the TCW platform
All Official Buyers on the TCW platform
Note
These lists do not include sellers or buyers from the Global or Retail platforms.
Below is an example of the Find Partners interface as it appears within the Linkbase module:
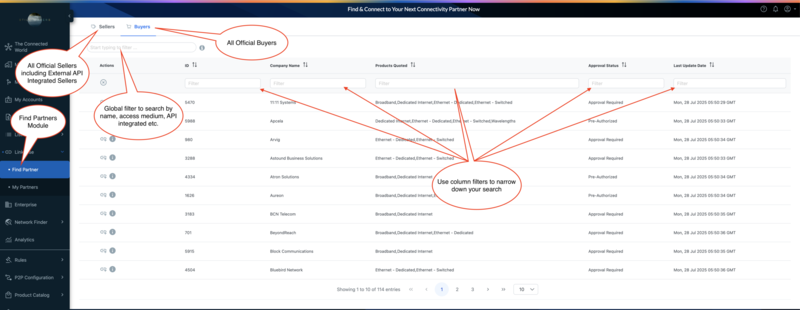 |
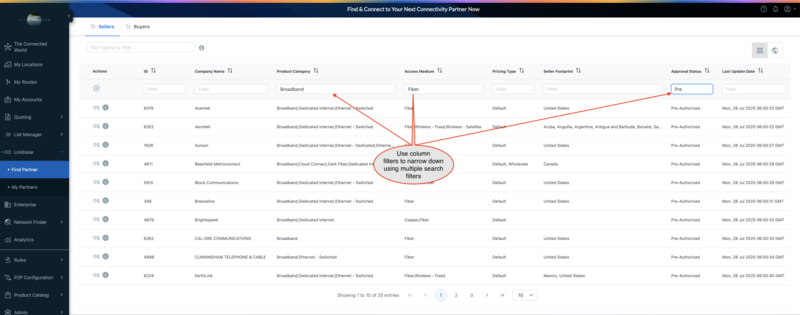
You can use column filters to narrow down search results to match your requirements.
 |
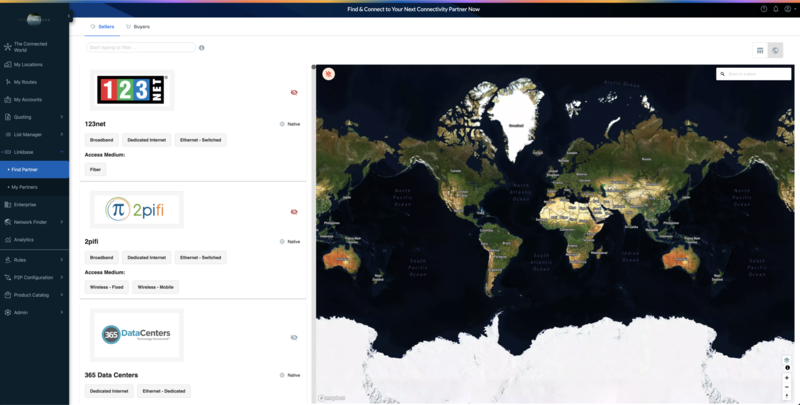
Map view enables you to see the network coverage of a partner if it operates in multiple countries. You can use the map view to view and search the network coverage of each partner by enabling or disabling the visibility of specific partner on the map.
Find Partners Map View
Map view displays the network coverage of a seller along with the products and access medium. To use the map view click on the Map icon of top right corner on page. Map view is only available for official sellers in TCW platform under the tab. By default all sellers are listed in alphabetical order as shown in the following example:
 |
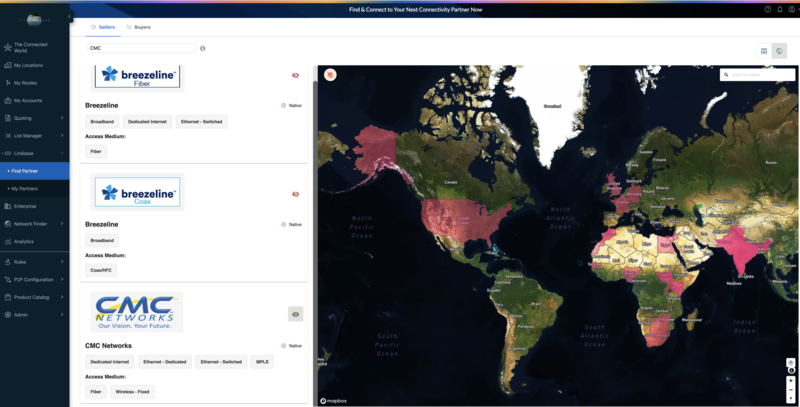
You can use the search function to search for a specific seller and click on the Show/Hide icon  (in front of the partner name) to view the network reach of the partner. Map view shows the network coverage if it operates in multiple countries as shown in the below example:
 |
Click on clear map icon  to clear the selection from the map view.
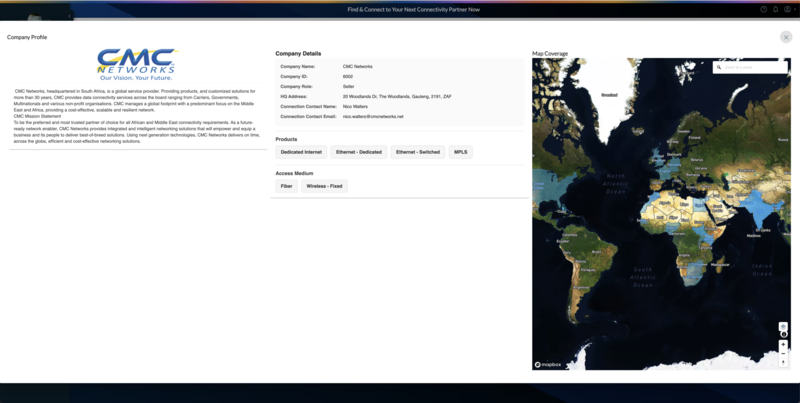
Viewing Company Information
To see more detail about a partner click on the information icon  located on the left side of the company name. This displays a new window containing more information about the company as shown in the below example:
 |
Connection Request
Find Partners comes with a powerful automated connection request process. You can generate a connection request with a particular partner by following the below process:
Under Linkbase click .
If you are a select the tab to search for the Seller to request a connection. Similarly as a you can select tab to search and request a connection.
Search for the partner you intend to initiate a connection request.
On the left of the partner name click on the icon
 . If you have already initiated a connection request it displays the ticket information containing the connection request. If there is no prior connection request, it opens a connection request form as shown in the below example.
Note
To raise a connection request you must be an or in your instance.

Select the products you want to select and add any comments for the seller. The "" button is enabled.
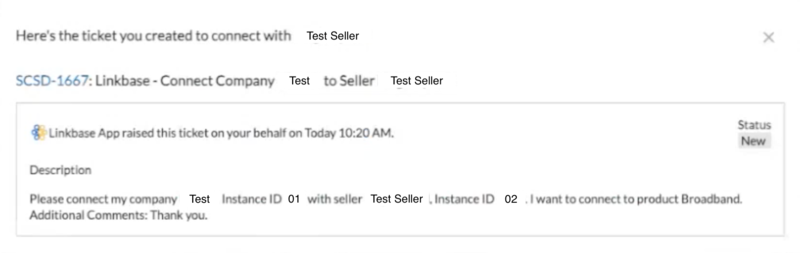
Click the "" button to initiate the connection request.
This immediately creates a Service Desk (Customer Support Desk) ticket and the connection process gets initiated. The following message displays with the ticket number.
Login to Connectbase Customer Support Desk to see the progress on the connection request.
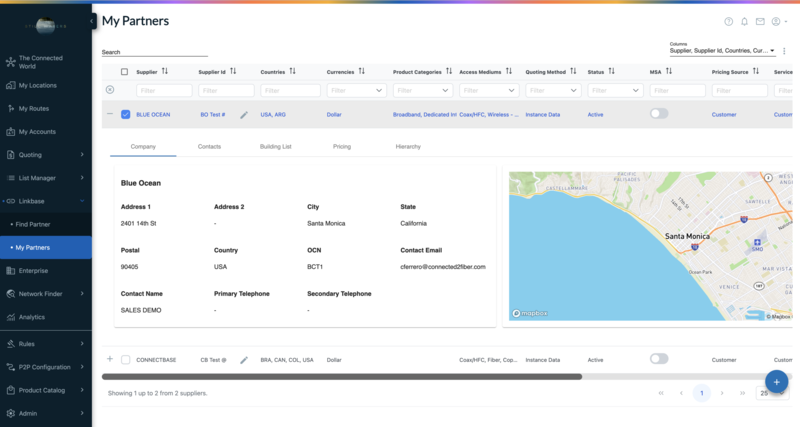
In , page enables you to view all your Linkbase Partners as well as External and Internal API connections in a single location within the platform.
To access My Partners:
Click from the navigation sidebar.
Click under the .
Result: My Partners page displays.
By default My Partners page displays listing of your configured suppliers.
For each supplier listed, the following data fields display:
Field Name
Description
Supplier
Indicates the name of the supplier, i.e., the origin instance name or external API name.
Supplier Id
This field enables you to assign a custom Id to a supplier. This is an alphanumeric field and editable.
Countries
Lists the country/countries in which the supplier has a presence.
Currencies
The currency, or multiple currencies, bonded to the supplier pricing data.
Product Categories
All products available from the supplier, for the customer instance.
Access Mediums
The medium used for connectivity to the building or specified location.
Valid values include:
Coax/HFC
Copper
Fiber
Wireless – Fixed
Wireless – Mobile
Wireless – Satellite
Other
Quoting Method
Internal API – Data is provided by internal Connectbase API
External API – Data is provided by an external 3rd party API
Instance Data – Data that was loaded by the customer into their own instance.
Direct Import - Pricing data imported from the supplier instance.
Internal API - Market Data Insight: Shows the flag set in the instance settings on the back end and uses the Connectbase proprietary market data for quoting purposes.
Internal API - Supplier Carrier Data: Shows the flag set in the instance settings on the back end and uses supplier data for quoting purposes.
Status
The supplier status, Active or Inactive
MSA
Master Service Agreement: Yes/No
Pricing Source
The platform does not currently track where the pricing data is derived from (the customer’s instance name, a different instance, loaded by another Connectbase customer (Supplier), or from Connectbase product data).
This field, when populated, will enable visualization of both the pricing source and an indication of who provided the pricing.
Serviceability Source
The platform does not currently track the source of the serviceability data (whether it is derived from the customer’s instance name, a different instance, loaded by another Connectbase customer (Supplier), or from Connectbase product data).
This field, when populated, will enable visualization of both the supplier data source and an indication of who provided the data.
Building List/Pricing List -> Customer
Internal API -> Customer
External API -> Supplier
Serviceability Confidence
Indicates whether the serviceability data for the instance is based on buildings or geography. Multiple values are allowed (i.e., extracted from the customer instance, as well as different instances, retrieved by internal API, or not. For external APIs, this field is always set to "Buildings".
Building List/Pricing List -> Buildings
Internal API -> Buildings/Geography
External API -> Buildings
Serviceability Update
The last date a list was uploaded by the customer (New Received on Linkbase Buildings), or Real Time (External APIs), or Check Locations (Internal APIs or other customer instances).
Building List/Pricing List -> Date (yyyy-mm-dd)
Internal API -> Check Locations
External API -> Real Time
Preferred Supplier
Toggle to ON (blue) to flag this supplier as a preferred supplier.
Supplier Penalty
This is an optional feature that enables you to Blacklist (block) a supplier or Suspend (temporarily block) a supplier.
If the supplier is flagged as blacklist or Suspend, you will have to select Enable to reactivate the supplier.
From the page, you can add a new supplier to your supplier's list.
To add a new supplier:
Click from the navigation sidebar.
Click under .
Click Plus Icon
 on bottom right corner of the page.
Result: Add supplier dialog box appears as shown in below example.
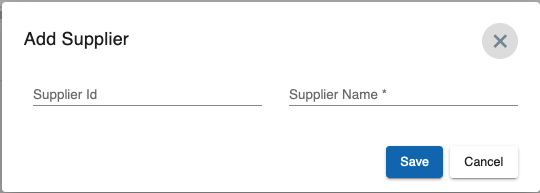
Enter supplier id of your choice.
Note
Supplier id should be unique within the instance. This field can accept any alphanumeric value as supplier id.
Start typing the name of the desired supplier in "Supplier Name" field. List of available suppliers, starting with the typed letters populates in the drop-down list as shown in the below example.
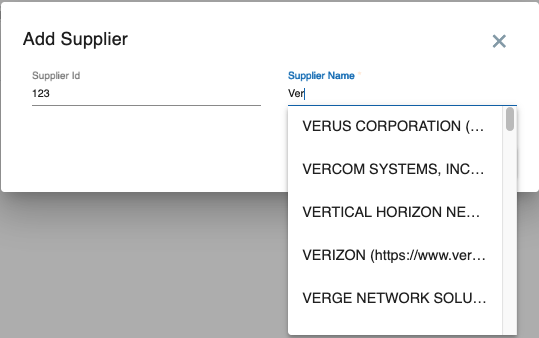
Select your desired supplier from the list.
Click "Save".
Result: The newly added supplier appears in the suppliers list.
From the page, you can export supplier record(s) to an Excel spreadsheet.
To export supplier record(s):
Click from the navigation sidebar.
Click under .
Result: page displays.
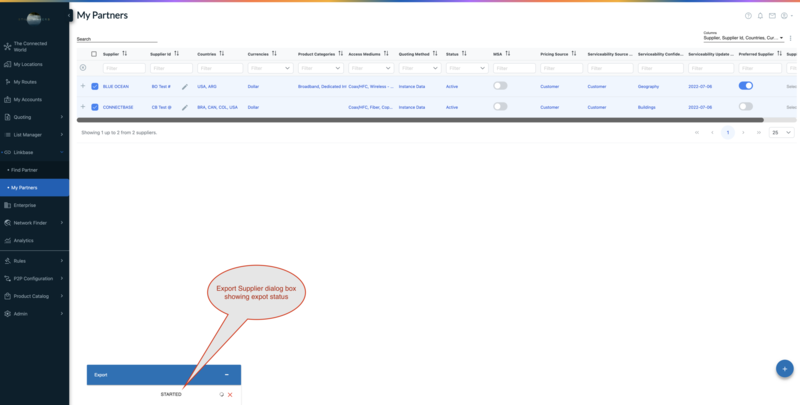
Select one or more suppliers from the suppliers list as shown in the below example.
Click
 (vertical ellipses) and select .
Result: A dialog box at the bottom of the screen shows the export progress status STARTED as shown in the below example.
On completion, the status changes to FINISHED as shown below.
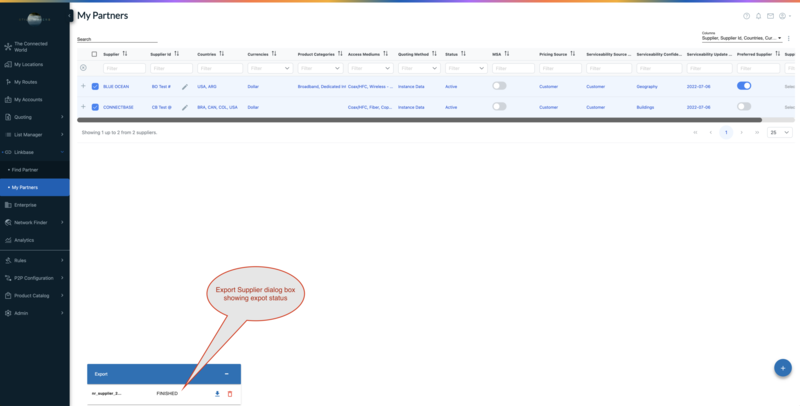
Click Download
 button, next to the FINISHED status.
Result: Save dialog box appears.
Click to save the Excel file on your system.
Import function enables you to modify the Supplier ID for one or more suppliers. Supplier ID is a unique ID within the instance that you can use to identify a specific supplier/provider.
To update/modify supplier ID in Linkbase:
Click from the navigation sidebar.
Click under .
Result: page displays.
Click
(vertical ellipses) and select .Result: Supplier import dialog box appears as shown below:
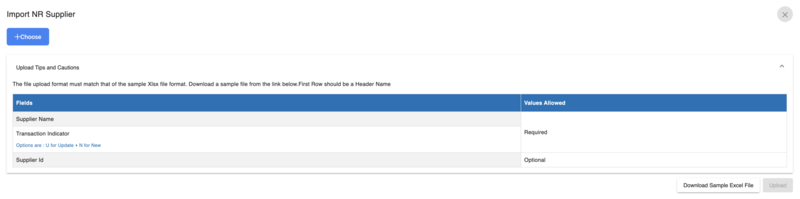
Optionally download the sample Excel file by clicking on and update the supplier name and supplier ID in respective columns.
Note
It is recommended to export the existing supplier list and amend the supplier ID and import the same file without making any other changes. This will update the supplier ID for the desired suppliers.
Save the Sample Excel File.
Click from the import dialog box and select the file to import the recently saved excel file and click the button.
Result: Following dialog box appears showing the import progress.
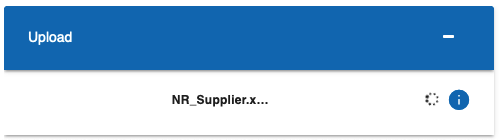
You can see the upload status by clicking on the information icon
 in the above dialog box, which will show the following dialog box:
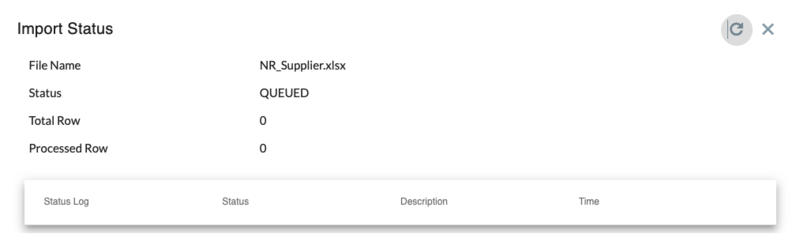
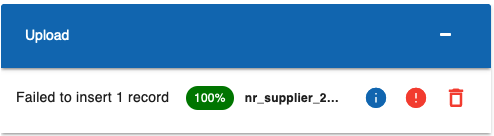
Once upload is complete, following dialog box appears showing the status of the import/upload.
A confirmation email shows the results of the import process. A sample email is shown in the below example.
Notice
Hi {user first name},
NR Supplier import details are below.
Company Name : StillWaters Documentation
Domain : https://cw-api.connectbase.com
File Name : nr_supplier_20230809121137_1.xlsx
File Uploaded Status : Unsuccessful
Date of Uploaded : 09/08/2023 15:47:27
Transaction Indicator U :
Success Records count : 2
Internal Duplicate Records count : 0
Invalid Supplier Name count : 1
Duplicate Supplier ID: 0
Records with Invalid Transaction Indicator : 0
Download
Thank you,
Connectbase
Refresh the supplier manager page to confirm the changes.
Expanding the supplier record
To expand supplier record details in My Partners:
To the left of the field, click the  sign.
sign.
Result: The dialog box expands to show the following five tabs:
Note
These tabs are only visible if the supplier is manually added in Linkbase and has shared their building/pricing lists using List Manager. If the provider is connected through internal API, only Hierarchy tab is available when expanding the supplier record.
Company tab – Displays the name, address, and contact information for the supplier.
Contacts tab – Where applicable, provides the first name, last name, title, escalation level, email, and phone information for the key contact.
Building List tab – Displays the supplier’s building list.
Pricing tab – Where applicable, enables you to import/export the supplier’s price list.
Hierarchy tab - Where applicable, enables you to view, add and/or edit parent supplier
When you expand the supplier record, the Company tab displays as the default view and enables you to see address information for the supplier.
 |
Click the tab to view a list of contacts that have been previously added for this supplier or to add additional contacts.
To add a contact:
Click the
sign to the far right of the Contacts page.Result: The record expands so that you can add and save the supplier contact information.
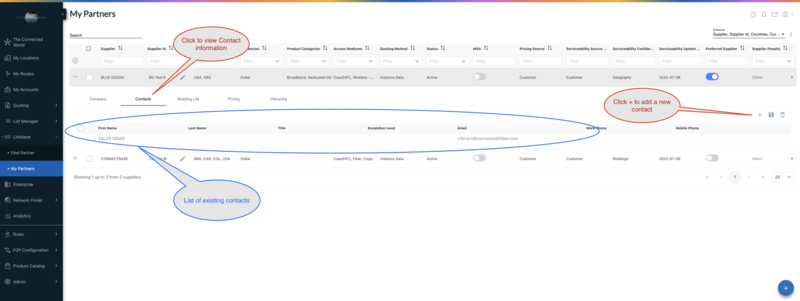
Complete the information fields as needed: as shown in the below example.
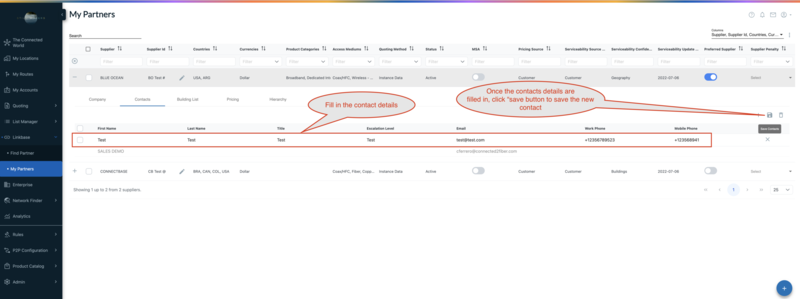
Click the (disk) icon.
Note
You can add CPQ contacts in Supplier Manager for Suppliers connected via Internal API or External API. Once contacts are added, you can use these to facilitate the Bid Management workflow.
The Building List page displays a compilation of the providers that have agreed to share their building lists with you. The Building Lists tab enables you to receive and view those provider’s building lists.
Viewing the Building List page
To view the Building Lists page:
Click from the navigation sidebar.
Click under .
Result: The page displays.
Use the to locate the name of the supplier in the supplier list or use the in the Supplier Name field.
Click the
sign to the left of the Supplier field to expand the record.Click the tab.
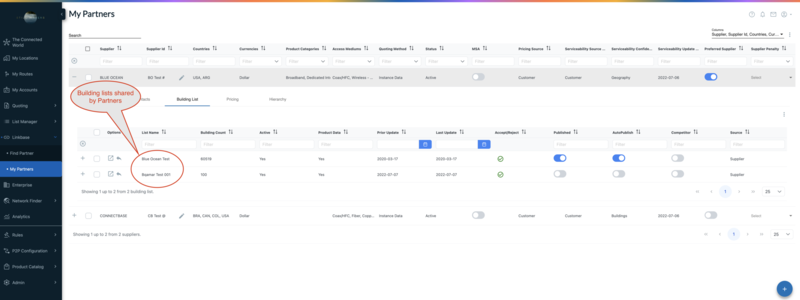
Result: One or more building lists displays on the page
Click the
sign to the left of the building list to expand the record.Result: The Building List page displays. The following example shows a populated Building List page.
Building List page properties
The Building List page provides the following filterable fields:
Field Name | Description |
|---|---|
Options | Provides the following options for obtaining/requesting more information
|
List Name | If this list was assigned a name during creation, the list name displays here.
|
Building Count | Identifies the number of buildings contained within the building list. |
Active |
|
Product Data | Indicates if Products and Services for pricing is turned on/off. If customer has only buildings loaded, this field is set to No. |
Last Received | Indicates the date that the last updated building list was received from the supplier. |
New Received | Indicates the date that a new building list was received from the supplier. |
Accept/Reject |
|
Published | Toggle field that you use to publish/unpublish supplier lists.
NotePublished lists are added to “”. If this field is set to No, the supplier data will not be included in CPQ quotes. |
Auto Publish | Enables you to specify one or more distribution lists for automatic updates, thereby eliminating the need for the user to re-accept every time there is an update. The AutoPublish toggle is blue when the feature is turned On/enabled or greyed out when the feature is Off/disabled. To enable a distribution list for automatic updates:
|
Competitor | On/Off toggle field that you use to identify if the company from which the list is received is a competitor. The selection controls whether the building provider shows as a Competitor, or as a Provider, within Building Intelligence. |
Source | Indicates if the supplier list is from an internal supplier building list or a supplier import file. |


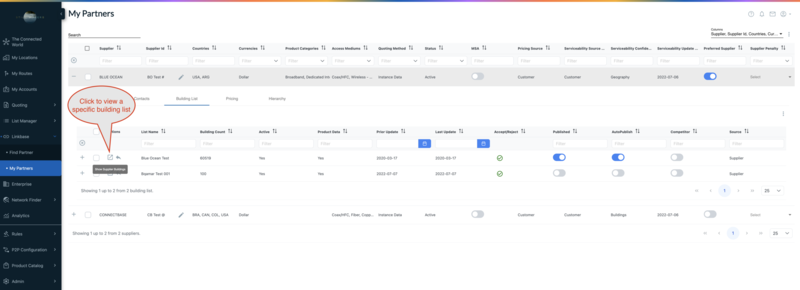
To view a supplier building list:
Click from the navigation sidebar.
Click under .
Result: The page displays.
Use the Search bar to locate the name of the supplier in the supplier list or use the Filter in the Supplier Name field.
In the Options column to the left of the supplier name, click the
 as shown in the below example.
Result: The supplier building list displays.
The supplier building list displays as showin the below example.

From the building list, click the
 locate building icon to the left of a building to locate the selected building on the map.
To request a supplier building list:
Click from the navigation sidebar.
Click under .
Result: The page displays.
Use the to locate the name of the supplier in the supplier list.
To the left of the field, click the
sign.Click tab.
Result: Building Lists page displays.
In the Options column to the left of the supplier name, click the
 .
.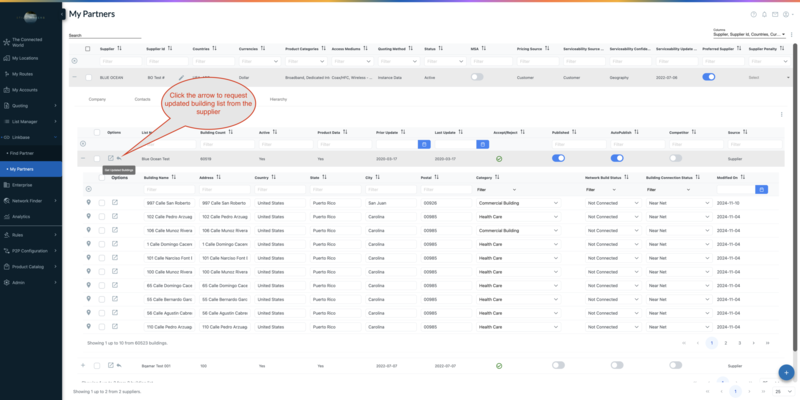
Note
If the buildings were uploaded directly into Linkbase, the GET request does not display.
Result: An email notification is sent to the supplier requesting an updated building list.
Import function can be applied to individual lists. Follow the process below to import a supplier building list in .
To import a supplier building list:
Click from the navigation sidebar.
Click under .
Result: The page displays.
Navigate and expand the intended tab in the supplier record.
Click the (vertical ellipsis) located in the upper right corner of the page and select as shown in the below example.
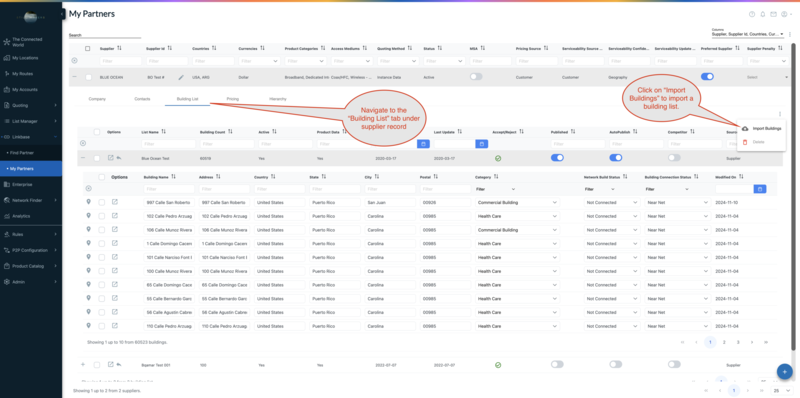
Click the button to download a sample import file and verify that your import file is properly formatted.
Fill the downloaded file and save it on your system.
From the dialogue box, click the button to locate and select the file you wish to import.
Click the button.
Result: An upload progress message displays in the lower right portion of the screen.
To delete a supplier building list:
Click from the navigation sidebar.
Click under .
Result: page displays.
Use the to locate the name of the supplier in the supplier list.
Click the box that appears to the left of the supplier name field to be deleted.
Result: A checkmark appears in the box to indicate selection.
Click the (vertical ellipsis) that appears in the upper right corner of the page and select as shown in the following example.
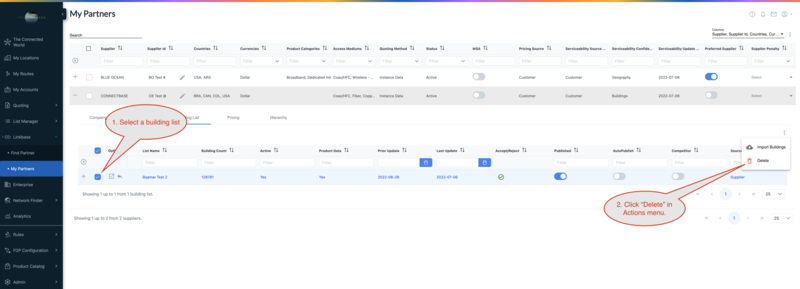
When prompted, confirm that you want to delete the selected supplier from the list.
The page enables you to receive and view OffNet Pricing from those provider’s that have agreed to share their Connected World product pricing catalog with you. If you have a rate card from a supplier, you can import the rate card. You can also send it from one customer’s instance to another.
To view the Pricing Manager page:
Click from the navigation sidebar.
Click under .
Result: page displays.
Use the to locate the name of the supplier in the supplier list.
To the left of the field, click the
sign.Click the tab.
Result: The Pricing page displays.
The following is an example of Pricing page.

Pricing page properties
The Pricing Manager List page provides the following filterable fields:
Field Name | Description |
|---|---|
Options | Provides the following options for obtaining/requesting more information: Click the Click the |
List Name | If this list was assigned a name during creation, the list name displays here.
|
Record Count | Signifies the number of pricing line items that were sent over. |
Active |
|
Previous Update | Indicates the date that the previous updated pricing list was received from the supplier. |
Last Update | Indicates the date that a new pricing was received from the supplier. |
Accept/Reject |
|
Published | Toggle field that you use to publish/unpublish pricing lists.
|
Auto Publish | Enables you to specify one or more distribution lists for automatic updates, thereby eliminating the need for the user to re-accept every time there is an update. The AutoPublish toggle is blue when the feature is turned On/enabled or greyed out when the feature is Off/disabled. To enable a distribution list for automatic updates:
|
Contact Name | The name of the contact at the supplier site that manages the distribution of the pricing lists. |
To view a supplier’s pricing list:
From the page, click the
 icon in the Options field for the supplier pricing list you wish to view.
Result: The OffNet Pricing page displays, as shown in the following example. Note that the pricing is OnNet for the supplier who is providing the pricing, but OffNet for the receiver.

Import function can be applied to individual lists. Follow the process below to import pricing from a supplier.
To import a supplier pricing list:
From the page, scroll to the right of the tab, click the (vertical ellipsis) located in the upper right corner of the tab and select .
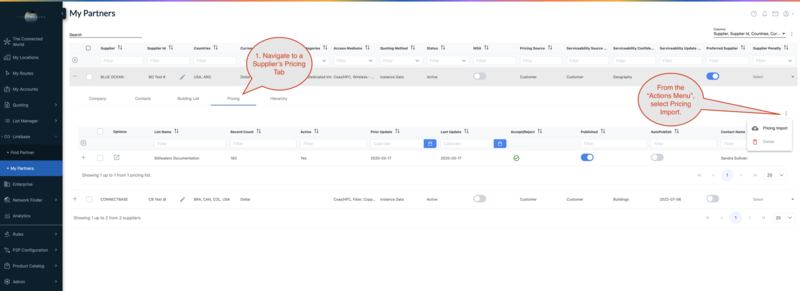
Optionally, but recommended, click the button to download a sample import file and verify that your import file is properly formatted.
Complete the following required fields:
Supplier Name
Contact Name
Contact Email
Provide a name for the list in the field.
Note
List Name field is optional for a direct import only.
Click the button to locate and select the file you wish to import.
Click the button.
Result: An upload progress message displays in the lower right portion of the screen.
To delete a supplier pricing list:
Click tab.
Click the box that appears to the left of the pricing list to be deleted.
Result: A checkmark appears in the box to indicate selection.
Click the (vertical ellipsis) located in the upper right corner of the frame and select .
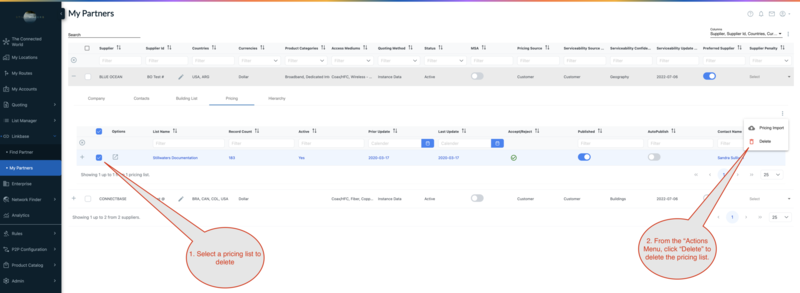
When prompted, confirm that you want to delete the selected supplier from the list.
The tab within a Supplier record enables you to see a listing of all the supplier inventory that is configured within your instance. It shows you all the APIs that Connectbase has set up and connected to your instance, including the companies, products, and how they are connected. An example of the hierarchy tab is shown below:
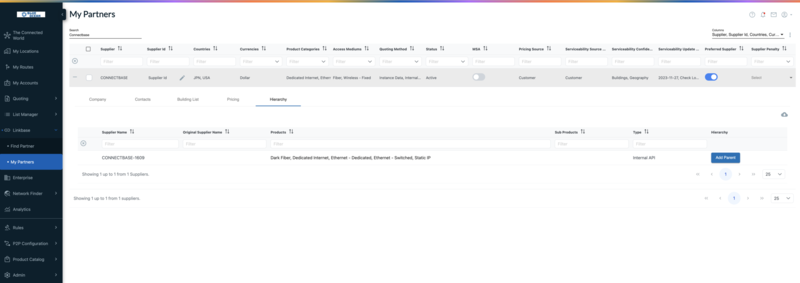 |
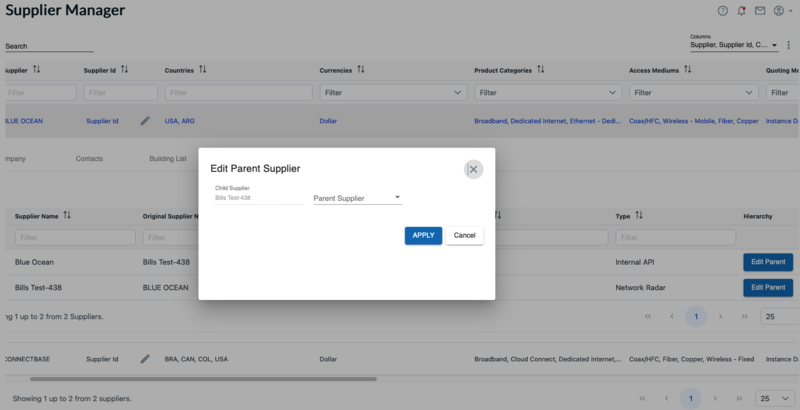
You can also assign the supplier a by clicking on the button in front of the supplier name under tab. To Add a Parent follow the procedure below:
Click on button in front of supplier name under tab.
Result: dialog box appears as shown below:
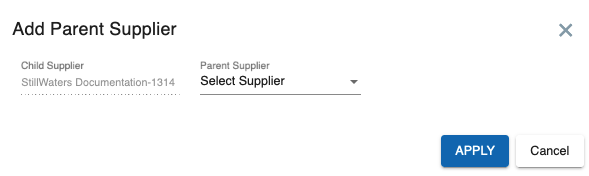
Click on drop-down arrow.
Result: Drop-down list shows the available supplier names that can be added as Parent Supplier.
Select a supplier name
Click button
Result: The selected supplier is assigned as a Parent supplier and button changes to button as shown in the below example.
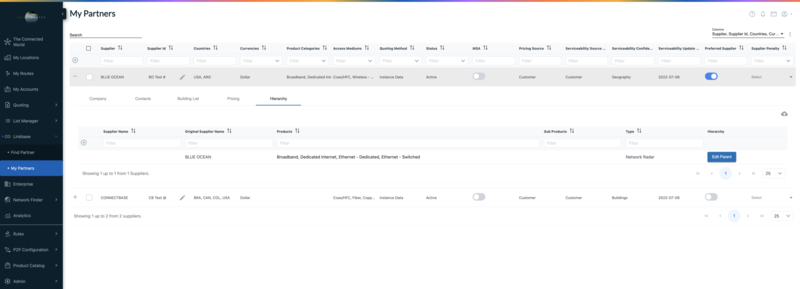
Note
One supplier can have one other supplier as a Parent only. When a suppliers is assigned a Parent Supplier, the button changes to Button. You can edit the parent supplier if the status of a supplier changes accordingly.
The Original Supplier Name is used to indicate a parent company name for the provider/supplier that will flow through to CPQ, APIs, and other areas of the platform.
Notice
As companies go through various mergers, acquisitions and name changes etc. this field helps you keep track of the current versus previous provider/supplier name and view both the parent and current provider/supplier name throughout the quote process. For example, the provider/ supplier TWC may be defined as Original Provider/Supplier Name = Charter (TWC).
To edit a original supplier in the hierarchy:
Under tab to the right of the Supplier Name field, click .
Result: The dialog box displays
From the drop-down menu, select the name of the correct supplier.
Click .
Result: The Original Supplier Name now displays and is carried through the CPQ, APIs, and other relevant grids within the platform.
The tab within a Supplier record enables you to capture and share important information about each partner in a structured way. Partner Notes tab can be accessed by expanding the supplier record under My Partners.
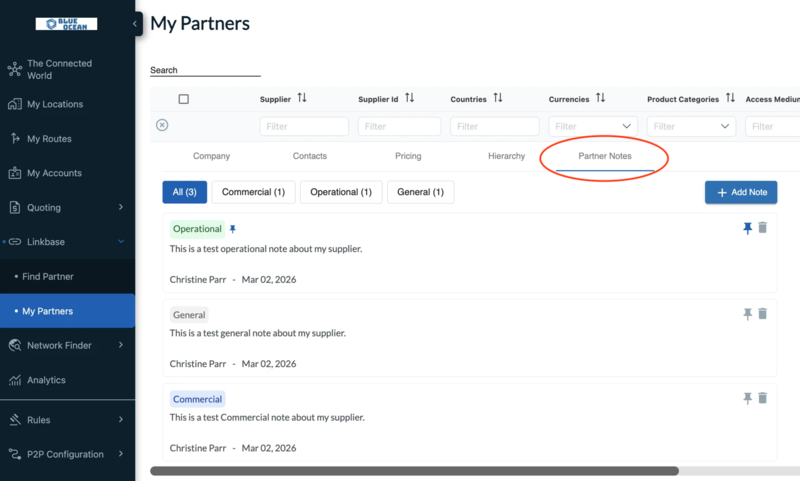 |
Partner Notes are organized into four sections:
All
Operational
Commercial
General
You can add new notes with:
Free‑form text.
A required category: Operational, Commercial, or General.
Once saved, a note:
Appears in the All tab.
Appears in the tab for its selected category.
Displays the author name and creation date.
Managing notes:
From the All tab, each note is clearly labeled with its category.
You can pin notes so they stay at the top of:
The All tab.
The corresponding category tab.
You have the ability to delete the notes.