Configure Geography Rules
Geography Pricing Tiers
From the Rules > Geography > Pricing Tiers menu , you can set up standard pricing by geography type (State, MSA, City, SWC CLLI, Country, Zip Code) or custom pricing at the building level by Location.
Geographies is an optional feature that you can use to define your standard pricing catalogs by geographic areas. You can add up to a maximum of ten geographies per customer instance; however, you can add multiple geography values to a single geography. For example, you can add multiple states to a single geography.
Supported geography types include:
State
MSA
City
SWC CLLI
Country
Zip Code
Location (custom geography type used for building-level pricing. See "Setting Up Customized Pricing by Location" below).
Boundary
LATA
Note
When processing pricing catalogs with geographies, the higher the priority, the more precedence it receives. For example, if you set MA state pricing as Priority=1, it would supersede Boston city pricing, if it is ranked with a lower priority.
From the Rules > Geography > P2P Zone Rules menu, you can configure zone geographies and pricing calculations to be applied between two target locations, such as end user to end user or end user to Data Center, referred to as A and Z locations.
A and Z locations are used to describe points on a telecommunications circuit that is connected to a customer. This can be a circuit used for voice, data, or both. Each letter indicates a specific position, either physical or logical, on the circuit. The A point indicates the carrier's location or network, and the Z point indicates the customer's location or network. These locations can be facilities, rooms in a facility, or specific connections to cabling or equipment. The use of A and Z designations to describe locations can be seen on new circuit orders, pricing, customer or carrier trouble tickets, and circuit disconnect orders.
Note
A and Z locations are applicable for Point-to-Point, Ethernet - Dedicated, Ethernet - Switched, and MPLS networks.
Configuring Point-to-Point Pricing
Within TCW, Admin users can configure zone geographies and pricing calculations to be applied between two target locations, such as End User to End User or End User to Data Center, referred to as A and Z locations.
Note
A and Z locations are applicable for Point-to-Point, Ethernet-Dedicated, Ethernet-Switched, and MPLS networks.
A and Z locations are used to describe points on a telecommunications circuit that is connected to a customer. This can be a circuit used for voice, data, or both. Each letter indicates a specific position, either physical or logical, on the circuit.
A location indicates the carrier's location or network
Z location indicates the customer's location or network.
These locations can be facilities, rooms in a facility, or specific connections to cabling or equipment. The use of A and Z designations to describe locations can be seen on new circuit orders, pricing, customer or carrier trouble tickets, and circuit disconnect orders.
Note
P2P Pricing Optimization
For improved P2P pricing performance response time, the system breaks the locations down into small batches, processing approximately 20 - 30 threads in parallel to reduce the number of times required to identify individual pricing zones.
Prerequisites
At a minimum, the instance must have default pricing configured.
Pricing Tier geographies, were applicable, have been defined.
Configuration process flow
Step 1: Define your P2P Zone Rules. When you configure P2P Zone Rules for P2P pricing, the zone rule geography is mapped to the Pricing Type fields within My Buildings for those locations. See Defining the P2P Zone Rules
Step 2: Configure the pricing calculations to be applied between two target locations. See Configuring the Pricing Calculator
There are two methods available for defining your P2P Zone Rules:
Import P2P Zone Rules in bulk format
Manually define P2P Zone Rules
To import P2P Zone Rules in bulk format:
As Admin user, click from the navigation sidebar.
Result: The P2P Zone Rules page displays.
Click the (three dots ...) to the right of the Manage Columns field.
Click .
Result: The Import Zone Geographies dialog box displays.
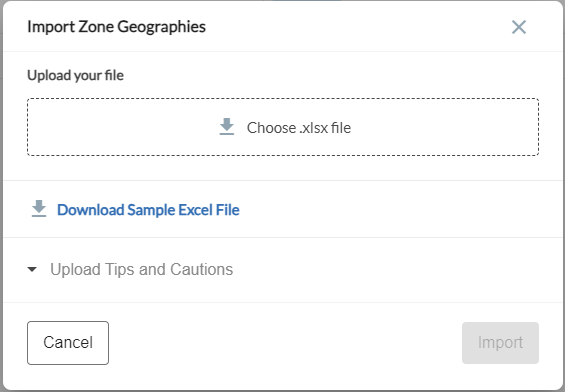
Click Download Sample Excel File to confirm that your CSV file for import matches the required format. You can use the template to create your import file.
Result: The sample excel file is downloaded to your local system.
Important
Connectbase recommends that you limit the size of your import file to no more than <2500 records at a time.
Prior to uploading your CSV file, click Upload Tips and Cautions to review the requirements and recommendations.
Result: The Upload tips and Cautions dialog box displays.
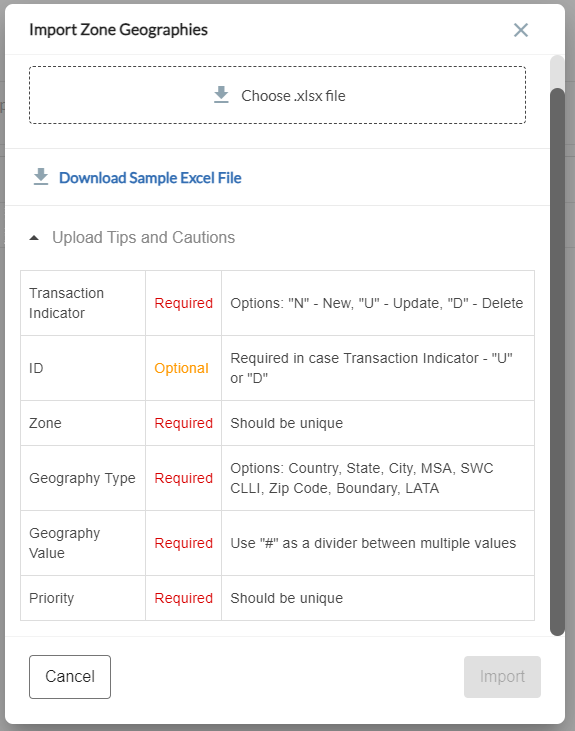
Click and select your file for import.
Click .
Result: The P2P Zone Rules display on the P2P Zone Rules page.
To manually define the P2P zone rules:
As an Admin user, click from the navigation sidebar.
Result: The P2P Zone Rules page displays.
Click the button located at the top right corner of the page.
Result: The Add New Zone Geography dialog box displays.
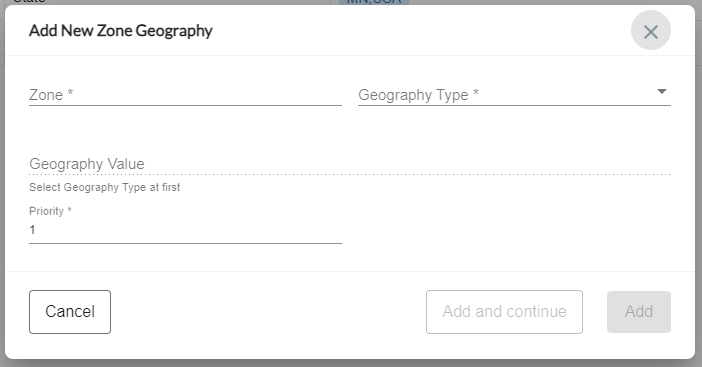
Complete the Add New Zone Geography dialog box as follows:
Field Name
Action
Zone (required)
Assign a number or name to uniquely identify this zone.
Geography Type (required)
From the drop-down list, select the type from the following options: State, City, MSA, SWC CLLI, or Country
Note
Connectbase does not recommended the use of “Location” as a Geography Type for P2P pricing.
Geography Value (required)
In the Search field, search for the geography value(s) to associate with the selected Geography Type. For example, if you choose State as the Geography Type, search for the respective state(s) that you want to include in this zone.
Priority (required)
Select the desired priority number from the drop-down list.
Click (or if you have additional zones to define).
The next step requires you to configure the pricing calculator. See Configuring the Pricing Calculator
At a minimum, you must configure at least one default formula for P2P pricing to be returned.
To configure the Pricing Calculator:
As an Admin user, click from the navigation sidebar.
Result: Pricing calculator page displays.

Click the button located at the top right corner of the page.
Result: The Add New Formula dialog box displays.
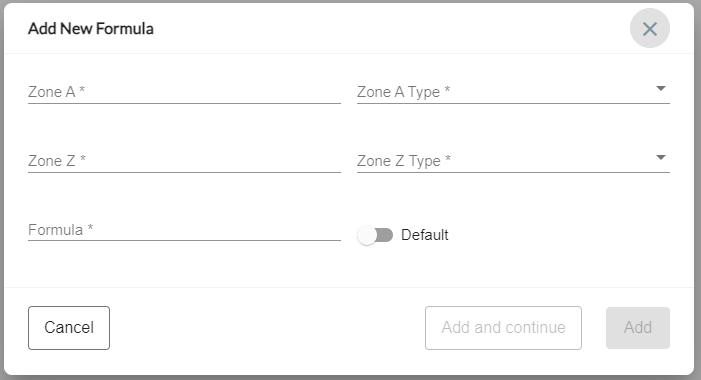
Complete the Add New Formula dialog box as follows:
Field Name
Action
Zone A
Assign a number/name to uniquely identify Zone A.
Zone A Type
From the drop-down list, select a type for Zone A.
The Zone Type must match the Pricing Type in the building record to return pricing.
Options include:
End User
Data Center
POP
Zone Z
Assign a number/name to uniquely identify Zone Z.
Zone Z Type
From the drop-down list, select a type for Zone Z.
The Zone Type must match the Pricing Type in the building record to return pricing.
Options include:
End User
Data Center
POP
Formula
Enter the formula calculations to be applied between the two target locations into the P2P calculator.
Combinations must be unique based on A Zone + A Type +Z Zone + Z Type. The system displays an error message if repeat A-Z combinations are attempted.
Example calculations include:
A+Z (add the two access prices together)
(A+Z)*1.1 (Add access prices and add 10%)
Note
All fields are required and must be completed prior to proceeding.
Optionally, click the toggle button to ON (blue) if you want this calculation to be used as your default formula to be applied to all pricing, when the specified criteria does not match a given formula.
For example, you create a formula between Location A “Massachusetts” and Location Z “Virginia”, and Zone Type “End User”. If one of the locations does not match the specific criteria, then the default formula would be applied to that location. For example, Location A is “Massachusetts”, but Location Z is “Kansas”, not Virginia.
Click or if you have additional formulas to define.
From the menu, you can set up your NNI inventory and pricing by geography to be carried through to the CPQ quoting process.
Once configured, Cross Connect MRC/NRC and Cross Connect Cost MRC/NRC pricing is automatically pulled into all applicable quotes in CPQ. A cross connect is a physical hardwired cable that provides a direct connection between two different termination locations within a Data Center.
For more information, see Setting up your NNI Locations for CPQ
Setting up your NNI Locations for CPQ
This feature enables you to set up your NNI inventory and pricing by geography to be carried through to the CPQ quoting process.
Once configured, Cross Connect MRC/NRC and Cross Connect Cost MRC/NRC pricing is automatically pulled into all applicable quotes in CPQ. A cross connect is a physical hardwired cable that provides a direct connection between two different termination locations within a Data Center.
This configuration is a two-step process:
In step 1, you set up your NNI locations.
In step 2, you set up pricing geographies and associations to your NNI locations.
You can add pricing geographies in two ways:
By bulk upload using the Import function.
By manual configuration using the Add Pricing Geography function.
Note
To add pricing geographies by Location, see Setting up customized pricing by Location.
To bulk upload (import) pricing geographies:
Click from navigation sidebar.
Result: The Pricing Tiers page displays.
Click under Rules menu.
Click
 to the right of the Manage Columns field.
Select Import.
Result: The Import Pricing Geography dialog box displays.
Download the Sample Excel file to verify that your import file contains the required values as shown in the example.

Note
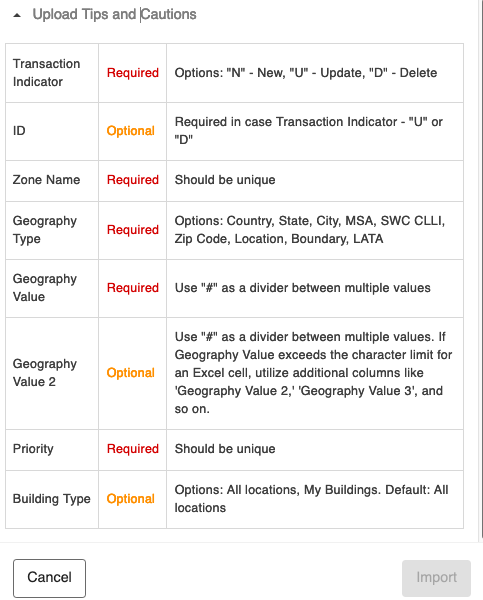
To accommodate larger geography field values that exceed the character limit of an Excel cell, the sample import CSV file includes two additional (optional) fields "Geography Value 2" and "Geography Value 3", as shown in the above example.
Review the Upload Tips and Cautions.
Click the .xlsx file icon.
Select the file for import from your local drive.
Click .
Result: The pricing geography requirements are validated and imported. If the import fails, recheck your import file to ensure that it meets the requirements for import and retry.
To manually add pricing geographies:
Click the Rules from the navigation sidebar.
Click .
Result: Pricing Tiers page displays. If geographies have already been added, they are listed here.
Click the button located in the upper right corner of the page. You can add up to a maximum of ten geographies (zones).
Result: The Add New Pricing Geography dialog box displays.
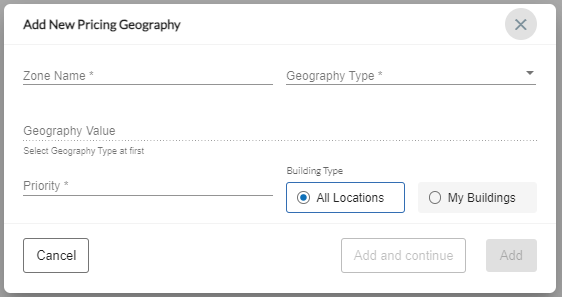
Complete the fields as indicated in the table below:
Field Name
Description
Zone Name
Enter a zone number or name to uniquely identify this zone.
Geography Type
From the drop-down list, select the geography type you wish to add.
Options include:
Country
State
City
MSA
SWC CLLI
Country
Zip Code
Location (see "Setting Up Customized Pricing by Location" below)
Boundary (custom geography type that supports the import of closed boundary files (SHP, KML, KMZ, or Geojson).
providing system administrators the ability to define pricing zones for Product Pricing throughout the system.
LATA (Local Access and Transport Area)
Search <Geography Type Value>
Search for the geography value(s) you want to associate with the selected Geography Type. For example, if you choose
State as the Geography Type, search for the respective state(s) that you want added to the geography.
All Locations/My Buildings toggle
All Locations - If the toggle is set to All Locations, the scope of the pricing will be applied to all buildings that are
positioned within that geography, regardless of whether they exist in My Locations (Buildings).
See Setting up customized pricing by Location for details.
All Locations Use Case: User can set a pricing geography for an entire country and toggle the setting to All Locations. When any location within that geography is priced, it will be successfully priced to the geographical pricing. In this case, the company does not have to load or inventory all buildings they can service into My Buildings in their instance. This is useful, for example, when there is a single provider in an area (country, region, etc.) and they provide service to every location in that area.
My Buildings (default) - If the toggle is set to “My Buildings” the scope of pricing is restricted to only those buildings
that have been imported into My Buildings.
Priority
Click the Priority field, then click the up or down arrow to select the priority that you want to assign to this geography.
Click (or if you have more geographies to configure).
Note
If you try to add more than ten geographies, the message “Pricing geography values cannot be greater than 10” displays.
To export geographies:
Click Rules from the navigation sidebar.
Go to .
Click the
 to the right of the Manage Columns field.
Click .
Result: The file downloads to your local system in an .xlsx format. The export file contains all columns and values that are visible within the Pricing Geography page.
Note
To accommodate larger geography field values that exceed the character limit of an Excel cell, the export CSV file includes two additional (optional) fields "Geography Value 2" and "Geography Value 3". Additionally, the import / export templates also contains these two extra fields to accommodate the import of large number of geographies.
To modify geography values:
Click Rules from the navigation sidebar.
Go to .
Click the vertical ellipsis
 (three dots) to the left of the Pricing Tier ID field.
Select Edit.
Result: The Edit New Pricing Geography dialog box displays.
Edit the fields as needed.
Click .
Result: The message “Pricing Geography is Successfully Updated” displays.
To delete geographies:
Click Rules from the navigation sidebar.
Go to .
Click the
 (three dots) to the left of the Pricing Tier ID field.
Select .
Result: A confirmation dialog box displays, “You are going to remove a Pricing Geography. Are you sure?”
Click to remove the geography, or to cancel the deletion.