Configure P2P Pricing
Configuring Point-to-Point Pricing
Within TCW, Admin users can configure zone geographies and pricing calculations to be applied between two target locations, such as End User to End User or End User to Data Center, referred to as A and Z locations.
Note
A and Z locations are applicable for Point-to-Point, Ethernet-Dedicated, Ethernet-Switched, and MPLS networks.
A and Z locations are used to describe points on a telecommunications circuit that is connected to a customer. This can be a circuit used for voice, data, or both. Each letter indicates a specific position, either physical or logical, on the circuit.
A location indicates the carrier's location or network
Z location indicates the customer's location or network.
These locations can be facilities, rooms in a facility, or specific connections to cabling or equipment. The use of A and Z designations to describe locations can be seen on new circuit orders, pricing, customer or carrier trouble tickets, and circuit disconnect orders.
Note
P2P Pricing Optimization
For improved P2P pricing performance response time, the system breaks the locations down into small batches, processing approximately 20 - 30 threads in parallel to reduce the number of times required to identify individual pricing zones.
Prerequisites
At a minimum, the instance must have default pricing configured.
Pricing Tier geographies, were applicable, have been defined.
Configuration process flow
Step 1: Define your P2P Zone Rules. When you configure P2P Zone Rules for P2P pricing, the zone rule geography is mapped to the Pricing Type fields within My Buildings for those locations. See Defining the P2P Zone Rules
Step 2: Configure the pricing calculations to be applied between two target locations. See Configuring the Pricing Calculator
There are two methods available for defining your P2P Zone Rules:
Import P2P Zone Rules in bulk format
Manually define P2P Zone Rules
To import P2P Zone Rules in bulk format:
As Admin user, click from the navigation sidebar.
Result: The P2P Zone Rules page displays.
Click the (three dots ...) to the right of the Manage Columns field.
Click .
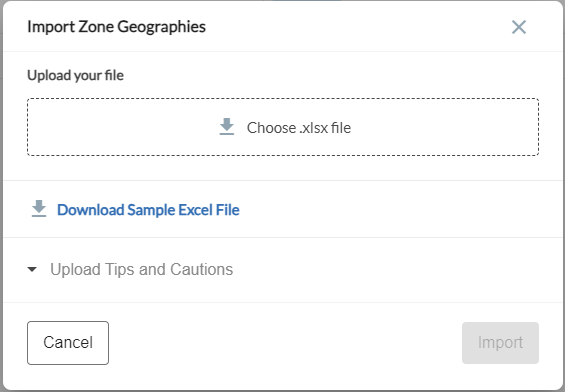
Result: The Import Zone Geographies dialog box displays.

Click Download Sample Excel File to confirm that your CSV file for import matches the required format. You can use the template to create your import file.
Result: The sample excel file is downloaded to your local system.
Important
Connectbase recommends that you limit the size of your import file to no more than <2500 records at a time.
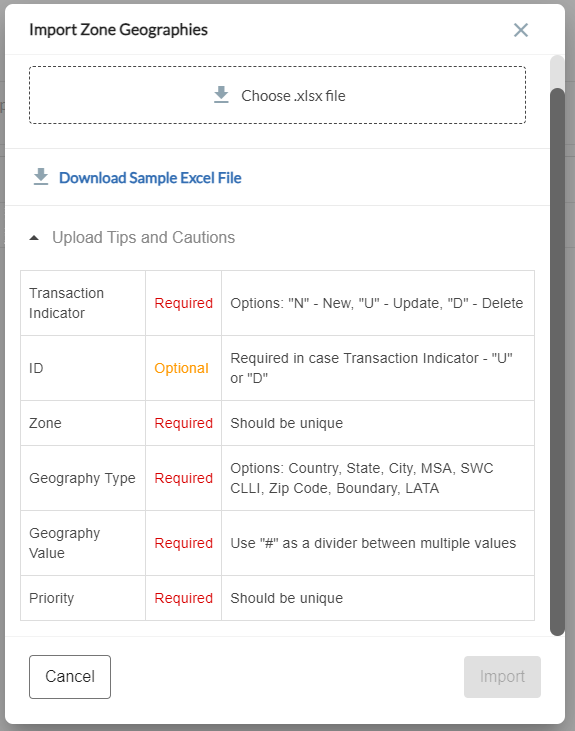
Prior to uploading your CSV file, click Upload Tips and Cautions to review the requirements and recommendations.
Result: The Upload tips and Cautions dialog box displays.

Click and select your file for import.
Click .
Result: The P2P Zone Rules display on the P2P Zone Rules page.
To manually define the P2P zone rules:
As an Admin user, click from the navigation sidebar.
Result: The P2P Zone Rules page displays.
Click the button located at the top right corner of the page.
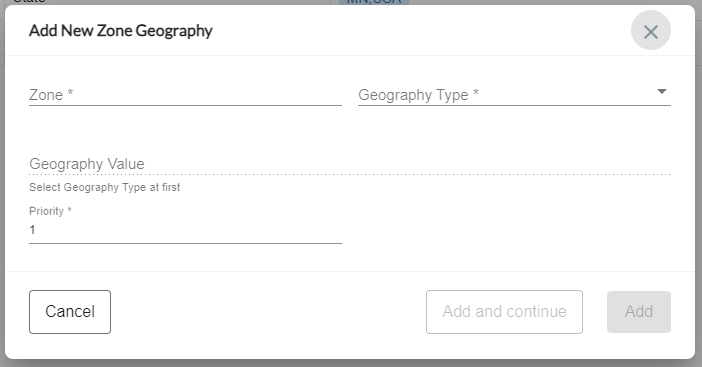
Result: The Add New Zone Geography dialog box displays.

Complete the Add New Zone Geography dialog box as follows:
Field Name
Action
Zone (required)
Assign a number or name to uniquely identify this zone.
Geography Type (required)
From the drop-down list, select the type from the following options: State, City, MSA, SWC CLLI, or Country
Note
Connectbase does not recommended the use of “Location” as a Geography Type for P2P pricing.
Geography Value (required)
In the Search field, search for the geography value(s) to associate with the selected Geography Type. For example, if you choose State as the Geography Type, search for the respective state(s) that you want to include in this zone.
Priority (required)
Select the desired priority number from the drop-down list.
Click (or if you have additional zones to define).
The next step requires you to configure the pricing calculator. See Configuring the Pricing Calculator
At a minimum, you must configure at least one default formula for P2P pricing to be returned.
To configure the Pricing Calculator:
As an Admin user, click from the navigation sidebar.
Result: Pricing calculator page displays.

Click the button located at the top right corner of the page.
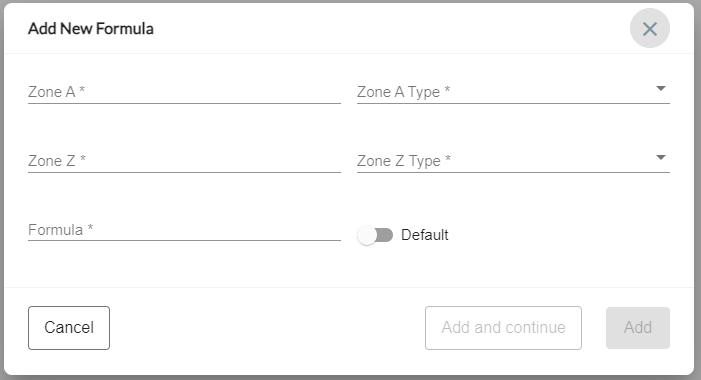
Result: The Add New Formula dialog box displays.

Complete the Add New Formula dialog box as follows:
Field Name
Action
Zone A
Assign a number/name to uniquely identify Zone A.
Zone A Type
From the drop-down list, select a type for Zone A.
The Zone Type must match the Pricing Type in the building record to return pricing.
Options include:
End User
Data Center
POP
Zone Z
Assign a number/name to uniquely identify Zone Z.
Zone Z Type
From the drop-down list, select a type for Zone Z.
The Zone Type must match the Pricing Type in the building record to return pricing.
Options include:
End User
Data Center
POP
Formula
Enter the formula calculations to be applied between the two target locations into the P2P calculator.
Combinations must be unique based on A Zone + A Type +Z Zone + Z Type. The system displays an error message if repeat A-Z combinations are attempted.
Example calculations include:
A+Z (add the two access prices together)
(A+Z)*1.1 (Add access prices and add 10%)
Note
All fields are required and must be completed prior to proceeding.
Optionally, click the toggle button to ON (blue) if you want this calculation to be used as your default formula to be applied to all pricing, when the specified criteria does not match a given formula.
For example, you create a formula between Location A “Massachusetts” and Location Z “Virginia”, and Zone Type “End User”. If one of the locations does not match the specific criteria, then the default formula would be applied to that location. For example, Location A is “Massachusetts”, but Location Z is “Kansas”, not Virginia.
Click or if you have additional formulas to define.