Manage My Routes
About My Routes
The “My Routes” function is for uploading, adding, and editing routes. Routes are the physical fiber routes that you have loaded into your entity.
There are three types of routes:
Instance routes – These are company-level routes, and anyone who has access to the instance can view them.
Saved routes – These routes are your personal routes that you create or upload and are only visible to you.
Published routes – These routes are any of your saved routes that you choose to publish so that other users of your instance can also view them, but they cannot edit them.
Note
In addition to (or instead of) using the My Routes function to manage your routes, you can use the My Layers function to create your own hierarchical folder structure and upload route files to better organize and maintain data that is specific to your needs and business role. See “Working with My Layers” for details.
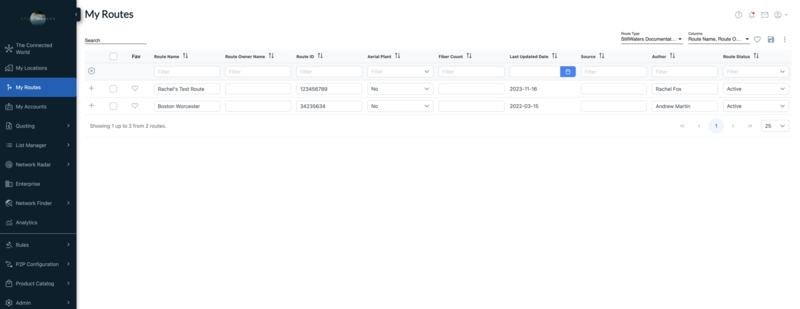
Click on navigation bar to access My Routes.
Result: This displays list of existing routes in your instance as shown in the below example:
 |
Click the '+' sign to expand an existing route. The route information displays as below:
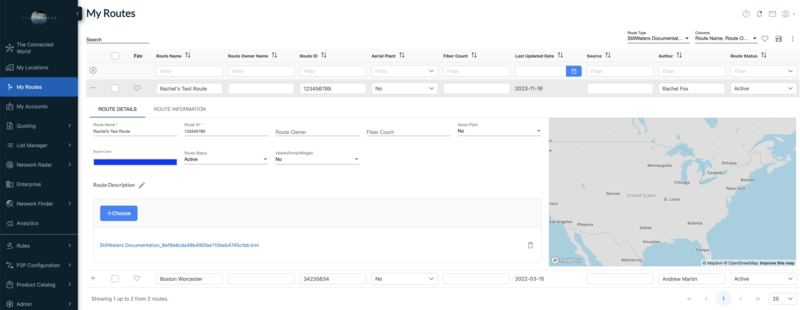 |
You can use this page to update/edit the route information of existing routes, including route color. You can also replace the existing route file by clicking on the "Choose" button and update the route displayed on the map.
Exporting an existing route:
You can export the existing route's kml file by clicking on the the link shown in the below example. This option lets you save the route file on your local machine.
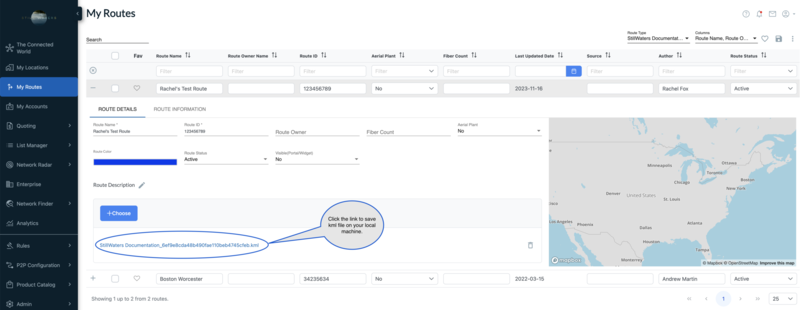 |
Routes can be added in either KML or KMZ format. You can add routes in one of two ways:
You can add routes to your instance
You can add routes as your saved routes.
To add a route(s):
Click the from the navigation sidebar.
Result: The My Routes page displays. If routes have already been added to the instance, they are displayed in a list here and include the following data fields:
Route Name – (required) A unique name given to identify the route
Route ID – (required) A user defined route id to be used as an identifier for the route.
Route Owner – (optional) Enter the name of the route owner.
Fiber Count – (optional) Enter a numeric count for the fiber route
Aerial Plant – (optional) Yes/No. Aerial plant is a fiber network, or any type of access medium, that is built above the ground on poles. The most common poles are telephone poles and electric utility poles.
Route Color – (optional) See Color coding your routes.
Route Status – (optional) From the dropdown list, select from the following options: Active, Competitive, In Progress, Partner, Planned, Sold,
Visible (Portal/Widget) – (optional) Yes/No
From the My Routes page, click the
 add icon located in the bottom right corner of the page.
Result: The following icons display enabling you to add to <Instance Name> Routes or Saved Routes.

Do one of the following:
Click the star icon to add a route(s) to your Saved Routes.
Click the circle icon to add a route(s) to the <Instance Name>.
On the Routes page, click the + button.

Complete these required user defined fields:
– (required) A unique name given to identify the route.
– (required) A user defined route id to be used as an identifier for the route.
All remaining fields are optional.
From your local directory, double click on the route file you want to upload.
Result: The selected route file is uploaded.
If you want others in the instance to view your Saved Route, click the toggle.
Result: The Publish Route toggle changes to blue to indicate selection.
To view a listing of uploaded routes:
Click the in navigation bar.
Result: The My Routes page displays.
Click the
 located in the upper right corner of the page.
Click .
Result: The list of uploaded routes displays.
From the My Routes page, you can manage your view of route data in the same way that you can for My Locations.
When viewing your routes on the map, move your cursor over a route to view the name of the route. To get route information and route details, double-click on the route and a pop-up dialog box displays.
To help organize your routes, you can select different color designations for each route, including your company specific route list, your saved routes, and your published routes.
To choose a route color:
Click the from the navigation sidebar.
Click the
 sign to the left of the route name.
From the Route Details page, click .
Result: The Route Color dialog box displays.
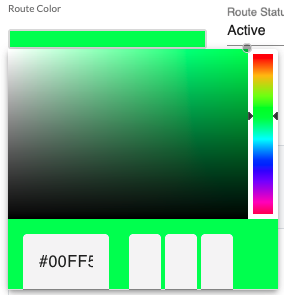
Either enter the or the for your color selection. Alternatively, you can use the sliding scale to the right of the dialog box to find your desired color configuration.
Click again to return to the Route Details page.
Result: The color you selected displays in the Route Color field and the route displays on the map in the selected color scheme.
There are two methods available for marking a route as a favorite:
From the Route List
From the Actions menu
To mark a route(s) as a Favorite from the Route List:
Type the address into the Search bar to locate the route record.
Click the
 that appears to the left of the route record that you want to mark as a Favorite.
Result: The heart icon appears yellow to indicate selection.
Alternatively, click the check box to the left of the route record and from the
select .
To unmark a route as a Favorite from the Route List:
Type the address into the Search bar to locate the route record.
To unmark the route as a Favorite, click the
to the left of the favorited route.Result: The heart icon now appears empty/blank.
Alternatively, click the check box to the left of the route record and from the select .
From within the map, you can switch between viewing the <instance> routes or saved routes.
In the field, click the drop-down menu to select either the or to view your route preference on the map.
Note
You can switch back to the alternate view at any time by clicking the appropriate Route Type from the drop-down menu.