Bid Manager (CBM)
The process of gathering customer requirements for products and services, selecting telecom vendors who can provide those services, sending them a request for proposal, and then allowing them to submit proposals can be an inefficient, arduous, and oftentimes broken process for connectivity providers.
Bid Manager (CBM) allows users to source bids from all possible suppliers, solve fallout issues, and address complex pricing needs when you need to request ICB pricing from one or more carriers. Bid Manager or CBM along with CPQ offers a single platform to initiate , track, and archive all quoting activities. CBM supports both CPQ-to-CPQ and CPQ-to-non-customer flows. Some common use cases for using Bid Manager include:
When locations do not return a price result in CPQ but the carrier footprint does reside in the Connectbase Network Intelligence.
The location is far enough off net for a carrier that they will not estimate a price to deliver service.
A request for individual case business or ICB pricing is needed for high volume opportunities.
5 or 10 locations within a single quote fall within a single carrier's footprint warranting special discounted rates.
From within Step 3 of the CPQ process flow, you can send a request for availability and pricing of specified locations and configurations to select providers.
Note
CBM is a user level entitlement for CPQ customers and will not display within the platform without the assigned permissions. If you need assistance to gain access to CBM functionality, contact your Connectbase Sales representative or your dedicated customer success manager. If you require technical assistance or wish to report an issue to the Connectbase Support team, please log into the Connectbase Customer Support Desk Portal at https://support.connectbase.com and submit a support ticket.
Key features
Bid Manager (CBM) functionality enables connectivity buyers to:
Further automate the overall CPQ process by automating the process of engaging with existing and potential suppliers at scale regarding locations of interest within a quote.
Understand what providers can service a location(s) of interest and request a pricing proposal from those providers.
Manage and track the bidding and responses from partners.
Avoid rekeying data when partners respond back.
Provide transparency and status of each order.
Eliminate swivel chair while trying to obtain proposals (send requests and receive responses without ever leaving the platform).
Key benefits
CBM provides the following key benefits to network buyers:
Connectbase leverages its internal Network Intelligence and your instance to identify potential suppliers at a specific location to quickly narrow down the list of potential suppliers.
It eliminates the need to swivel chair to other applications or email. You can manage and track your bidding and responses from partners directly within the platform, providing transparency and status for each order.
Suppliers are not required to be a client of Connectbase to receive or respond to bids. Suppliers can easily respond to a bid request by simply clicking a link in the bid request email.
Upon acceptance of pricing from a supplier, the pricing is automatically added as a line item in CPQ. No rekeying of data is needed; all information flows through the process, including the ability to apply margin.
Connectbase provides a default email that you can use to send bid notifications or respond to requests. Admin users can customize the content of those email notifications as needed. For example, you can personalize messaging to align with your business needs, add disclaimers, or add any other messaging you want to convey.
To customize you email templates:
Select from the navigation sidebar.
Result: In the Email Templates section, the Default Email messaging displays.

In the Template field, use the dropdown list to select the template you want to modify.
Modify/customize the Email content messaging as needed.
Note
You can copy and paste any of the provided keywords directly into the template. For example, you can replace (REQUESTED_USER_FIRST_NAME) with Customer user first name by copying and pasting that keyword from the button provided.
Click the Save icon in the upper right corner of the Email Templates section.
Sample CBM request email
Below is an example of a CBM request email using the default template.
Notice
Dear emailusername@xxx.com
John Doe FROM XYZ Company has requested pricing from you for a project that is currently out for bid with an expiration date of 2021-05-28T04:00:00Z and the following notes:
We look forward to hearing from you soon! Please use the following link to access the Bid Management request where you can supply your pricing for this bid. Thank you in advance for being a trusted partner of XYZ Company.
Regards,
<Contact Name>
The CBM process flow enables you to send a request for availability and pricing of specified locations and configurations to select providers. CBM requests are created in Step 3 of the CPQ process flow. Once a quote is completed, you cannot return to the quote to create a CBM request.
Note
The email subject line becomes editable when you click . Enter a new subject line under the Email Subject column for the chosen request. The default email subject is "New CBM request".
To create a new CBM request:
If not already completed, complete Steps 1 and 2 in the CPQ process flow (Step 1: Add or select the quote project and Step 2: Choose the configuration criteria). Refer to the Configure, Price, Quote Feature Guide, or the topic “Configuring a quote in CPQ” in the Online Help for details.
In Step 3 of the CPQ process flow “Enter Pricing and System Reference Data”, click the check box to the left of the location(s) to be included in your bid request(s). Typically, these can be fallout locations as indicated in the Has Supplier column as “No Supplier found” (yellow triangle), or in cases where special pricing is required, such as ICB. In the following example screen, note the last location indicates a fallout address.
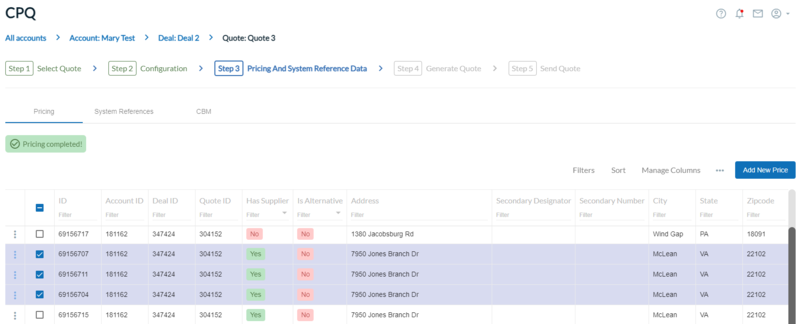
To start a bid management request, click ... icon.
Click .
Result: The Create CBM new request dialog box displays. The selected locations and configurations are pulled forward as shown in the following example.
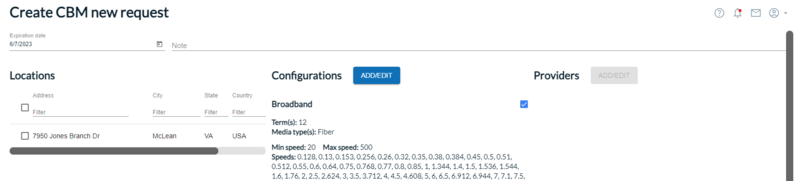
In the column, select/deselect locations to be included/excluded from the bid. In the example above, the fallout location from the quote is selected.
In the column, select/check the configurations to be included in the bid request. Use the Add/Edit button to add/edit terms or speeds for this bid request.
In the Providers field, click, the button.
Result: The Configure providers dialog box displays.
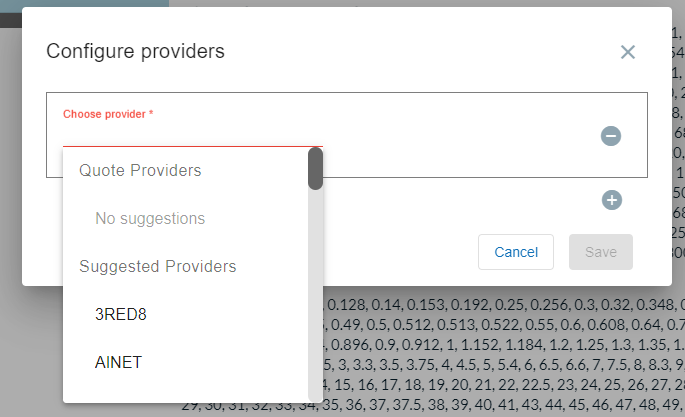
Note
The list of Suggested providers is sourced from Connectbase’s Network Intelligence data.
To add a contact, select from the list of contacts or click Add contacts to manually add a contact.
Click Save.
Result: The Create CBM new request page is refreshed with the locations from the selection in CPQ, the configurations from the quote design in CPQ, and the providers that you selected or added.
Verify that the Locations, Configurations, and Provider for this bid request are selected/checked.
Do one of the following:
To do this
Complete these steps
Send an individual bid request now
Click .
Save bid request to repository
Click and add additional bid requests to the bucket as necessary.
Optional: Change the subject line of the email under the Email Subject column. The default email subject is "New CBM request".
Click to submit all of the bid requests in the repository simultaneously.
Bid requests are sent via email to the selected contact. See Sample CBM request email. Additionally, the CBM Quote Requests list is populated, showing the status of the request, for example, "Waiting for provider". See Viewing CBM Bid Requests.
The Quoting > Bid Manager (CBM) > My Requests page provides a view of the repository of the CBM requests you sent out and the status of those pending requests.
To view a listing of request sent:
Select from the navigation sidebar.
Result: The My Request page displays.

Click on the arrow to the left of any Receiver name to expand the bid request record.
When a provider receives the email request and clicks on the link in the notification, the Customer Bid Management request dialog box displays.
The provider can either accept or reject a request as follows:
To do this | Complete these steps |
|---|---|
Approve a request |
|
Reject a request |
|
When the provider approves a request, the CBM Quote Requests “Status” changes to “Waiting for Customer” and a notification is sent via email to the requester.
To approve the bid and incorporate the pricing into the quote:
Select from the navigation sidebar.
Select a request.
Click the arrow to the left of the Receiver's name.
Result: The bid pricing displays and awaits customer response.
Once a response is received, you can either approve or reject the response as follows:
To do this
Complete these steps
Approve a request
Verify that the pricing line you want to approve is selected (check marked).
Optionally, enter a note in the Leave a comment field.
Click . The response configuration and pricing are added to the current quote, and you can continue to the next step in the quoting process.
Pricing comes into CPQ as cost, but you can manually add any margin that needs to be applied to the pricing. All transactions are logged in the Audit Log.
Reject a request
Optionally, enter a note in the Leave a comment field.
Click .