Configure CPQ Rules for Pricing
CPQ Rules
Note
If you need to configure Financial Rules, refer to the section Configuring Financial Rules for details.
The CPQ Rules Engine is a user level entitlement. It enables administrative users to configure predefined rules for processing and filtering of returned results in a quote. This feature builds intelligence and actions into CPQ, so that you can auto process, auto integrate, and be creative in the ways in which you leverage CPQ.
With the CPQ Rules Engine you can refine your search criteria, preferred logic, actions, triggers, and tagging, so that the returned results more closely align with your specific business needs from CPQ design to CPQ pricing.
 |
Within the Rules Engine, you can define one or many rule chains using the logic provided for your selection, i.e., Equal, Greater Than, Greater Than or Equal, Less Than, Less Than or Equal, or Not Equal. Additionally, you can apply defined rules to one or multiple user groups.
Note
The current limitation for configuring a rule chain is 400 rules per chain.
Adding a new Rule Chain
To add a new rule chain:
Click from the navigation sidebar.
Result: The CPQ Rules page displays. If rules have already been defined, they are displayed in a list on this page.
Click the button.
Result: The Add New Chain dialog box displays.
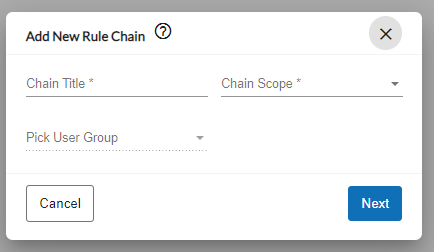
Type a name in the Chain Title field to uniquely identify this rule chain.
Click the drop-down arrow in the Chain Scope field. Select either Company, Seller (previously called “Account”), Deal, Quote, or Buyer to define the target for which this rule chain applies.
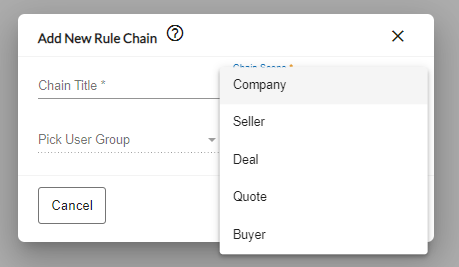
Note the following regarding Seller and Buyer Chain Scopes:
Seller Rules: When creating a chain for a Seller, you must then select an Account. All rules created under that chain will apply only if the selected account is the one used to quote in CPQ. By adding an account during the rule chain creation, you are setting the Account as the default for the chain.
Buyer Rules: Essentially, the same rules apply as for the Seller, except that you must select a Provider instead of an Account. All rules created under this rule chain will only apply if the selected Provider is quoted in CPQ.
Click the drop-down arrow in the Pick User Group to select the User Group for this rule. The default is Default Group.
Click .
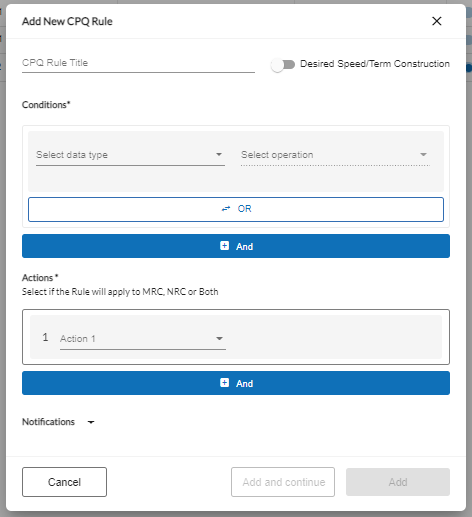
Result: The Add New Rule dialog box displays.
The current limitation for configuring a rule chain is 400 rules per chain.
Note
If you set the Desired Speed/Term Construction toggle to the “On” position (blue), different parameters display for input within this dialog box. See Using the Desired Speed/Term construction toggle.
To add a new rule to a rule chain:
Complete the dialog box as follows:
In the Title field, give the rule a unique name or number as the identifier for this rule.
In the Conditions section of the dialog box, use the drop-down list in the Select data type field to select from the following data type options:
Data Type
Description
A Zone Geography
Indicates the A location zone geography in a P2P configuration.
Access medium
The medium used for connectivity to the building or specified location, such as Fiber, Copper, etc.
Account BAN
Billing account number
Account Name
The name given to the account when it was created.
Address
The name of the street in which the building or location resides.
API Info
Any additional information about products pulled from external APIs that provide serviceability and/or pricing information, are stored in “API Info
API Product Name
Enables the creation of rules to include/exclude CPQ solutions based on Product Name. When "API Product Name" is selected, enter the value of the product name in the condition as free text. API Product Name is a custom product name that flows into CPQ Step 3 via external APIs.
BAN ID
Customer provided billing account number identifier.
Building Category
Description of the type of building or specified location. Options include:
Commercial Building
Airport
Data Center
Government
Health Care
Land
Military
Residential
School/University
Utility
Venue
Wireless
Building connection status
A metric used to identify the connectivity status of fiber-connected buildings, such as Near Net, OffNet, etc.
Carrier Zone
Contains pricing tier information as returned from either Carrier APIs or the Advanced CPQ API. The format depends on the value returned by the carrier.
CPQ Component
The name assigned to the CPQ component.
Channel
Default, Wholesale, Enterprise, or Channel
City
The city in which the building or specified location resides.
Company Geography
A specific predefined geographic region.
Company Z Geography
The Z location for P2P pricing, for example.
Competitive Rating
Designations that are used to understand the competitive landscape and more effectively price services.
Green – No other competitive fiber provider is at this location other than the customer’s own network, LEC, or Cableco.
Yellow –One competitive fiber provider is present at this location.
Red – Two or more competitive fiber providers are present at this location, in addition to the LEC or Cableco.
Country
The country in which the building or specified location resides.
Created date
The date the quote was created.
Customer Component ID
The customer provided Id used to identify the CPQ component.
Customer Component Item ID
The customer provided item Id.
Customer NNI ID
In certain instances, customers identify their NNI locations by an NNI ID, rather than by a physical address. Including this field in the CPQ results gird enables those users to see/select the appropriate NNI for pricing.
Disposition Type
Options include: Budgetary, Final, ICB, or RAQ.
Budgetary –The pricing has been loosely defined and may need to be revisited during the buying process.
Final - The pricing/cost is well defined and firm. The default is “Final” unless specifically known. This can vary by customer/supplier relationship.
ICB - The pricing is on an Individual Case Basis.
RAQ – Request a quote for pricing.
Download speed
The rate at which data is transmitted from the internet to a user device.
Fallout
A term used to describe addresses that could not be validated or for which no solution was found.
Flex field 1
A customer defined text field (Character limit = 255).
Flex field 2
A customer defined text field (Character limit = 255).
Handoff Type
Related to the type of service to be provided. For example, Ethernet service delivered via CAT5.
Install Interval
The timeframe for installation that is quoted by the provider to the customer.
is bulk deal
Yes/No.
Is msa available
Yes/No. Indicates a master service agreement.
is preferred solution
Indicates if the quote has been identified as the preferred solution.
Is selected
Indicates if the quote is selected as the solution.
is sub-quote solution
Indicates that the quote has been identified as the sub-quote solution.
Last Mile Supplier
Indicates if you want the rule applied to the last mile supplier. Note: Last Mile Supplier is an instance level entitlement.
For example:
If Company X is quoting a product from Company Y, then Company X is indicated as the Supplier and Company Y is indicated as the Last Mile Supplier.
However, If Company X is quoting a product from its own footprint, Company X is listed as both the Supplier and the Last Mile Supplier.
Where enabled, the Last Mile Supplier can be viewed in Step 3 of the CPQ process flow.
Minimum Circuit Level
Identifies the minimum circuit level required by this vendor to accept orders to bring a Near Net building OnNet (for example, 10M, 10G, 100G, etc., low speed EoC generally in 1.5 increments to 12mb).
Mrc
Monthly Recurring Charge (12M, 24M, 36M, 48M, 60M, 84M, 120M, 240M).
Condition options include:
Equal
Greater Than
Greater Than or Equal
Highest
Less Than
Less Than or Equal
Lowest
Not equal
Mrc margin
A margin applied to the monthly recurring charge.
Condition options include:
Equal
Greater Than
Greater Than or Equal
Highest
Less Than
Less Than or Equal
Lowest
Not equal
Network connection status
A metric that is used to identify the build status of a carrier’s network in a building. For example, Connected, In Progress, Not Connected, etc.
NNI location
NNI locations identify where you connect to your partner networks.
Notes
Indicates if the rule is to be applied to a quote containing a specified note.
Nrc
Non-Recurring Charge (12M, 24M, 36M, 48M, 60M, 84M, 120M, 240M)
Condition options include:
Equal
Greater Than
Greater Than or Equal
Highest
Less Than
Less Than or Equal
Lowest
Not equal
Nrc margin
A margin applied to the non-recurring charge.
Condition options include:
Equal
Greater Than
Greater Than or Equal
Highest
Less Than
Less Than or Equal
Lowest
Not equal
Preferred Supplier
Used to indicate if the supplier is the customer-preferred supplier for the product(s) being quoted.
Pricing Criteria
Indicate if the rule is to be applied to one of the following options:
Highest Speed per Address
Lowest MRC per Address per Product
Lowest MRC per Address per Supplier
Lowest MRC per Diversity
Lowest MRC per Quote
Lowest MRC per Supplier
Lowest TOV per Address
Lowest TOV per Address per Supplier
Lowest TOV per Quote
Lowest TOV per Supplier
Pricing Type
Indicate if the rule is to be applied to one of the following options:
End User
Data Center
POP
Product Category
The name of the product as defined in the Connectbase product catalog, such as Dedicated Internet, Ethernet – Dedicated, Ethernet – Switched, etc.
Project ID
System generated CPQ project identifier.
Provider
The name of the provider.
Provider mrc
The provider’s monthly-recurring charge.
Provider nrc
The provider’s non-recurring charge.
Site Type
Customer provided site type
Site count
The total number of sites returned in the response.
Site Id
Customer provided site identifier, where applicable.
Site name
Customer provided site name, where applicable.
Solution Status
Solution Found, No Solutions Found, etc.
Speed
Identifies the speed(s) offered by a given product, for example, SONET/TDM OC3, OC12, OC48, etc.
Condition options include:
Equal
Greater Than
Greater Than or Equal
Highest
Less Than
Less Than or Equal
Lowest
Not equal
State
Identifies the state in which a building or location resides.
Supplier Geography
Where applicable, a geography type applied to a supplier pricing.
Supplier Z Geography
Where applicable, a geography type applied to a Z location for supplier pricing.
Term
Identifies the term condition for pricing, for example, 12M, 24M, 36M, etc.
Upload speed
The rate at which data is transmitted from a user device to the internet.
User Group
A predefined user group. User groups are configured in the platform to enable/disable access of certain functions to specific users. Each user group is assigned a set of Permissions that determines which functions they can perform within the platform.
Z Zone Geography
Indicates the Z zone geography in a P2P configuration.
Zip
The zip code where the building or specified location resides.
Custom fields
Account
Deal
Quote
Customer defined fields for accounts, deals and/or quotes.
In the Select operation field, use the drop-down list to select the operation to be applied to the rule. Depending on your selection, options may include one or more of the following options: .
Where applicable, select the or from the drop-down list. For example, if you select Product Category as your Data type and Equal as your Select operation, you could then select Dedicated Internet, for example, as your Use Value.
Optionally, use the button within the section to define OR conditions for this rule.
Use the button to add additional rules to this rule chain.
Note
If you want to remove a condition prior to saving, click the
 – (cross sign) to the right of the condition to be removed.
In the section of the dialog box, use the drop-down list in the field to select from the following options:
Note
Once you define all actions to be applied to this rule, you can reorder and prioritize the actions list using the drag and drop function.
Action Option
Description
Deselection
Deselect the solution for the next CPQ steps.
Forwarding
The solution can take part in the next rules of the chain. This action is the opposite of Termination.
Include Customer Component ID
Where provided, enables a CPQ component to be identified by a customer provided Id for easy identification, future product bundling, and management of a higher number of components.
Include Component by Item ID
Include the component by its assigned ID.
Include Component by Name
Include the component by its assigned name.
Include Product
When you select Include Product, you must also select the Cardinality (Per Location or Per Quote). You then have the option to select Provider, Term, and/or Speed.
Depending on your configuration, the Customer Component ID may/may not be a required field. The following conditions apply:
The Customer Component ID is now optional, depending on which parameters are filled in/selected. If the user includes Customer Component ID. Cardinality is mandatory.
If you select to include by provider, speed ,and term, all three parameters are mandatory, but in this case, the Customer Component ID is optional. Cardinality is mandatory.
Quoting
The Quoted stats assigned to the solution. The solution is marked as Selected automatically.
Remove Solution
Remove the entire solution if the given conditions are met. You can also use this option to effectively exclude or include suppliers as described below:
To use this action to exclude suppliers:
For example: If a rule were created to exclude a set of suppliers and associated to the “XYZ Communications” account. The rule would look like this:
If provider = “ABC” or provider = “DEF” or provider = “GHI”, then remove solution.
To use this action to include suppliers:
For example, If provider not = “ABC” and Provider not = “DEF” and provider not = “GHI”, then remove solution.
Selection
Select solution for next CPQ steps.
Set Flex field 1
Set the Flex field 1 to the value indicated in the definition. A customer defined text field (Character limit = 255).
Set Flex field 2
Set the Flex field 2 to the value indicated in the definition. A customer defined text field (Character limit = 255).
Set custom field
Set the custom field to the value indicated in the definition.
Set field
Set field to the value indicated in the definition.
Stopping
Stopping halts the entire rule chain execution at that point. No further rules or actions in the chain are evaluated for any solutions once this action is hit.
Use Stopping when you want to end rule processing altogether.
Tagging
Add tag to the solution.
Termination
Termination removes the current solution from further evaluation, but the rule chain itself continues for any other solutions still in scope. This is effectively the opposite of Forwarding, which allows a solution to continue through subsequent rules.
Use Termination when you want to exclude a specific solution from the remaining rules, while allowing the rest of the rule chain to continue.
Trigger integration
Send a notification to the user through the external client notification system.
Use the within the Actions section to add as many actions as required to be applied to this rule.
In the Notifications section, use the drop-down arrows to send notifications to specific User groups, User roles, or Users.
When you complete the rules definitions for this rule chain, click if you are done or to configure additional rules.
Result: The newly added rule displays in the Rules List on the “CPQ Rules Default Page” and the Activity toggle is automatically enabled, which makes the rule usable within a CPQ quote.
Activity and Automatic Toggles
The CPQ Rules List provides two toggle fields that enable you to activate/deactivate a rule chain for use within CPQ, and, optionally, select a default rule chain to be triggered for use in APIs.
Activity toggle – The Active toggle is automatically enabled (blue) once you Save the Rule chain. If you want to save the rule chain for later use, you can deactivate it, so that it is not currently usable within CPQ quoting. To do so, set the Active toggle to the off position (dimmed).
Automatic toggle – When you enable the automatic toggle (set it to blue) for a specific rule chain, that rule chain is automatically triggered within the CPQ UI quote and/or from the CPQ APIs, unless manually overridden. To disable the automatic application of the rule from a rule chain, disable the Automatic toggle (dim).
Note
To see where the rule can be selected for execution within a CPQ quote, see Selecting a rule for execution in a quote.
Using the Desired Speed/Term construction toggle
When you set the toggle to “On”, the Add New Rule dialog box parameters vary from the standard Add New Rule dialog box.
To set the Desired terms toggle:
Complete Steps 1 through 4 in the section Adding a new Rule Chain.
On the dialog box, set the toggle to “On” (blue).
Result: The dialog box parameters appear as shown below when toggle is ON.
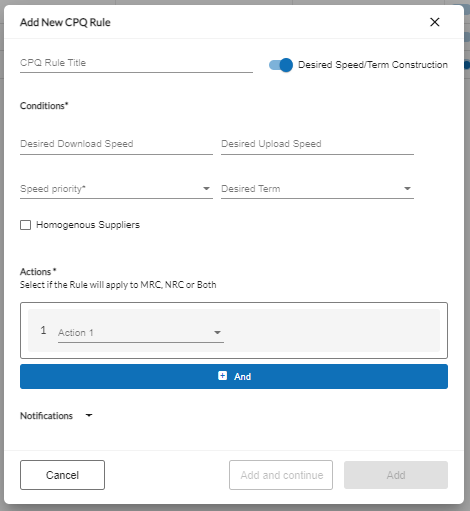
In the Conditions section of the page, enter the Desired Download Speed and/or the Desired Upload Speed, based on your preference.
From the drop-down selector, select the Speed priority. This is a required field.
Select the Desired Term using the drop-down selector.
Note
The Desired Term field allows you to indicate if you have a specific term that you want returned in the response. For example, in the Choose Term(s) field, you may have entered 12, 24, and 36; however, 24 is the desired term you are most interested in.
Optionally, select the Homogeneous Suppliers (checkbox).
The “Homogeneous Suppliers” directive is intended to support instances where more than one product card is selected in Step 2 of the CPQ process flow. When checked, it will exclude suppliers who cannot satisfy “All” of the products specified. It has no effect in instances where only one product is selected at step 2.
For example: If a user selects “Broadband” and “Static IP” products as design configuration and selects “homogeneous suppliers”, only those suppliers who returned results for BOTH Broadband and Static IP products would be returned.
If checked the response includes everything that was configured as part of the solution, i.e., only return those results where all configured/selected conditions are met.
If unchecked, the response returns only those results that meet the configured conditions.
In the Actions section of the page, use the drop-down menu to select the Action to be applied to the rule.
Refer to Action Options.
Click the icon.
Result: The newly added rule chain appears in the CPQ Rules list.
To edit an existing rule in a Rule Chain:
Click from the navigation sidebar.
Result: The default CPQ Rules page displays, and all existing rule chains display in the list.
From the CPQ Rules page, click
 icon (from left side of the desired rule chain) to navigate to the rules list for the selected rule chain.
Result: List of rules within the rule chain displays.
Click
 (vertical ellipsis) > for the rule to be edited.
Result: The Edit Rule dialog box displays.
Edit the rule parameters as needed.
Click .