Configuring Company Pricing
Adding Products to your Product Catalog
From the function, you can add products into your product catalog and apply standard pricing.
Note
Colocation Products
Along with standard products, sellers can also add colocation products (categorized under "Data Center Services" product category) with defined attributes, such as the number of cabinets. Once configured, buyers can configure and quote these colocation products in CPQ. Additionally, sellers can create CPQ components (such as, for power options) and associate those components to colocation products in CPQ Step 3 using Rules. For information about configuring CPQ Components
To add/import products into your product catalog:
Click from the navigation sidebar.
Click
As needed, click the toggle that appears to the right side of the page to display all of the available products and services currently available for your instance.
At the top right side of the page, click the
 (three dots) and select Import from the list.
Result: The Import Pricing dialog box displays.
Click to view the recommended format for import. This sample file can also be used as a template for import.
Complete the Excel spreadsheet with the product details for your desired configuration. See descriptions below.
Note
Network Build Status and Building Connection Status are required fields.
Field Name
Description
Company Name
The instance company name in which the product is being added.
Is Company
Default = Yes.
No is generally used for internal testing instances.
Channel (required)
Default, Wholesale, Enterprise, or Channel
Entity name
If you have more than one company instance, enter the entity name.
Account Name
This field enables you to identify a specific account in which to create/apply the price list.
For example, ABC Company "Company" offers custom pricing to one of its account holders (Account Name).
Customer Component ID (optional)
Enables you to associate a customer defined component id to your product catalog id for the product, component, or API return, so that you can carry the CPQ pricing back through your native systems for ordering, testing, and turn up activities.
Base Currency
This column enables you to enter your base pricing for pricing. Options include: USD, EUR, JPY, AED, AFN, ALL.
For bulk uploads, always use ISO 3 codes for currency.
Disposition
Options include:
Budgetary - The pricing has been loosely defined and may need to be revisited during the buying process.
Final - The pricing/cost is well defined and firm. The default is “Final” unless specifically known. This can vary by customer/supplier relationship.
ICB - The pricing is on an Individual Case Basis.
RAQ - Request a quote for pricing.
Network Build Status
(required)
Enter the Network Build Status from the following options:
Connected
In Progress
Not Connected
Planned
Note
When using the “All Locations” toggle instead of My Buildings to set up pricing, leave this field blank.
Building Connection Status (required)
Enter the Building Connection Status from the following options:
Near Net
OffNet
On Net-Limited Access
OnNet
Note
When using the “All Locations” toggle instead of My Buildings to set up pricing, leave this field blank.
Media Type
(optional)
Enter the Media Type from the following options:
Coax/HFC
Copper
Fiber
Wireless - Fixed
Wireless - Mobile
Wireless - Satellite
Competitive Rating
(optional)
Competitive Rating data helps you to better understand the competitive landscape and more effectively price services.
If subscribed to Competitive Ratings data, click the specific competitive rating attribute that you want to assign, thereby limiting the pricing to only those locations that are designated with the chosen rating.
Options include:
Green – There is no other competitive fiber provider at this location other than the customer’s own network, the LEC, or the cableco
Yellow – A single competitive fiber provider is present at this location
Red – Two or more competitor fiber providers are present, in addition to the LEC or cableco, at this location
Building Category
(optional)
To limit your pricing to a specific building category, select the category from the dropdown list. Options include:
Airport
Commercial Building
Data Center
Government
Health Care
Land
Military
Residential
School/University
Utility
Venue
Wireless
Geography
(optional)
Enter the desired Geography, where applicable.
Distance Band
(optional)
Select the desired Distance Band from the dropdown list. Options include:
0 - 500 feet
501 - 1000 feet
1001 - 1500 feet
1501+ feet
Product Category
In the Product Category column, enter the product to be added to the catalog.
Broadband
Cloud Connect
Dark Fiber
Data Center Services
Dedicated Internet
Dedicated Internet - Managed
Ethernet Dedicated
Ethernet Switched
Frame
MPLS
Network to Network Interface
SDWAN
SONET
TDM
SONET/TDM
Statis IP
User Network Interface (UNI)
VoIP
VPN
Wavelengths
WiFi
Note
For colocation products, enter Data Center Services in this column.
For WiFi products, following products are applicable:
'Wifi - Standard' Upload Speed: 1 Mbps Download Speed: 1 Mbps
'Wifi - Premium' Upload Speed: 2 Mbps Download Speed: 2 Mbps
Speed
Enter the speeds that you service for the product.
Note
If you are adding colocation products, enter the cabinet product description, such as 1x ILA/TELCO Cabinet or 1x Data Center Cabinet, for example. The Speed field will automatically be remapped to Cabinets upon upload.
Availability
Enter Yes if you want the product to be available for quoting upon upload.
Other options include:
Leave blank - You do not want this product to appear in your price list.
ICB - You offer this product on an Individual Case Basis only.
No - You do not offer this product and you want that explicitly indicated in your price list. If you do not want unoffered products listed in your price list report, leave the field blank.
Add pricing for each of the desired pricing time frames
MRC - Monthly Recurring Charge (12M, 24M, 36M, 48M, 60M, 84M, 120M, 240M)
NRC - Non-Recurring Charge (12M, 24M, 36M, 48M, 60M, 84M, 120M, 240M)
MM_MRC - Month-to-month Recurring Charge
MM_NRC - Month-to-Month Non-Recurring Charge
Save your Excel spreadsheet.
From the Import Pricing dialog box, click
Select the file for upload.
Result: The pricing file is imported into the Product Catalog.
At the top right side of the page, enable the toggle to view all pricing for the instance.
Click the Save Pricing icon located at the top right side of the page.
On the confirmation dialog box, click to set pricing as the default for all buildings; otherwise, select .
Note
Selecting Yes does not override custom pricing that has been set at the building level.
Once products are added to your Product Catalog, you can edit the configuration to add/change pricing for specific configurations.
You can use the copy and paste function to copy an entire product price catalog from one pricing configuration to another, such as from Default to Wholesale or from one company to another company based on your selections. You can also copy and paste pricing within a single channel.
Click from the navigation sidebar.
Click .
Result: Company pricing page displays
Click the
(vertical ellipsis), located in the upper right corner of the page, and select .Result: The Copy & Paste dialog box displays.
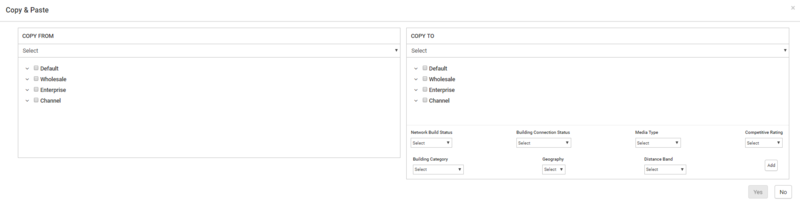
In the Copy From field, complete the following:
Optionally, use the Select drop-down list to select a specific company name.
In the Options fields: Default, Wholesale, Enterprise, and Channel, select the specific configuration options you want to copy. For example, you can click the Default checkbox or click the down arrow to select from the drop-down list to further refine your copy criteria.
In the Copy To field, complete the following:
Optionally, use the Select drop-down list to select a specific company name.
Like the previous step, you can click the checkbox to copy all configurations from one option to another or click the drop-down arrow to the left of an option to select from the list and further refine your paste criteria.
Verify your selections and click to complete the operation. Otherwise, click to exit without copying the configuration.
Go to the configuration that you selected and verify the paste operation.
To update your company pricing:
Click Product Catalog from the navigation sidebar.
Click Company Pricing.
Result: Company pricing page displays.
Optionally, to search for a specific company (carrier) that was previously defined with special or unique pricing, click the Search Company field and type the name of the company for display.
On the left pane, select the name of the product to be updated.
Note
Each product must be updated individually. For example, if you want to update pricing for Dedicated Internet, click the product name “Dedicated Internet” so that it appears highlighted in blue. The defined speeds, availability, and pricing for that specific product is then displayed in the pane to the right of the selected product name.
Either select the pricing configuration using the drop-down options, or
Click the
 icon to see all of your configurations, then click the one you want to update.
Edit the pricing as needed.
Repeat steps 4 and 5 above for each product pricing that requires updating.
Click the
 Pricing icon, located at the top right side of the page.
Result: The following confirmation screen displays.
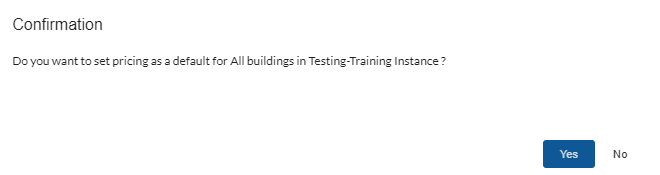
Click to set pricing as the default for all buildings; otherwise, select .
Note
Selecting Yes does not override custom pricing that has been set at the building level.
For some buildings, you may need to override the default pricing to account for certain factors that affect pricing for that building such as competition, account, partner pricing, status, geography, connectivity, etc.
To override pricing for a specific building:
Click from the navigation sidebar.
In the Search bar, type and select the name of the building to locate it in the list.
When you locate the building name in the list, click the
 sign to the left of the building name to expand the record.
Click the tab.
For the product pricing to be updated, click product name so that the product name appears highlighted in blue to indicate selection.
Edit the building-specific pricing as needed.
Click the
icon, located at the top right side of the page.
To import product catalog pricing:
Click from the navigation sidebar.
Click .
Result: Company pricing page displays.
Click the Actions menu
(vertical ellipsis), located at the top right side of the page, and select .Click and follow the required format for the import.
Verify that the excel spreadsheet for import adheres to the format as shown in the sample excel file.
Click .
Select the file to be imported.
Click .
Result: When the import is complete, the Administrator receives an email notification with the results.
You can export Company Pricing from the Company Pricing menu, or you can export Supplier Pricing from the Supplier Pricing menu. In both cases, you have the option to export only select records, or all records for download to an excel spreadsheet.
To export pricing to an excel spreadsheet:
Click from the navigation sidebar.
To export company pricing click , or click to export supplier pricing.
Click the
(vertical ellipsis), located at the top right side of the page, and select .Result: When the export completes, the Export Finished dialog box displays at the bottom left corner of the page.
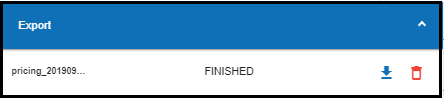
Click the
 icon to save the file to your desired location.
Alternatively, you can click the
 icon to remove the file without saving it.
Note
If the exported file size is large, the file downloads as a zip file.
To export pricing at the building level:
Click from the navigation sidebar.
In the Search bar, type and select the name of the building to locate it in the list.
Either select specific buildings for export by clicking on the checkbox for the requested locations or click the checkbox at the top of the list to select all buildings for export.
At the top right side of the page, click the
(vertical ellipsis).Either click to export only those locations you have selected for export or click to export all locations.
Result: When the export completes, the Export Finished dialog box displays at the bottom left corner of the page.
Click the
icon to save the file to your desired location.Alternatively, you can click the
icon to remove the file without saving it.Note
If the exported file size is large, the file downloads as a zip file.