About Company Default Attributes
Depending on your instance-level permissions, the Company Default Attributes page enables you to set default level attributes to be displayed within your instance. For example, you can set a Default Install Interval. CPQ customers can set an expiration date for quoting, etc. CPQ Bid Management customers can create email templates for requests and responses. Additionally, you can add Ethernet Zones and view a list of custom fields that have been added to your instance from this tab.
Important
If you make any changes, remember to click the Save (disk) icon in the upper right corner of the respective section to save your changes.
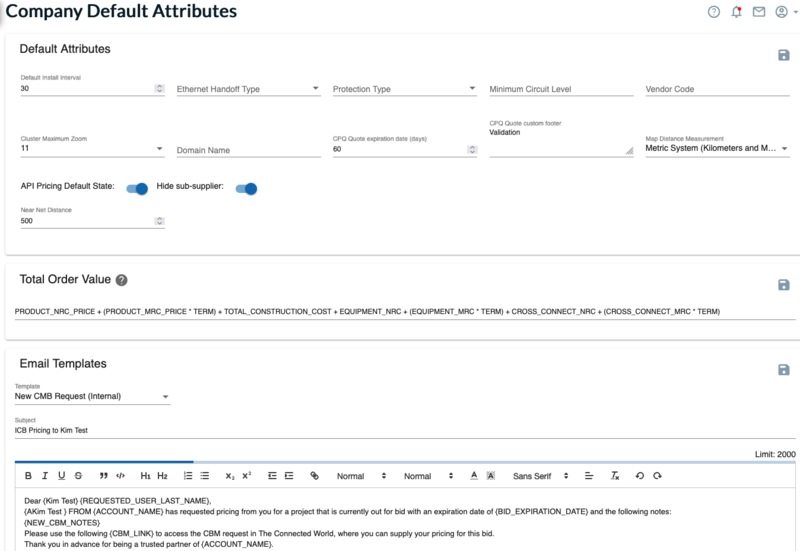
The following figure provides an example of the Default Attributes section. From this page, you can view/edit the default level attributes to be set within your instance.
 |
Field Name | Description |
|---|---|
Default Install Interval | The timeframe for installation that is quoted by the provider to the customer. |
Ethernet Handoff Type | Related to the type of service to be provided. For example, Ethernet service delivered via CAT5. CAT5 FIBER CAT5/FIBER |
Protection Type | This field identifies the redundancy mechanism in place. Core Protected Dual Path Single Path All |
Minimum Circuit Level | Identifies the minimum circuit level required by this vendor to accept orders to bring a Near Net building OnNet (for example, 10M, 10G, 100G, etc., low speed EoC generally in 1.5 increments to 12mb). DS1 DS3 OC3 OC12 OC48 OC192 Ethernet (all possible speeds) |
Vendor Code | Enables you to set a default “custom” vendor code to be returned in CPQ quotes. |
Cluster Maximum Zoom | Use this field to set the zoom level for clusters on the map. If, for example, the user selects 5, then anything below 5 records on the map will not be visible in a cluster. The cluster will only be shown when there are 5 or more buildings on the map. |
Domain Name | This field enables you to set your domain (web address). |
Near Net Distance | This field is only visible if Market Explorer is enabled within your instance. Currently, this field is not in use. It is a placeholder for future functionality. |
CPQ Quote expiration date (days) | Identifies the amount of time lapse, in number of days, before a CPQ quote should expire. |
CPQ Quote custom footer | Enables you to define a custom footer to be included in your CPQ quotes. |
Map Distance Measurement | Enables company-level customization of distance measurement unit when using the map ruler tool. Administrators can set the distance measurement tool to either use the metric system, the imperial system or both. Distance can be measured using different units. You can select the metric system displaying, kilometers (km) and meters (m), or the imperial system displaying distance in miles and feet (ft). 1 kilometer (km) = 1000 meters (m); 1 mile = 5280 feet (ft). Selecting both from the drop-down list will display distance in both systems on the map. |
OffNet Suppliers (API Pricing) toggle | Enabled (On), by default. This toggle, when enabled, allows offnet supplier/API pricing to be automatically included in CPQ UI workflow. If this toggle is disabled (Off), the user must specifically request API pricing in the quote process flow when configuring a new quote. |
Hide sub-supplier | Default is On (blue) meaning that the sub supplier name will be hidden in the CPQ quote. If disabled (dimmed), the sub supplier name will be shown in the CPQ quote. |
Default Product Pricing | Enables you to define a specific product category as the default product to be returned first when pricing. For example, if DIA is defined as the default, then DIA products will always price first for company and supplier pricing. If no DIA product exists for the selected product, the latest, topmost product category pricing is returned/displayed. |
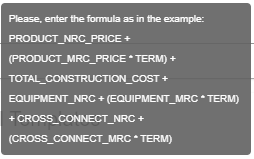
This field enables you to define the total value formula to be applied to quotes/orders. It provides you with greater flexibility allowing you to use the formula field to include in other/all financial components, such as construction and cross connect costs.
The standard TOV formula is Product NRC Price + (Product MRC Price * Term) + Total Construction Cost + Equipment NRC + (Equipment MRC * Term) + Cross Connect NRC + (Cross Connect MRC * Term). However, the TOV field configuration enables you to change a specific field by a static value (for example, term). or change the formula arrangement as needed to suit your specific use case.
Once configured, you can then build/configure rules to be applied to the TOV for improved accuracy of total cost. The configured values will then flow through to CPQ Step 3 in the process flow.
Note
The CPQ user group must have the column "TOV" enabled/checked within the Edit CPQ view Rights to view the TOV pricing in CPQ.
 |
In the Email Templates section, you can define your personal company messaging for these email notifications:
New CBM Request (Internal)
CPQ Project Activity Rejection Notify
CBM response rejected
CPQ Activity Approval Notify
CPQ Project Activity Approval Notify
CBM response accepted
CPB response
CPQ Activity Approval
New Bid Management Request (External)
Serviceability Portal New User
CPQ Project Activity Approval
The figure below shows an example where CPQ Bid Management customers with this user-level entitlement can define the default content to be sent in email requests for CPQ Bid Management.
 |
You can use the buttons at the bottom of the section to select predefined fields, such as Internal provider user first name, etc.
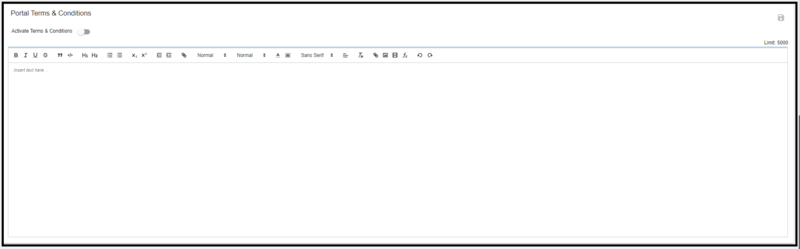
In the Portal Terms & Conditions section, you can define your own customized Terms and Conditions to be applied to your Serviceability Portal. Where defined and activated, the first time a portal user logs into your Serviceability Portal, the Terms & Conditions popup displays and requires user acknowledgement to continue.
 |
To define portal terms and conditions:
Type your Terms & Conditions message in the section Insert text here.
When you are ready to activate the Terms & Conditions popup dialog box within your Serviceability Portal, toggle the to the “On” position (blue).
Click the icon.
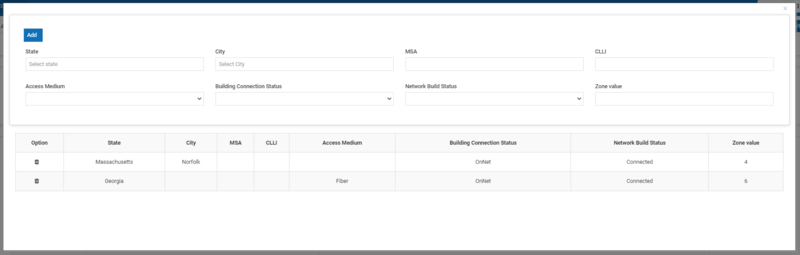
This section enables you to add in custom ethernet zones to display within your instance.
In the following example, Massachusetts and Georgia have been added as Ethernet Zones.
 |
To add a new ethernet zone:
Click .
Scroll down the page to the Ethernet Zone section of the page.
Click .
Result: A new Ethernet Zone line displays where you can add data. If existing zones are configured, they display in a list.
As required, either select or enter the data you want to include in the Ethernet Zone.
Options include and .
Enter a Zone Value to be applied to the Ethernet Zone. This is a required field.
To view the custom fields defined in your instance:
Click .
Scroll down the page to the Custom Fields section of the page.
In this section of the Admin page, you can view any custom fields that have been added to your instance. Custom fields are added by a Connectbase Administrator in Super Admin. Custom fields can be added to My Buildings records or to a CPQ Account, Deal, Quote, or Solution. When custom fields are added to My Buildings or CPQ, the custom data fields automatically flow through to all applicable data grids in the platform and all associated APIs.
In the Geo Map Services Layer section, you can identify the Industry Data layers and Company Data Layers to be included/excluded within the instance.
Note
"Allow Geo Map Service Layer" is an instance level entitlement and an internal Connectbase administrator must enable "Allow Geo Map Service Layer" entitlement for the instance.
To select/deselect the Industry Data layers:
Click the down arrow to the right of the Industry Data field.
Select/check for inclusion or deselect/uncheck for exclusion the industry data layers from the list provided.
Click the icon.
To select/deselect the Company Data layers:
Click the down arrow to the right of the Company Data field.
Select/check for inclusion or deselect/uncheck for exclusion the company data layers from the list provided.
Click the icon.
The CPQ Pricing Grid Fields section enables you to configure additional columns to CPQ Step 3 Pricing. Admin users of the instance can configure/customize additional columns of data to be included for display within CPQ Step 3 pricing response.
This configuration is a two-step process:
Step 1: Configure the additional fields within the Company Default Attributes.
Step 2: Enable the desired user group entitlements: [Allow CPQ Pricing Grid Fields feed to CPQ Grid view], [Allow CPQ Pricing Grid Fields feed to CPQ Grid csv Export].
To configure additional fields/columns for viewing:
1. Click from the navigation sidebar.
Scroll to the section CPQ Pricing Grid Fields.
Click theicon, located at the top right.
Result: The drop-down menu is enabled where you can select the building fields and custom fields to be included.
Either use the Search bar to locate the field name or use the scroll bar to scroll through the list of available fields.
Optionally, enter a UI label if you want the field name to appear different from the selected field name.
In the Module column, use the drop-down menu to select if you want the fields to display in the CPQ Grid View only, the CPQ Grid View CSV Export, or BOTH.
Click the check mark to the configuration.
Repeat the above steps to additional fields as needed. Remember to Save each configuration.
To enable new or existing user groups to view the additional data:
Click from the navigation sidebar.
Click either or as applicable.
Depending on your preference, click one or both of the following check boxes to enable the fields: [CPQ] Allow CPQ Pricing Grid Fields feed to CPQ Grid view] and/or [CPQ] Allow CPQ Pricing Grid csv Export. Result: A check mark displays in the field to indicate selection.
Click .