Adding deals
Limitation: A single deal can have no more than 2000 locations.
If a deal surpasses the 2000 locations per deal limitation, the deal will automatically split into multiple small deal batches, with naming convention "deal_name-1", "deal_name -2" etc.
The deal counts the combination location counts of supplier name, access media, connection status, etc. to distinguish differences as unique location counts (addresskey +secondary). This number is indicated in the Counts with Duplicates field (formerly named Location Counts).
Please note that our location counts may include system duplicates of access medium, connection status, and supplier name. This means that locations with different supplier names, different connectivity status, and different access medium.
Previously, when importing deals greater than 500 addresses into a CPQ deal, the system split the deal into batches of deals with 500 each. This required the user to manually group the deals into a CPQ project to manage them as one. Now users may import more than 500 addresses into a single deal without additional user input.
Connectbase recommends no more than 2500 addresses per import for optimal performance.
Note
A large import file may increase processing time to return results.
To add or import addresses to a deal:
Select from the navigation sidebar.
Locate an account, and click the icon.
Select a deal.
Result: If the deal has no addresses added the Step 1: Add Addresses or Coordinates page automatically displays.
Click .
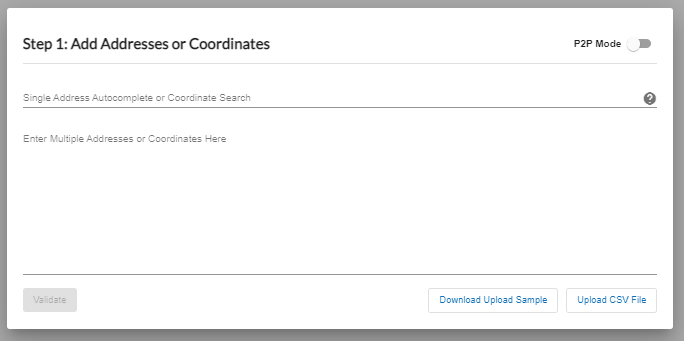
Result: The Step 1: Add Addresses or Coordinates page displays.
The first screen image below shows an example with the toggle button . If the toggle button is , the screen presents with the option to add two address points as shown in the second screen image below.
P2P Mode toggle Off
P2P Mode toggle On
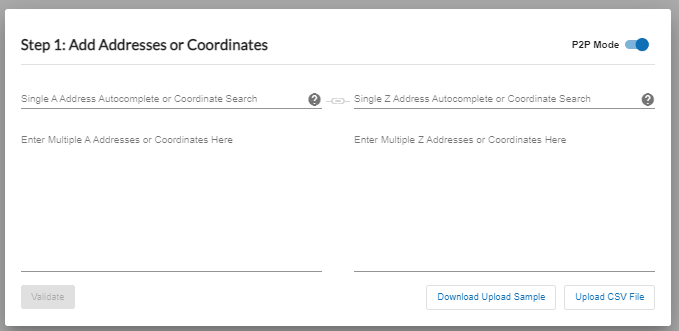
To create a deal to obtain P2P pricing between two target locations, enable the toggle. Otherwise, skip this step and proceed to the next step.
Note
A point to point is a circuit that connects two end points together and does not terminate to a shared service at a provider. The Z side is the customer side. The A side of a circuit is the provider side in an Access circuit.
From the Add Addresses page, do one of the following:
Type, or copy and paste, a single address or Latitude/Longitude coordinates into the field.
For point-to-point pricing, if P2P Mode toggle is On/ enabled, type or copy and paste a pair of addresses or latitude/longitude coordinates (Address A and Address Z).
Type, or copy and paste, multiple addresses or Latitude/Longitude coordinates, separated by commas, into the box.
Upload a CSV file containing addresses in bulk format.
For bulk uploads, it is recommended that you first click located at the bottom of the page to review the required format for bulk upload.
To upload the CSV file, click .
Note
When typing or entering an address, it is recommended that you enter the complete and exact street address for your location. The required fields for an address include Street, City, State, Postal, and Country. If entering multiple addresses (or Lat/Long coordinates), each address must be separated with a comma, for example, 1800 Amphitheatre Parkway, Mountain View, CA 94043.
For international addresses, google search for the 3-letter ISO code for each country or countries in which you have included addresses. Validation will fail if the ISO code is incorrect
Once addresses are added, the Validate button is enabled.
Note
Optionally, you can assign a Site Group to each location when uploading or pasting addresses into Address Import and use those groups to drive pricing. Alternatively, users can define site group by pre-pending copy and pasted address with [Site Group] in brackets. When site group is defined using either method, validation results will show Site Group per location plus a summary of groups and site counts.
If no site group is defined, all addresses would fall under one site group named "Default".
An example of address with site groups is provided in the below example:

Click .
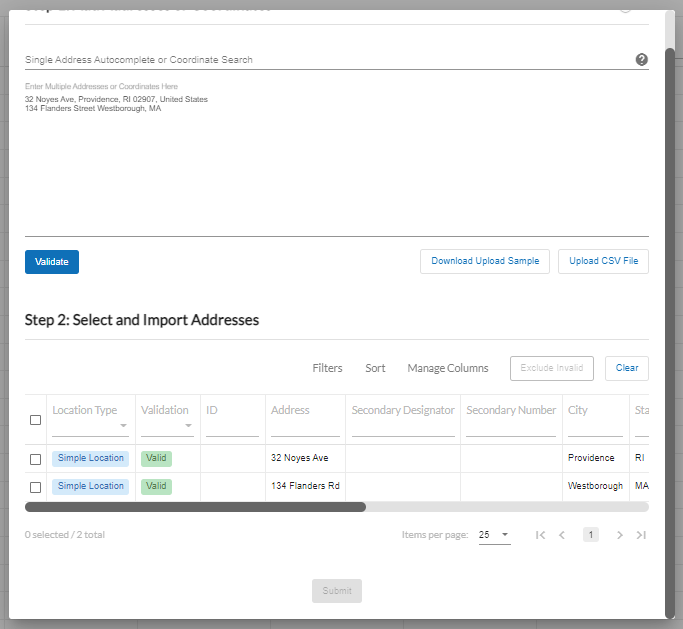
The Step 2: Select and Import Addresses dialog box displays.
The system conducts a USPS address validation on the address(es).
All validated addresses display with a green check mark in the Valid Address field at the bottom of the page.
All addresses that could not be validated display with a Red in the Valid Address field and appear as highlighted within the list.
If site groups are used in addresses, the validation results would contain the site groups as tabs as shown in the below example:

Note
Some addresses may not be USPS validated, such as towers, street furniture, etc. For non-validated USPS addresses, you can choose to either include or exclude them from the deal/quote.
Select the addresses for import into the deal:
To select all addresses for import, click the field.
To select specific addresses for import, click the to the left of each address.
To exclude invalid addresses for import, click the check box located in the top right corner of the dialog box.
Click .
Result: All selected files are imported into the deal.
As needed, you can filter and sort the data within columns within the headers of each column. You can also manage which columns you want to view using the Manage Columns function. See Managing columns in the Deal grid view
Now that your deal has been created, you can proceed with the CPQ Process Flow.
To add or import addresses to a deal:
Select from the navigation sidebar.
Locate an account, and click the icon.
Select a deal.
Result: If the deal has no addresses added the Step 1: Add Addresses or Coordinates page automatically displays.
Click .
Result: The Step 1: Add Addresses or Coordinates page displays.
The first screen image below shows an example with the toggle button . If the toggle button is , the screen presents with the option to add two address points as shown in the second screen image below.
P2P Mode toggle Off
P2P Mode toggle On
To create a deal to obtain P2P pricing between two target locations, enable the toggle. Otherwise, skip this step and proceed to the next step.
Note
A point to point is a circuit that connects two end points together and does not terminate to a shared service at a provider. The Z side is the customer side. The A side of a circuit is the provider side in an Access circuit.
From the Add Addresses page, do one of the following:
Type, or copy and paste, a single address or Latitude/Longitude coordinates into the field.
For point-to-point pricing, if P2P Mode toggle is On/ enabled, type or copy and paste a pair of addresses or latitude/longitude coordinates (Address A and Address Z).
Type, or copy and paste, multiple addresses or Latitude/Longitude coordinates, separated by commas, into the box.
Upload a CSV file containing addresses in bulk format.
For bulk uploads, it is recommended that you first click located at the bottom of the page to review the required format for bulk upload.
To upload the CSV file, click .
Note
When typing or entering an address, it is recommended that you enter the complete and exact street address for your location. The required fields for an address include Street, City, State, Postal, and Country. If entering multiple addresses (or Lat/Long coordinates), each address must be separated with a comma, for example, 1800 Amphitheatre Parkway, Mountain View, CA 94043.
For international addresses, google search for the 3-letter ISO code for each country or countries in which you have included addresses. Validation will fail if the ISO code is incorrect
Once addresses are added, the Validate button is enabled.
Click .
The Step 2: Select and Import Addresses dialog box displays.
The system conducts a USPS address validation on the address(es).
All validated addresses display with a green check mark in the Valid Address field at the bottom of the page.
All addresses that could not be validated display with a Red in the Valid Address field and appear as highlighted within the list.
Note
Some addresses may not be USPS validated, such as towers, street furniture, etc. For non-validated USPS addresses, you can choose to either include or exclude them from the deal/quote.
Select the addresses for import into the deal:
To select all addresses for import, click the field.
To select specific addresses for import, click the to the left of each address.
To exclude invalid addresses for import, click the check box located in the top right corner of the dialog box.
Click .
Result: All selected files are imported into the deal.
As needed, you can filter and sort the data within columns within the headers of each column. You can also manage which columns you want to view using the Manage Columns function. See Managing columns in the Deal grid view
Now that your deal has been created, you can proceed with the CPQ Process Flow.