Setting up customized pricing by Location
The product pricing catalog enables you to set a custom geography attribute of "Location" at the building level (in bulk) that can be used as a “custom” geographic dimension. Upon selection of the Location geography type, you can use the Import function to import a list of Connectbase unique keys/locations that will be set with this new value.
For example, if you define 4000 buildings as custom pricing zone ‘T04’, then ‘T04’ becomes a possible Geographic definer from within the Admin panel. Within the building record, the "Custom Pricing Zone" is mapped to its respective "custom" geography zone in the Admin panel.
Note
When you create and save your custom pricing geographies by Location, they are automatically added to the building record in My Buildings under Custom fields and can then be applied to your pricing quotes.
Before you can upload your pricing geographies by location, you must first configure your zones, select the geography type (in this case, Location), and set the priority level for each zone.
Note
The Import Pricing Geography icon is not applicable for adding zone geographies by location.The Import Pricing Geography icon is not applicable for adding zone geographies by location.
To configure your zones:
Click from the navigation sidebar.
Go to .
Click the button located in the upper right corner of the page.
Result: The Add New Pricing Geography dialog box displays.
Type the name that you want to assign to this zone.
In the Geography Type field, click the drop-down arrow and select Location.
Search for the geography value(s) you want to associate with the selected Geography Type. For example, if you choose State as the Geography Type, search for the respective state(s) that you want added to the geography.
In the Priority field, enter the priority level to be applied to the new pricing zone. The priority field determines the order in which zones will be looked at for pricing.
Select the Building Type = All Locations or My Buildings.
Click (or if you have additional zones to configure).
Before you begin:
Download the sample template to ensure that your import file meets the required criteria.
Click Rules from the navigation sidebar.
Go to .
To the right of the Manage Columns field, click the vertical ellipsis
 (3 dots).
Select Import.
Click .
Configure your input file using the sample template format and save it in CSV file format.
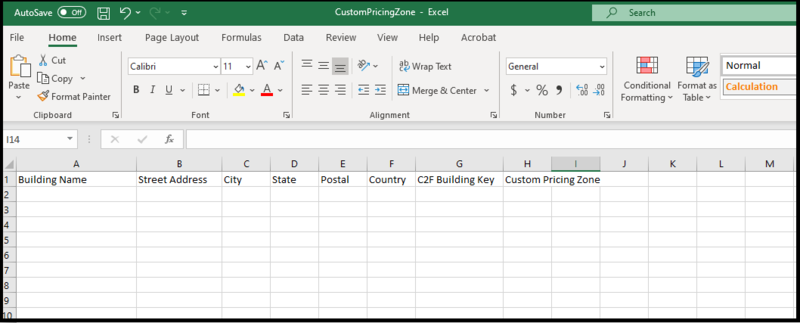
Here is an example of the Custom Pricing Zone format. You can use this template to prepare your file for import.
 |
Note
The Connectbase Building Key can be found in the My Buildings record. The Custom Pricing Zone will be the name that you assigned to the zone.
To bulk upload your import file:
From the page, click the vertical ellipsis
 (three dots) to the right of the Manage Columns field.
Select Import.
Click the button located in the top left corner of the dialog box.
Select the file from your local drive.
Click .
Result: The import files are validated, and the buildings are then added to the pricing zone.