Configuring CPQ Components
CPQ Components is an instance level enablement that is set in Super Admin by a Connectbase Administrator (“Allow Reusable Components”).
CPQ components enables you to set up “reusable” pricing groups for use in a CPQ quote under the configured conditions. You can configure CPQ components individually, one at a time, or you can use the Import Components & Prices function to bulk load your CPQ component configurations.
To upload CPQ components in bulk:
Click from the navigation sidebar.
Click .
Result: The CPQ components page displays. If components have already been added, they are listed here.
Click
 (3 dots) located to the right of the Manage Columns field.
Click .
Result: The Import Components & Prices dialog box displays.
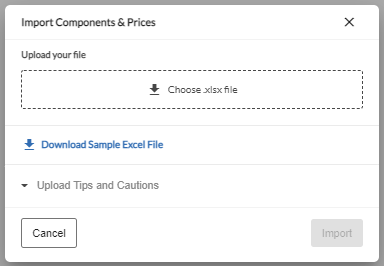
Optional, but recommended, click to download a sample excel file that can be used as a template to ensure that your import file is properly configured for upload.
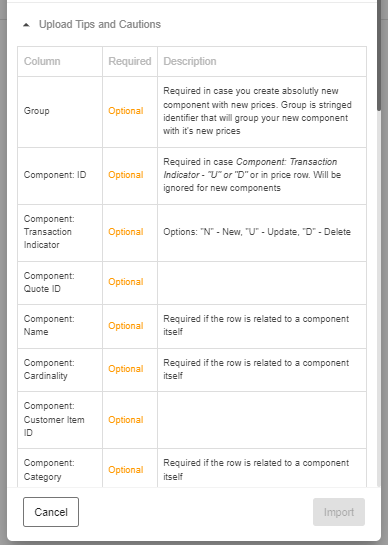
Review the Upload Tips and Cautions.
When you are ready to upload your file, click .
Select the file for import from your local drive.
Click the button.
Result: The newly uploaded CPQ Components now display in the CPQ Components list and are each identified with a unique ID and name.
Once uploaded, select your preference for the Automatic and Active designations.
Automatic (radio button) – If enabled, prices from the component will be automatically included to a new quote if the conditions are met. If disabled, this component is considered a stand alone component that can be optionally added ad hoc in step 3 of the CPQ process flow.
Active (radio button) – Enabled by default. The component is editable and applicable in CPQ. If disabled, the component is not available in CPQ.
To configure CPQ components individually:
Click Product Catalog from the navigation sidebar.
Click CPQ Components.
Result: The CPQ components page displays. If components have already been added, they are listed here.
Click button.
Result: The Add New Component dialog box displays.
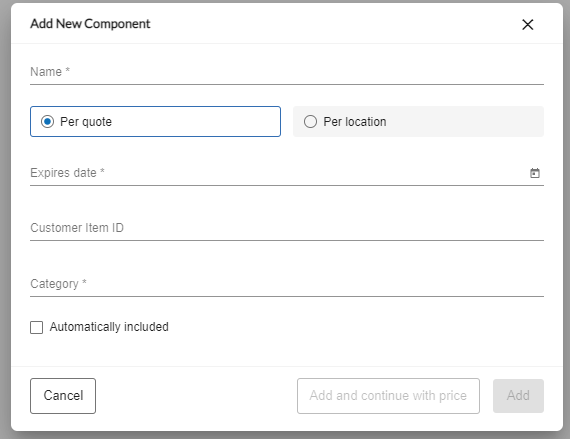
Define the component:
In the Component name field, enter a unique name to identify this component. This is a required field.
Click the respective radio button to specify which condition to apply to the pricing: or . (once per entire quote, or once per building)
Required: Use the calendar icon to the right of the Expires date field to provide an expiration date for this component configuration.
Optionally, enter a Customer Item ID to be consumed in the CPQ process flow.
Note
Customer Item IDs can also be imported using the bulk import functionality.
Optionally, enter the Category. Category is a customer-defined field that may include such designations as, for example, Equipment, Managed Services, Installation, Cross Connect, or Other. These designations can then be referenced by the Rules Engine.
Optionally, select/deselect the Automatically included checkbox.
If Automatically included is selected (checked) and the CPQ quote configuration meets the defined conditions, it is automatically added to the quote in CPQ.
If Automatically included is deselected (unchecked), the condition is not automatically added to the quote. In this case, you must manually add it in CPQ.
Click to define the price condition.
Note
Alternatively, you can click if you only want to add the component record at this time.
Result: The Add New Component Price dialog box displays.
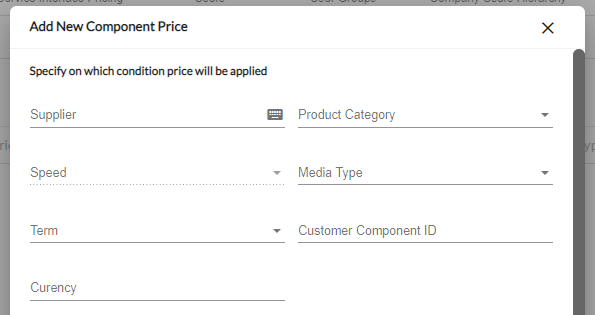
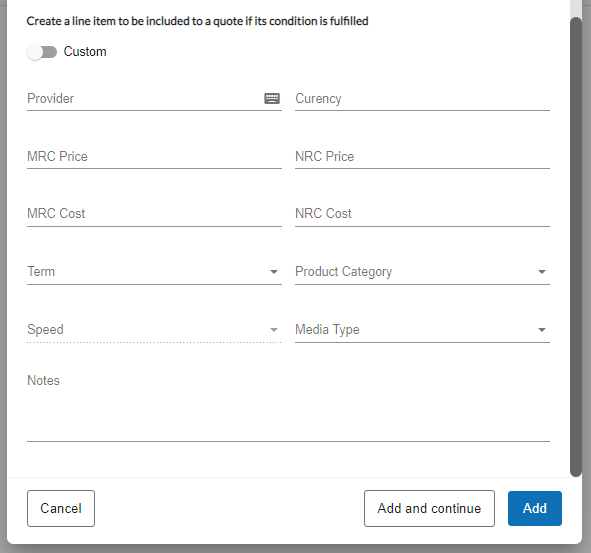
At the top of the dialog box, define the price conditions:
Complete the applicable fields: Supplier, Product Category, Speed, Media Type, and/or Term. A minimum of one condition must be applied.
Note
When configuring a new CPQ component, if you do not specify a Supplier on the Add New Component Price dialog box, the system will automatically populate the Supplier field within the CPQ grid with the instance company name.
Optionally, enter a Customer Component Id. Customer Component Id enables you to identify a CPQ component by Id for easy identification, future product bundling, and management of a higher number of components.
Optionally, enter the desired Currency. If no currency is entered, the system defaults to USD.
At the bottom section of the dialog box, define the price/cost to be applied to the condition:
Optionally, enable the toggle (blue) to add a product that is not in the standard Connectbase product catalog. For example, you can use the Custom toggle to add special equipment pricing, such as a modem charge.
If the Custom toggle is disabled (dimmed).you must select a standard product from from the drop-down list in the Product field.
Complete the applicable fields to define the price/cost to be applied to the condition: Provider, Currency, MRC Price, MRC Cost, NRC Price, NRC Cost, Term, Product Category, Speed, and/or Media Type.
Optionally, add any Notes that you want to capture for this component.
Click if you are finished with your configuration. If you want to continue adding another new price component, click .
Result: The line item that you just added displays in the Component list.
When you complete your configuration, return to the All Components page and for each component, select your preferences for the Automatic and Active designations.
Automatic (radio button) – If enabled, prices from the component will be automatically included to a new quote if the conditions are met. If disabled, this component is considered a stand alone component that can be optionally added ad hoc in step 3 of the CPQ process flow.
Active (radio button) – Enabled by default. The component is editable and applicable in CPQ. If disabled, the component is not available in CPQ.
To export CPQ components in bulk:
Click Product Catalog from the navigation sidebar.
Click the .
Result: The CPQ components page displays. If components have already been added, they are listed here.
Click the
(3 dots) located to the left of the button.Click .
Result: The file is downloaded to your local device in an Excel spreadsheet.
If you need to edit and re-import the components, you can do so directly in the spreadsheet. Refer to the section Uploading CPQ Components in bulk for details.